Product No: GNGPL-31A1
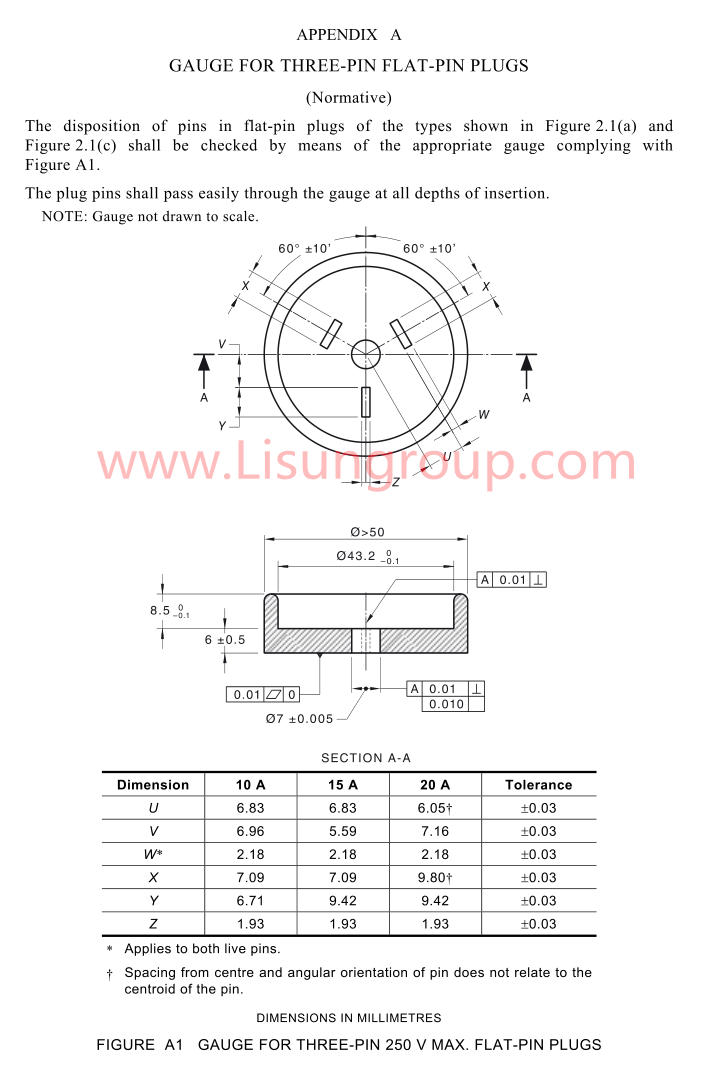
AS/NZS 3112 Figure A1 Gauge for Three-Pin 250 V Max Flat-Pin Plugs is tailor-made for verifying the dimensional compliance and performance of three-pin flat-pin plugs with a maximum rated voltage of 250V, strictly adhering to the specifications outlined in AS/NZS 3112 Figure A1. Crafted with high-precision machining techniques and durable materials, it ensures consistent, accurate measurements to support reliable quality assessment of plugs, making it an indispensable tool for manufacturers, inspectors and quality control personnel in the electrical industry.
Specifications:
• Complies with AS/NZS 3112 standard, fully matching the dimensional requirements of Figure A1
• Designed for three-pin flat-pin plugs with max 250V rating
• Material: High-strength steel with hardness exceeding 50HRC for wear resistance and deformation resistance
• Dimensional tolerance: Meets AS/NZS 3112 specified precision, key dimensions with tolerance control within ±0.02mm
• Low thermal expansion coefficient, maintaining dimensional stability in different test environments (temperature range: 15°C – 35°C)
• Surface roughness: Ra ≤ 0.8μm to avoid scratching the test plug surface
• Pin spacing and configuration strictly conform to the flat-pin plug standard
Test Procedures:
• Prepare the three-pin 250V max flat-pin plug sample, ensuring it is free from damage, deformation, burrs or surface contamination that may affect test results.
• Pre-inspect the test gauge: Check for surface scratches, wear or dimensional deviations, and clean it with a lint-free cloth to remove any debris.
• Place the plug sample on a stable, flat test bench and secure it with a fixture if necessary to prevent movement during testing.
• Align the gauge with the plug’s pin holes and contact areas in strict accordance with the orientation specified in AS/NZS 3112 Figure A1.
• Gently insert the gauge into the plug’s pin receiving structure with uniform force, ensuring no forced insertion that may damage the sample or gauge.
• Verify and record whether the gauge fits smoothly with the plug, and check if the plug’s key dimensions (such as pin spacing, pin length and hole size) match the gauge’s specifications.
• Slowly remove the gauge from the plug, then re-inspect the plug for any structural damage caused by the test.
• Compare the test data with AS/NZS 3112 requirements to determine if the plug sample is compliant.
Applications:
• Dimensional compliance testing and quality inspection of three-pin flat-pin plugs (max 250V) manufactured in accordance with AS/NZS 3112 standard
• In-line quality control during plug production processes to ensure batch consistency
• Compliance verification for plug manufacturers applying for Australian and New Zealand market access certification
• R&D testing for new plug product development, supporting design optimization and performance validation
• Third-party testing institutions’ product conformity assessment for electrical plugs
• After-sales quality re-inspection of plugs in electrical appliance maintenance and repair industries
• Educational and research use in electrical engineering institutions for standard teaching and experimental demonstrations

AS/NZS 3112 Figure A1 Gauge for Three-Pin 250 V Max Flat-Pin Plugs