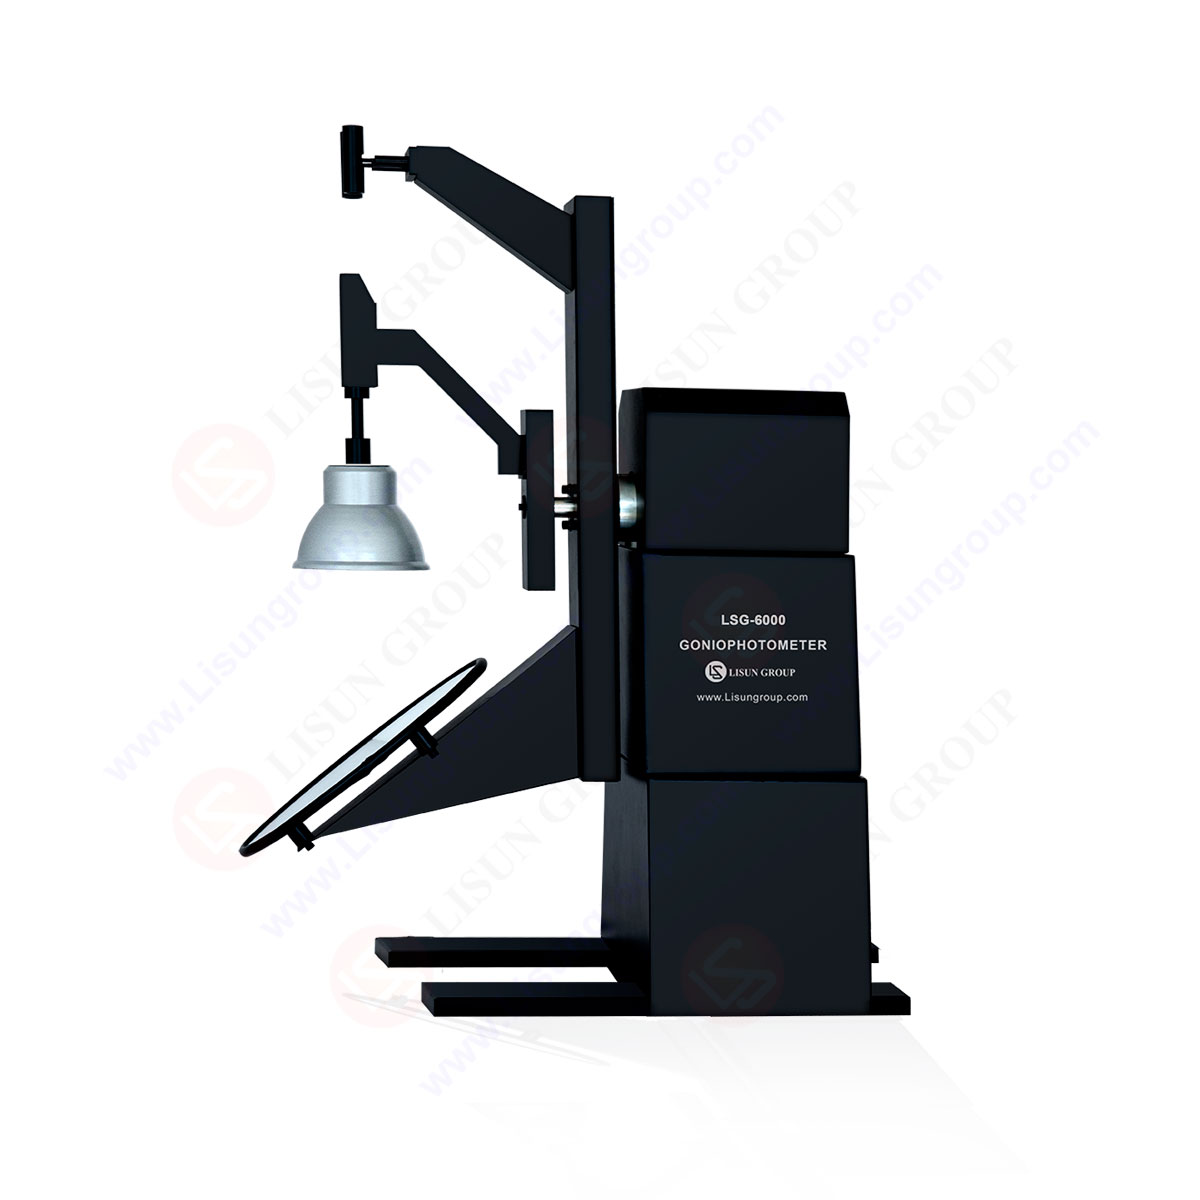
LM-79 Moving Detector Goniophotometer (Mirror Type C)
LSG-6000

High Precision Rotation Luminaire Goniophotometer
LSG-1890B
High Precision Rotation Luminaire Goniospectroradiometer
LSG-1890BCCD
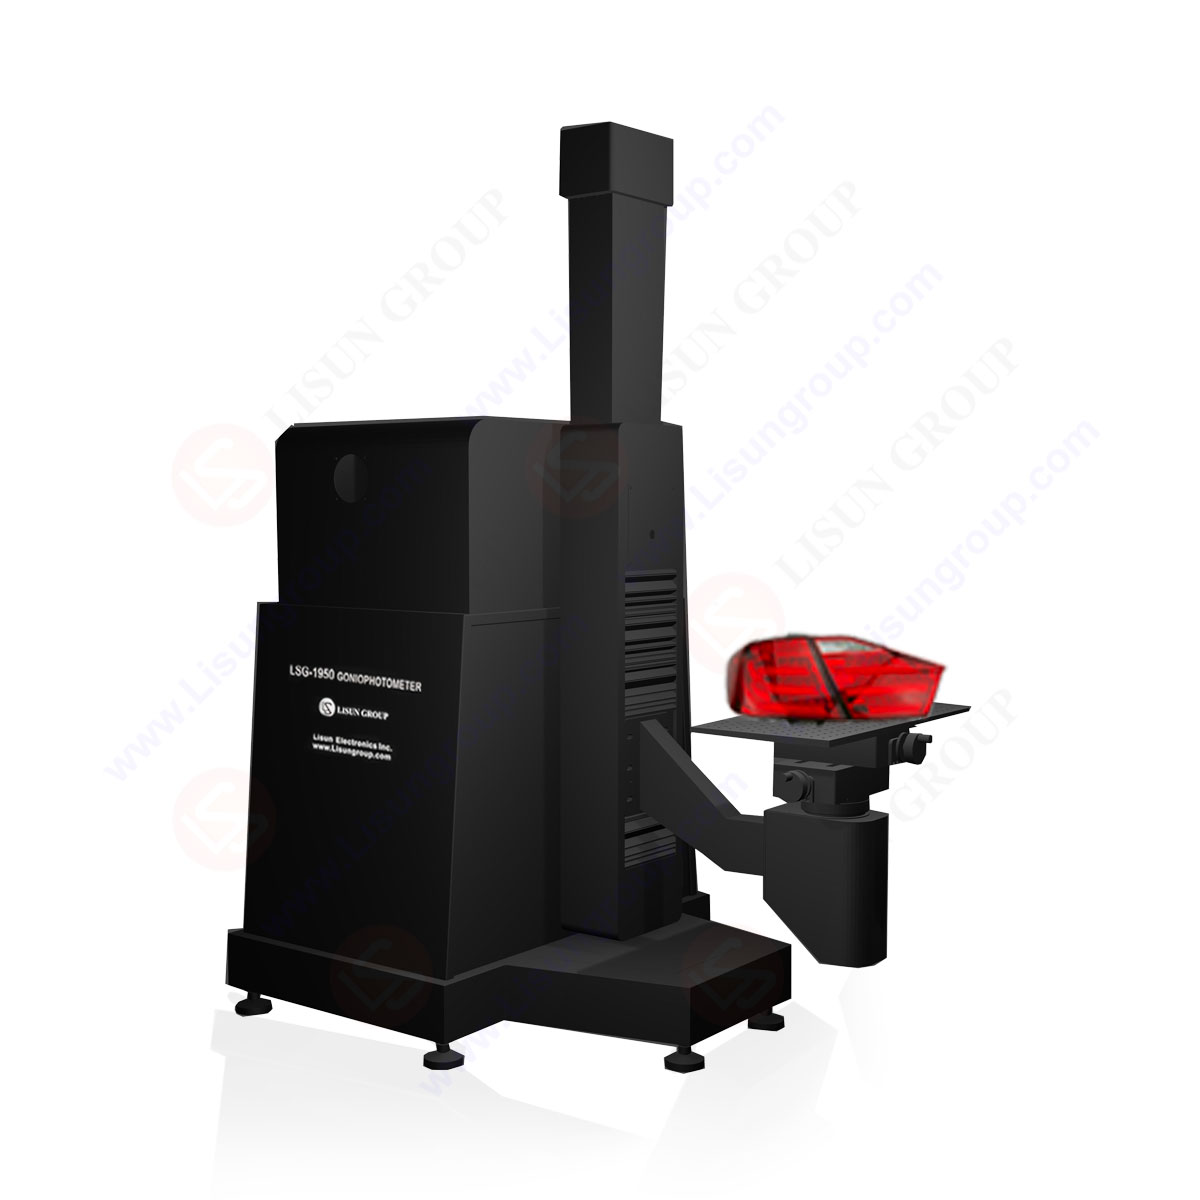
Goniophotometer for Automotive and Signal Lamps
LSG-1950
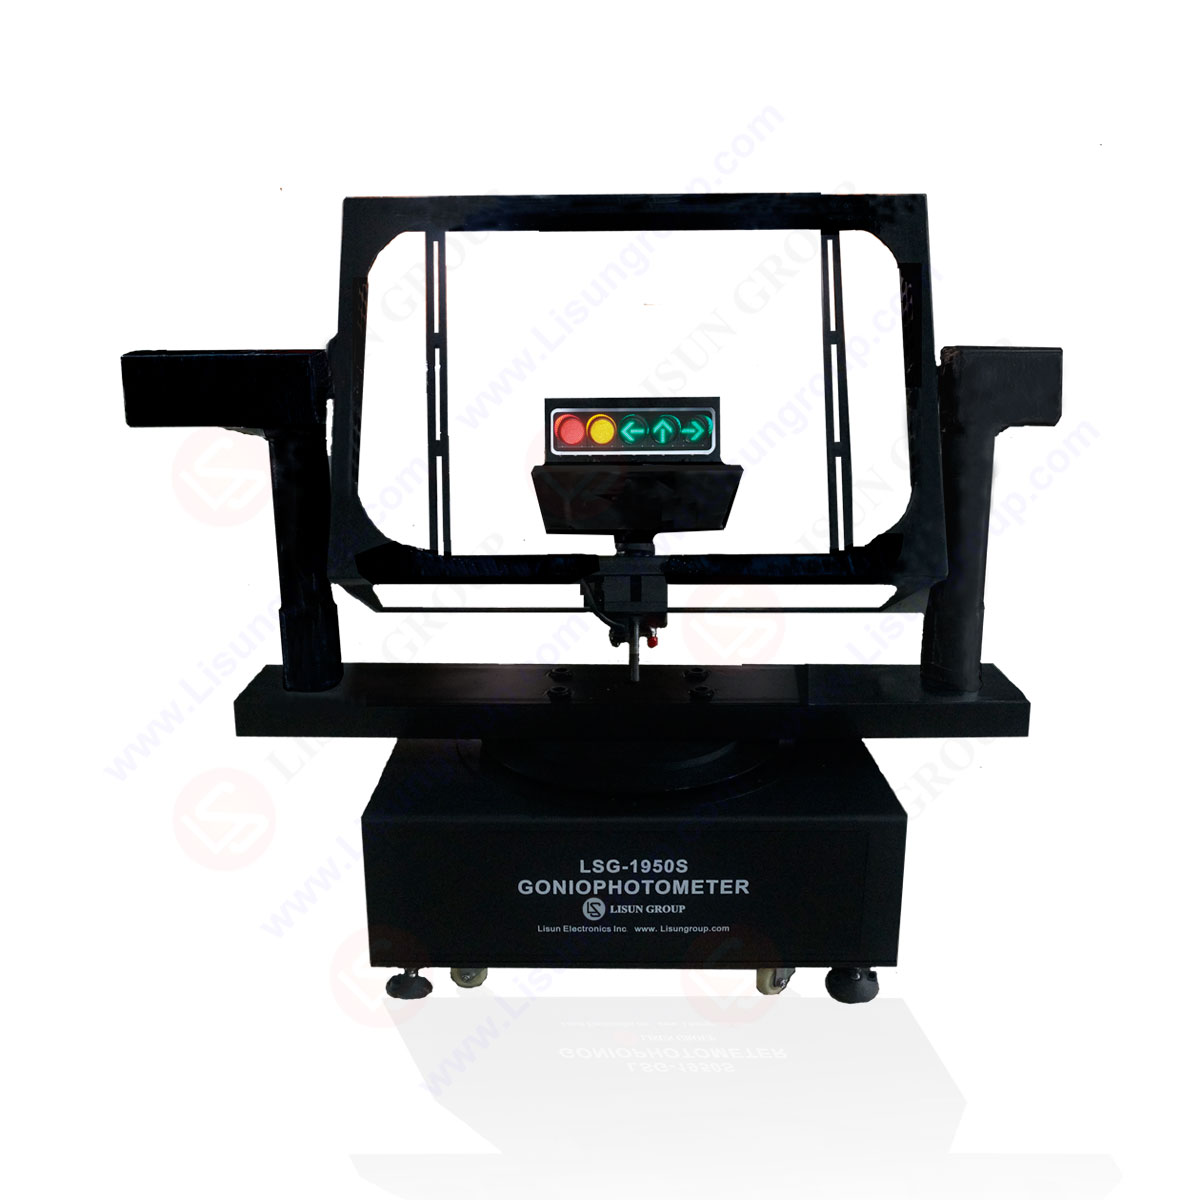
Goniophotometer for Traffic Signal Lamps
LSG-1950S
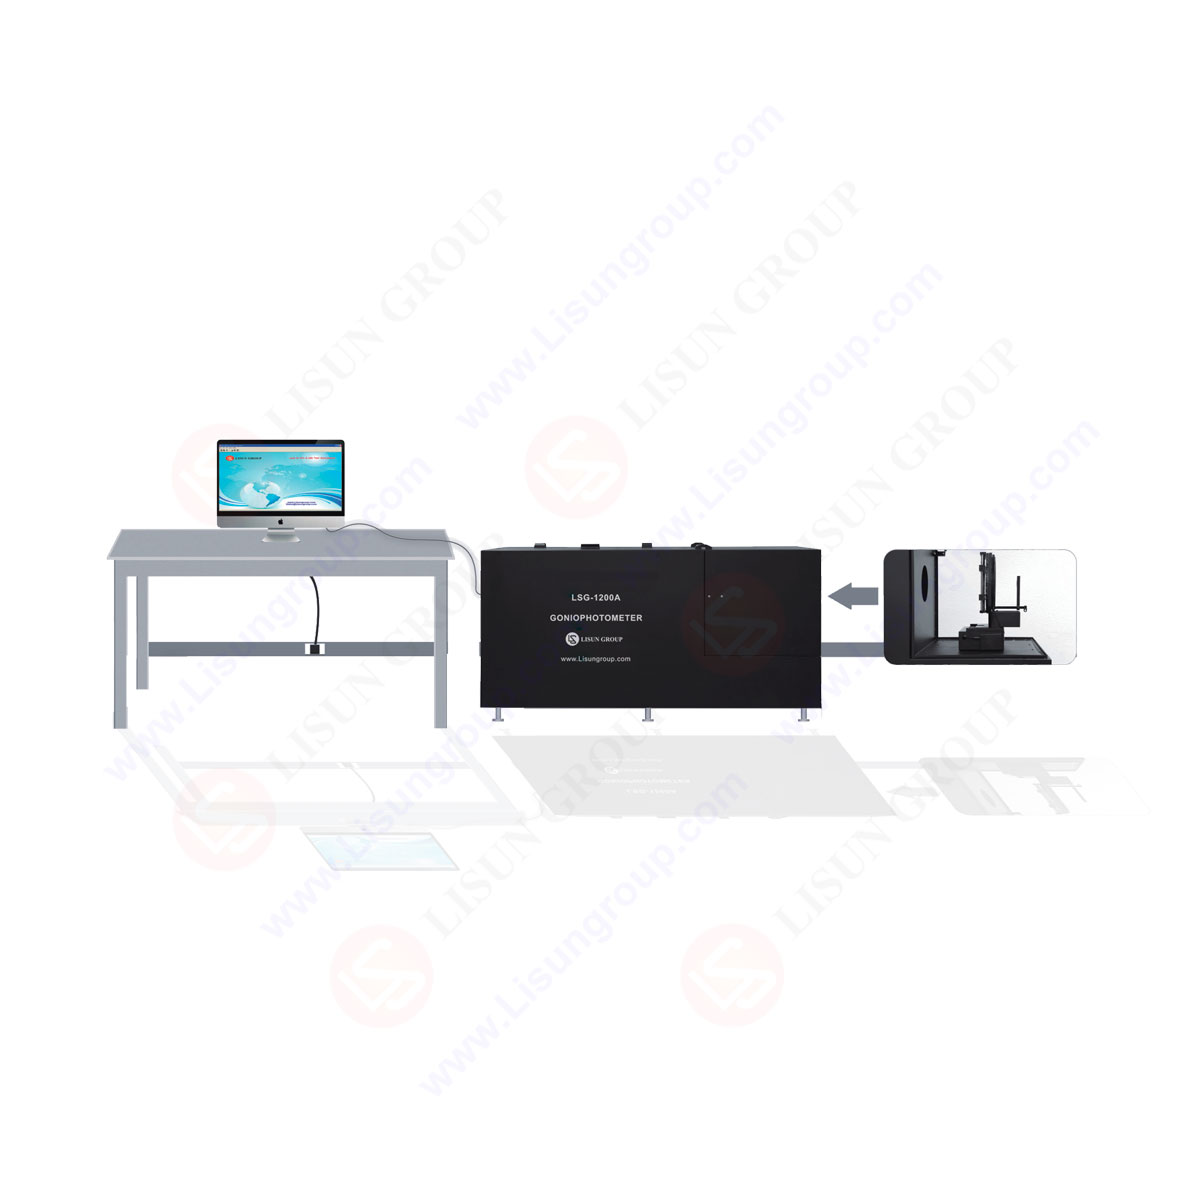
Compact Goniophotometer
LSG-1200A

Near Field Moving Detector Goniophotometer
LSG-1900B
Select an organization
to browse standards
What is a spectrophotometer?
The spectrophotometer uses the grating spectrophotometer principle for color measurement. A grating is an optical element that is engraved with a set of parallel periodic lines or grooves (often inclined) on a plane. When a beam of compound light is incident on the grating plane, its periodic structure will undergo diffraction, and the transmitted or reflected diffraction light will also interfere.
The energy of the light will be redistributed, and different wavelengths of light will travel in different directions, forming a specific wavelength superposition extremum at a certain position, thereby achieving light splitting. Spectroscopic colorimeters can produce spectral curves, which are equivalent to a color’s ID card and are unique. Therefore, the color data read by the spectrophotometer is absolutely accurate.
Characteristics of spectrophotometer:
This type of product is currently the mainstream technology in the field of color testers because it can accurately measure the specific values of colors. It is a high-end product and the price will also be higher.
Operation method of spectrophotometer:
1. Press the UPS on/off button to turn on the UPS power. After the power is turned on, the power indicator light is: 2 green lights up, and 1 green light flashes.
2. Press the power button on the computer host (located above the chassis), wait for the computer to turn on, and then turn on the instrument power. After about 6-7 seconds, you can hear a “beep” sound, indicating that the spectrophotometer has been turned on.
3. Double click on the spectrophotometer software icon on the computer desktop. When there is a beep, the instrument software in the computer will start and the instrument is ready.
4. After the software is opened, the spectrophotometer must be calibrated first. Without calibration, normal measurements cannot be made. Select “Setting Mode” from the “Instrument” menu. When the dialog box prompts, first select “Reflection” in the mode, click “Correction”, and correct in two steps according to the prompt.
After the prompt that the correction has been successful, then select the next mode (i.e. transmission mode) to correct, and also correct in two steps according to the prompt. After calibration, return the calibration equipment to its original position and use it for the next calibration.
5. After completing the calibration of both modes, a white or green board can be used for measurement to verify the success of the calibration. After measuring according to the regulations of the spectrophotometer, right-click in the blank space below the data and select “Settings” to pop up the “Chromaticity Data Table Settings” dialog box.
Select “XYZ” from the dropdown list “▼” under “scales”, and then click the “<” icon on the left side of the dropdown list. At this time, “XYZ (J, K, L)” will appear at the bottom of the left border, and then click “OK” to display “X” after the measured data value Compare the values of “Y” and “Z” with the standard XYZ values on the back of the whiteboard or green board.
If the error is within the allowable range (whiteboard error is within 0.1, green board error is within 0.5), it indicates successful calibration. Otherwise, it needs to be re calibrated.
After successful calibration, the “Chromaticity Data Table Settings” dialog box will also be opened. Click on the “XYZ (J, K, L)” at the bottom of the left border, and then click on the “Remove” icon at the far left of the dialog box to remove it. Click “OK”, and the “X”, “Y”, and “Z” values will not be displayed after the measurement data.
6.When measuring with a spectrophotometer, the first step is to determine the measurement mode to be used (i.e. select reflection or transmission mode). From the “Instrument” menu, select “Setting Mode”, and then select the mode as needed.
Click “OK” with the mouse, and the type of mode used will be displayed below the software. Then call out the standard sample to be used from the database, select “Call sample from database” from the “File” menu, click the mouse, click “OK” in the pop-up dialog box, then select the standard sample to be used from the database, click the mouse, and a “?” appears in the selection box in front of the standard sample, click “OK”, and the dialog box “Insert option?” pops up, select “Yes”,
In this way, the standard samples to be used will be called out from the database. Use the mouse to select the standard sample from the operation interface on the left side of the software interface, and then measure the sample piece, and the data obtained will be automatically saved under the standard sample. The standard sample is not allowed to be changed, added, or deleted at will.
7. When the sample and standard sample data meet the production requirements, product production can be carried out, and the production data can be saved and recorded. Firstly, open the data saving file (LOW or sunlight film) on the desktop, then use the mouse to select the measured sample data, right-click the mouse, select Copy to Paste Board, and paste the copied data into the opened table. At the same time, fill in the production time, order number, product ID and other data in the specified format in the table, and then save the table to complete the production data saving.
8. After saving the measurement data, first close the spectrophotometer software, then turn off the computer and power supply, and place the items on the computer desk to ensure they are correct before leaving.
9. To ensure the accuracy of the measurement data of the spectrophotometer, it is necessary to calibrate the instrument according to the steps specified in this regulation every 12 hours or when the software prompts for calibration.
10. During the use of the spectrophotometer, various parameter settings of the software must not be changed.
11. Non spectrophotometer operators are not allowed to use computers and instruments without permission.
12. This computer cannot connect to external storage devices such as mobile phones, MP3 players, and USB drives.
13. Users of spectrophotometer should pay attention to maintaining the surface hygiene of the instrument and the cleanliness of the lens.
Benchtop Spectrophotometer (Reflectance and Transmittance) DSCD-920 adopts 7 inches touch screen, full wavelength range, Android operate system. Illumination : reflectance D/8° and transmittance D/0°(UV included / UV excluded), high accuracy for color measurement, large storage memory, PC software, because of above advantages, it is used in laboratory for color analysis and communication.

DSCD-920_Desktop Spectroradiometer
Lisun Instruments Limited was found by LISUN GROUP in 2003. LISUN quality system has been strictly certified by ISO9001:2015. As a CIE Membership, LISUN products are designed based on CIE, IEC and other international or national standards. All products passed CE certificate and authenticated by the third party lab.
Our main products are Goniophotometer, Integrating Sphere, Spectroradiometer, Surge Generator, ESD Simulator Guns, EMI Receiver, EMC Test Equipment, Electrical Safety Tester, Environmental Chamber, Temperature Chamber, Climate Chamber, Thermal Chamber, Salt Spray Test, Dust Test Chamber, Waterproof Test, RoHS Test (EDXRF), Glow Wire Test and Needle Flame Test.
Please feel free to contact us if you need any support.
Tech Dep: Service@Lisungroup.com, Cell/WhatsApp:+8615317907381
Sales Dep: Sales@Lisungroup.com, Cell/WhatsApp:+8618117273997

 中文简体
中文简体