
 English
 中文简体
中文简体 English
 Русский
 Español
 Português
 Türkçe
 العربية
 Deutsch
 Polski
 Italiano
 Français
 한국어
한국어 ไทย
ไทย Tiếng Việt
 日本語
日本語





























Non-Solid Pins Testing Device
User's Manual
Applicable LISUN models: LS-B04
1. Basic Understanding of Equipment
1.1 Scope of Equipment Application
This device is suitable for specialized hardness testing of non-solid metal latches for household and similar uses.
It is primarily used in electrical product quality inspection laboratories, the quality control departments of plug manufacturers, third-party testing organizations, and for the inspection of products entering or leaving the country.
1.2 Applicable Standards
Strictly in accordance with Clause 14.2 and Figure 14 of GB/T 2099.1-2021 “Plugs and Sockets for Household and Similar Purposes—Part 1: General Requirements” (IEC 60884-1:2022, Clause 14.2, Figure 17), and testing has been conducted accordingly.
Conduct a static compression hardness test on hollow pins in accordance with the load, compression angle, and holding time specified in the standard. After testing, the pins shall show no cracks, no permanent deformation beyond the specified tolerance, and no indentations or dents that would affect normal use.
1.3 Test Principles
1.3.1 Principles of Mechanical Pressurization
A gravity-loading mechanism is used to apply a standard, constant load perpendicular to the surface of the latch pin at the angle specified in Figure 14 of GB/T 2099.1-2021.
1.3.2 Principles of Qualitative Testing
After the pressure-holding time specified in the standard has elapsed, observe the appearance of the pin, measure the amount of deformation and the dimensions of the indentation, and determine whether the pin meets the requirements for hardness and mechanical strength in accordance with national and international standards.
1.4 Downloading Electronic Documents
We have already sent the download links for the electronic user manual, calibration certificate, warranty card, and other documents via email at the time of shipment. Please download them promptly. If you have not received the email, please contact us to request the download links again.
2. Precautions for Use
2.1 Operating Environment Safety Requirements
Operating environment temperature: 15°C to 35°C; relative humidity: 45% to 75%; no condensation, no corrosive gases, and no airborne dust.
Place the device on a level, stable workbench, leaving at least 30 cm of working space on all sides, and keep it away from sources of vibration.
2.2 Safety Guidelines for Operational Procedures
During testing, do not extend any body parts between the steel rod and the specimen holder to prevent crushing injuries.
Samples must be securely positioned to prevent them from falling or ejecting during loading, which could pose a safety hazard.
It is strictly prohibited to exceed the equipment’s rated load by adding weights without authorization or by forcibly pressing down on the loading mechanism, in order to prevent equipment damage and safety incidents.
3. Introduction to the Test Setup
See Figure 3-1.
| Number | Note |
| ① | Load weight, 100 N |
| ② | Steel rod, 4.8 mm in diameter |
| ③ | Sample holder; during testing, place the hollow pin sample between the holder and the steel rod |
| ④ | Handwheel for adjusting the height of the bracket |
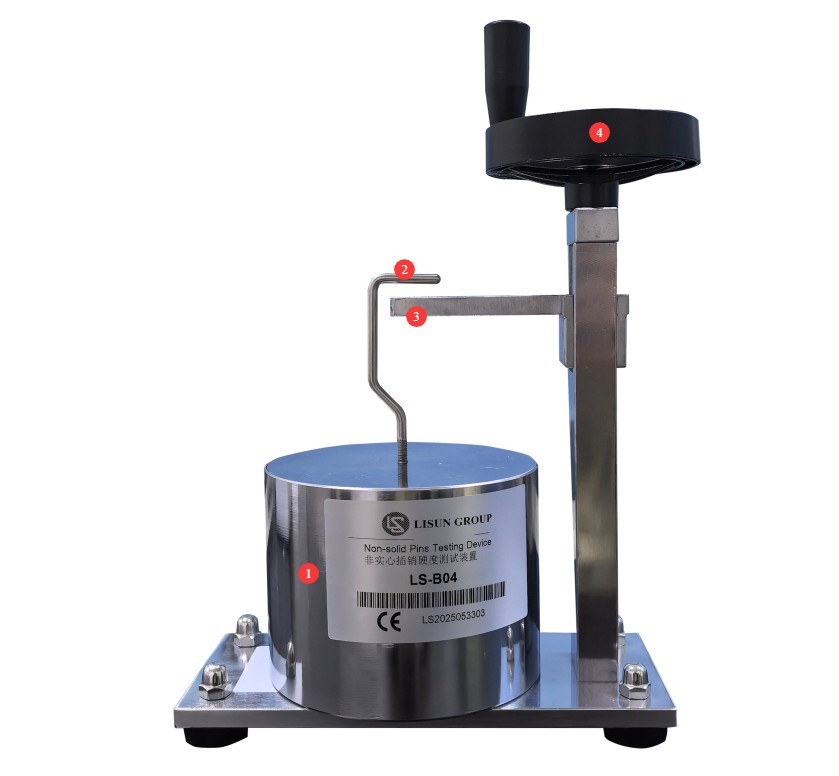
Figure 3-1
4. Hardness Testing of Hollow Pins
4.1 Sample Pretreatment
Select brand-new, unused, finished plugs and prongs that have not undergone any destructive testing, and exclude any nonconforming specimens with surface dents, cracks, or obvious deformation.
Allow the test sample to stand for 30 minutes in a standard environment with a temperature of 10°C to 35°C and a relative humidity of 45% to 75%, so that the sample temperature matches the ambient temperature and temperature differences do not affect the test results.
4.2 Specimen Clamping and Precise Alignment
Lower the stand, place the plug under test gently on the stand, and adjust the position of the weight and the orientation of the steel rod so that the axis of the steel rod is perpendicular to the axis of the plug. The center of the plug under test should be aligned and coincide with the vertical center of gravity axis of the weight, as shown in Figure 4-1 (image sourced from the IEC standard).
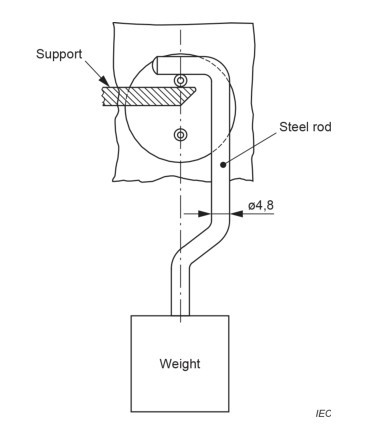
Figure 4-1
4.3 Pin Hardness Testing Procedure
Slowly raise the support so that the test pin comes into contact with the steel rod. Continue to slowly raise the support, and start the timer once the weight has completely left the base of the apparatus. Be careful to prevent the weight from swaying.
Monitor the equipment’s status throughout the entire pressure-holding period to ensure there are no unusual noises, no loosening of samples, and no misalignment between the steel rod and the pin. Do not touch any of the device’s adjustment components.
After 1 minute, the test is complete. Slowly lower the stand and carefully remove the test plug.
4.4 Interpretation of Test Results
During the application of force, the reduction in dimensions at the point of force application on the latch shall not exceed 0.15 mm; after the steel rod is removed, the dimensional change of the latch in any direction shall not exceed 0.06 mm.
If both of the above conditions are met, the test passes; if either condition is not met, the test fails.
5. Post-Test Procedures
5.1 Device Reset
Lower the stand to prevent force from being applied when the test is not in progress.
5.2 Sample Preparation
Separate the samples that passed and failed the test, label them clearly, and avoid any confusion.
5.3 Cleaning and Tidying Up the Test Site
Use a lint-free, soft cloth to wipe away dust and debris from the steel rods, brackets, and surfaces of the equipment. Do not rinse the equipment directly with water.
Organize the tools and weights on the workbench, arrange them neatly, and clean up any debris generated during the experiment.
6. Routine Maintenance and Care
6.1 Regular Maintenance
Every three months, apply a small amount of neutral lubricating grease to key components, such as steel rods, brackets, and the shafts of the adjustment handwheels, to prevent rust and jamming.
6.2 Long-Term Storage and Maintenance
After routine maintenance is complete, cover the entire unit with a dust cover and store it in a dry, well-ventilated warehouse; apply rust-preventive oil to the weights and store them separately to prevent rust and deformation.
6.3 Calibration Interval Requirements
To ensure the accuracy and reliability of the device, it is recommended that it be sent periodically to a qualified third-party metrology laboratory for calibration. The recommended calibration interval is 12 months. Users may determine the specific calibration interval based on frequency of use, environmental conditions, and quality system requirements.
7. Troubleshooting and Resolving Common Problems
| Fault Symptoms | Possible Causes | Procedure |
| The stand moves up and down jerkily | Dust buildup on the slide rail, insufficient lubrication, foreign objects lodged in the rail | Try again after removing dust from the slide rails, replenishing the lubricant, and clearing any foreign objects from the gaps. |
| Force Offset and Tilt | The device is not level; the steel rod and the pin are not perpendicular; and the center of the pin does not align with the center of gravity of the weight. | Make sure the device is placed horizontally; refer to Section 4.2, readjust the position of the steel rod, pin, and weights, and try again. |