
 English
 中文简体
中文简体 English
 Русский
 Español
 Português
 Türkçe
 العربية
 Deutsch
 Polski
 Italiano
 Français
 한국어
한국어 ไทย
ไทย Tiếng Việt
 日本語
日本語





























Waterproof Jet Test Device
User's Manual
Applicable LISUN models: JL-56
1. Unboxing and Basic Familiarization with the Equipment
1.1 Key Technical Specifications
| Parameters | Note |
| Measurable Water Resistance Levels | IPX5 and IPX6 |
| Standard Water Tank Sizes | 780 × 580 × 1100 mm (L × W × H) |
| IPX5 | Nozzle diameter: 6.3 mm; water flow rate controlled at 12.5 ± 0.625 L/min |
| IPX6 | Nozzle diameter: 12.5 mm; water flow rate controlled at 100 ± 5 L/min |
| Maximum Load Capacity of the Turntable | 50 kg |
| Equipment Power Supply | Three-phase 380 V/50 Hz (60 Hz optional) |
Note: The turntable can be customized based on the maximum dimensions and weight of the test object.
The equipment complies with the test requirements for IPX5 and IPX6 specified in GB/T 4208-2017, Sections 14.2.5–14.2.6 and Figure 6.
1.2 Unboxing and Checking the Contents
1.2.1 Unpacking and Visual Inspection
When unpacking the device, handle it gently to avoid scratching the exterior casing with sharp tools. After unpacking, first inspect the exterior of the device to ensure there is no obvious deformation or dents, and that the buttons are not damaged or loose. If you notice any abnormalities with the device or its accessories, do not turn it on. Please contact us immediately.
1.2.2 Main Unit and Major Components
| No. | Note |
| ① | Water tank, including a touchscreen, flow control, inlet, and outlet |
| ② | Rotating turret; samples are placed on it, and it rotates automatically during testing. |
| ③ | Nozzle Holder for IPX5 and IPX6 Nozzles |
| ④ | Corrugated pipe, which can be used to connect inlet, outlet, and overflow ports |
| ⑤ | IPX5 Hose and Nozzle |
| ⑥ | IPX6 Hoses and Nozzles |
| ⑦ | Waterproof sockets and plugs; used to connect the turntable to the sample during electrical testing of the sample |
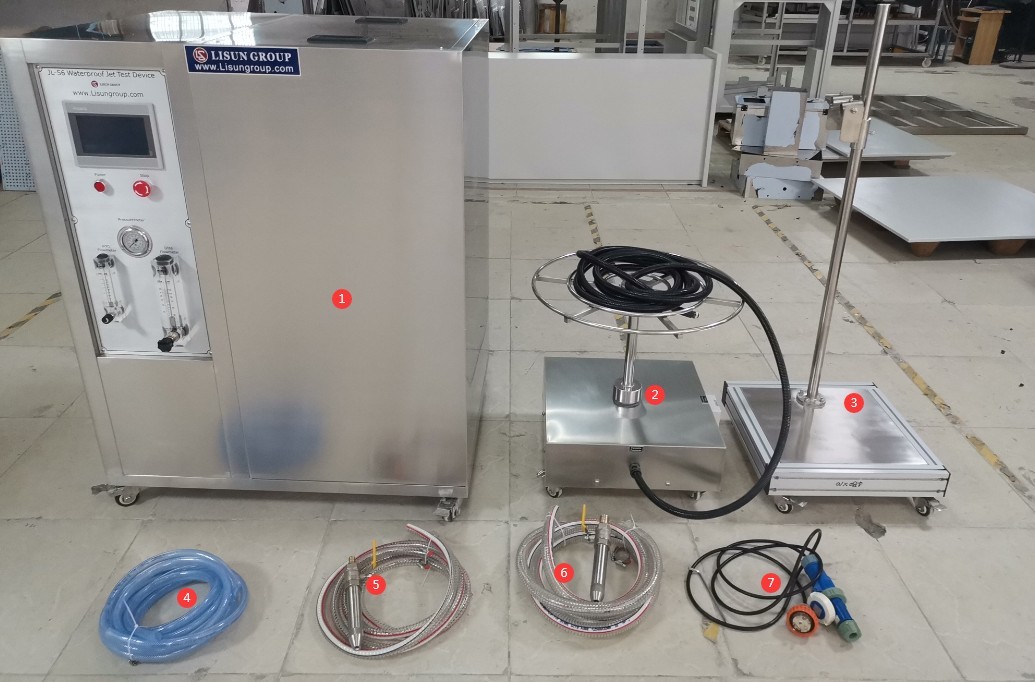
Figure 1
Download links for the electronic user manual, software, warranty card, and other materials have been sent via email. Please download them as soon as possible. If you missed the email, please feel free to contact us to request the download links again.
2. Safety Precautions
2.1 Electrical Safety
2.1.1 Power Connection Specifications
Based on the nameplate, connect the equipment to the correct power source, typically 380V 50Hz (60Hz available upon request), and ensure the voltage and frequency are correct. Wire the equipment separately to avoid sharing a circuit with other high-power devices. Verify that all connections are secure and free of looseness.
2.1.2 Grounding Requirements
The equipment must be reliably grounded, with a grounding resistance of ≤4 Ω. Do not use gas lines, non-metallic water pipes, or neutral wires as substitutes for the grounding wire. After grounding is complete, use a Grounding Resistance Tester to measure the grounding resistance. Power may only be applied after confirming that it meets the requirements, to prevent electric shock, equipment malfunctions, or measurement errors caused by poor grounding.
2.1.3 Electrical Operation Precautions
Before wiring, inspecting, or maintaining equipment, the main power supply must be disconnected, and operations should not begin until it has been confirmed that there is no residual voltage;
Do not operate the equipment’s power switch, touchscreen, or instrument buttons with wet hands to avoid the risk of electric shock;
Do not place any foreign objects (such as tools or paper) inside the electrical control cabinet to prevent short circuits or component damage caused by dust or foreign objects;
Do not plug in or unplug power cords or signal cables while the equipment is running to prevent short circuits that could damage the controller or electrical components.
2.2 Operational Safety
Before testing, securely fasten the sample to the center of the turntable to prevent the impact of the water spray from dislodging or displacing the sample; when conducting powered tests on the sample, ensure that the sample’s wiring is secure and that there is no risk of short circuits or electrical leakage;
The IPX6 test involves high water flow and strong water pressure. Before testing, ensure the water tank is full and that the spray gun is secured to the mount; do not conduct the test by holding the spray gun in your hand;
Do not place any objects within the equipment’s operating area. Do not enter the spray zone while the equipment is in operation to avoid being struck by a strong jet of water;
In the event of a malfunction, non-professionals are prohibited from disassembling or repairing the equipment; please contact us or follow the instructions of a technician;
If the touchscreen displays an alarm, immediately stop the test and troubleshoot the problem. Do not force the device to restart (to prevent further damage).
2.3 Environmental Safety
The distance between the equipment and walls, as well as surrounding structures (such as other test equipment and shelving), must be at least 1500 mm to facilitate operation and maintenance;
The water tank, nozzle bracket, and turntable must be placed on a solid, level surface. Use a level to ensure they are level, making sure the bubble in the level is centered. Note: The equipment’s feet are adjustable to achieve a level position.
2.4 Other
For matters not covered in this manual, please proceed with caution or contact us.
3. Equipment Overview and Assembly
3.1 Water Tank
3.1.1 Front View of the Water Tank
| No. | Note |
| ① | Touchscreen |
| ② | Power Switch |
| ③ | Emergency Stop |
| ④ | Water Pressure Gauge |
| ⑤ | IPX5 Water Flow Regulation and Flow Meter |
| ⑥ | IPX6 Water Flow Regulation and Flow Meter |
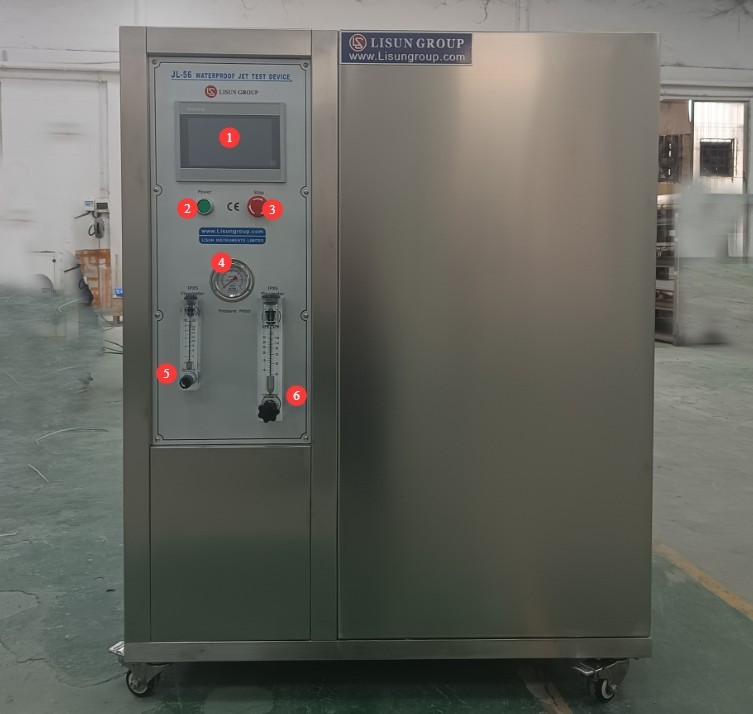
Figure 2
3.1.2 Back of the Water Tank
| No. | Note |
| ① Inlet | This unit can be connected to a clean tap water faucet; simply keep the inlet valve and faucet handle open at all times. The water tank contains a float valve that automatically controls the opening and closing of the inlet. Note : Before using the unit for the first time, please rinse the inside of the water tank with clean water. If debris enters the pump, it may affect the pump’s performance or even damage it. |
| ② Overflow outlet | If the float valve inside the inlet malfunctions and the water level continues to rise, water will flow out through the overflow outlet. |
| ③ Circuit Breaker | |
| ④ Please connect the turntable cable to this port. | |
| ⑤ Main Power Cord | Please connect the device to the appropriate power source according to the information on the nameplate. |
| ⑥ Sample Power Cord | Please connect the device to an appropriate power source based on the sample being tested. Note: Abnormal conditions, such as short circuits, may occur in the sample during testing; you may connect an external ground-fault circuit interrupter (GFCI) here. |
| ⑦IPX6 Water Outlet | Connect the IPX6 hose |
| ⑧IPX5 Water Outlet | Connect the IPX5 hose |
| ⑨ Drain | If the water tank has not been used for an extended period, or if you need to replace or drain the water inside, turn off the water supply faucet, open the drain valve, and drain the water. |
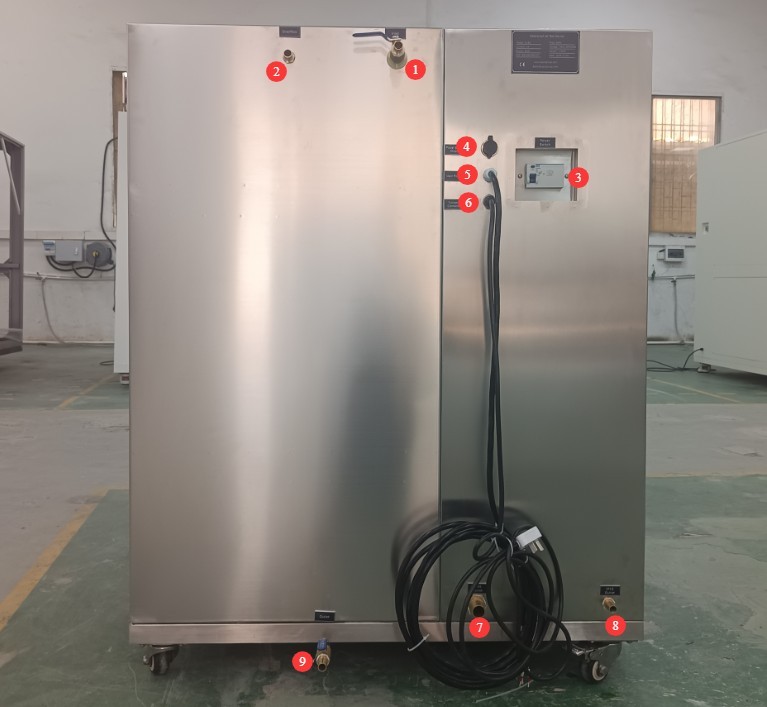
Figure 3
3.1.3 Inside the Water Tank
| No. | Note |
| ① Mechanical Float Device | When the water tank is low on water, the float drops, and the inlet automatically opens; when the water tank is full, the float rises, and the inlet automatically closes. |
| ② Electronic Float Device | If the water level in the tank is too low and the electronic float drops, a low-water alarm will appear on the touchscreen. |
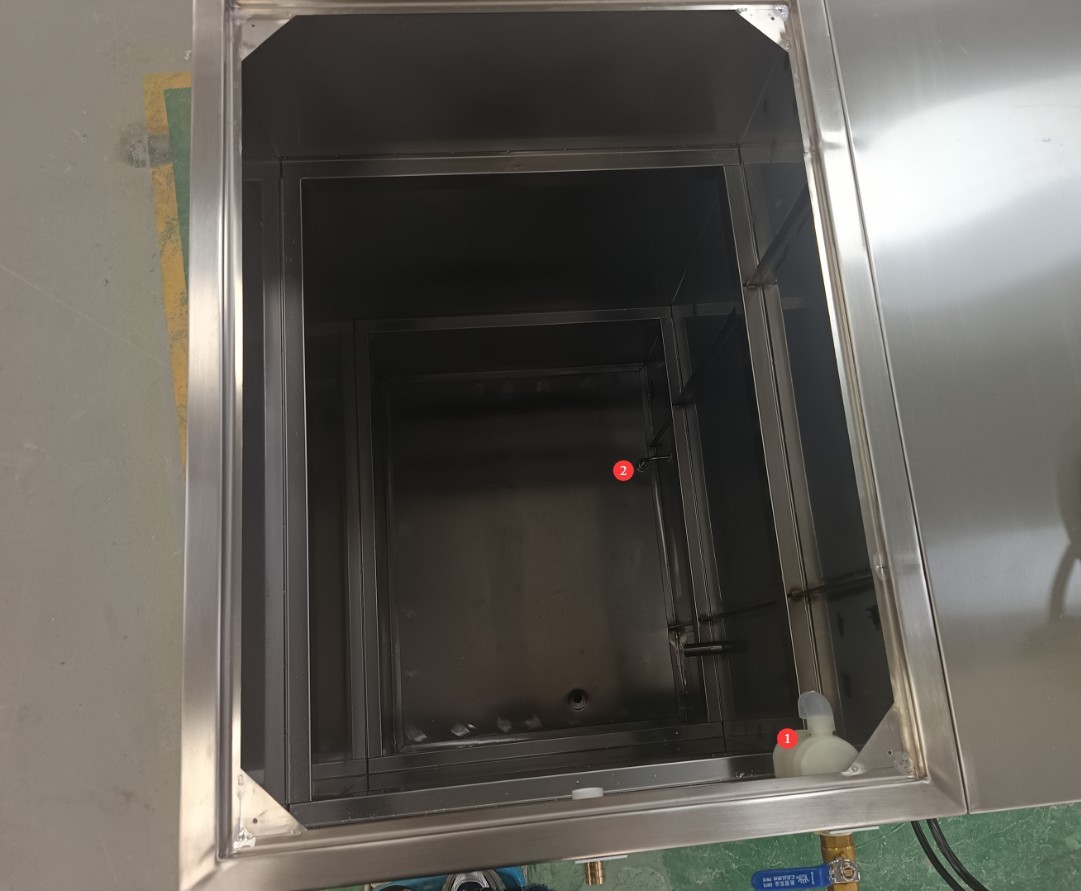
Figure 4
3.2 Nozzle Bracket
Attach the IPX5 and IPX6 nozzles to the bracket; the height and angle of the nozzles are adjustable.
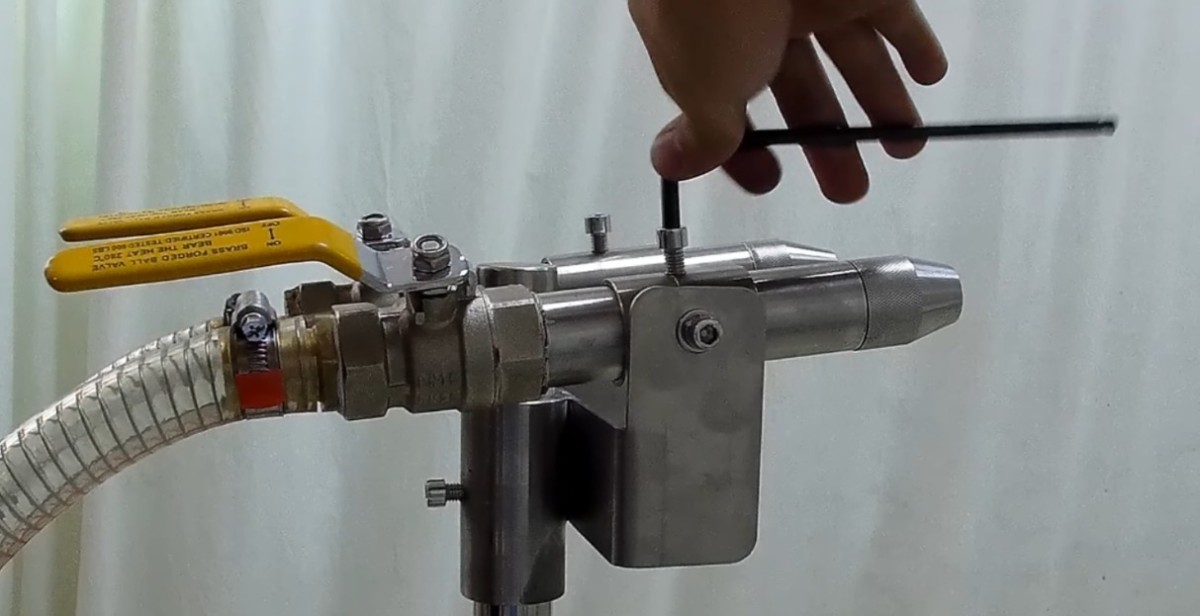
Figure 5
Note: During the test, hold the nozzle bracket with one hand to control the direction of the nozzle and prevent the bracket from tipping over due to impact.
3.3 Turntable
The test distance for IPX5 and IPX6 is 2.5 to 3 meters. Please position the nozzle bracket and turntable appropriately to ensure the test distance meets the standard requirements. The height of the turntable is adjustable.
If the sample requires testing under power, please use a waterproof plug and socket to connect the turntable to the sample.
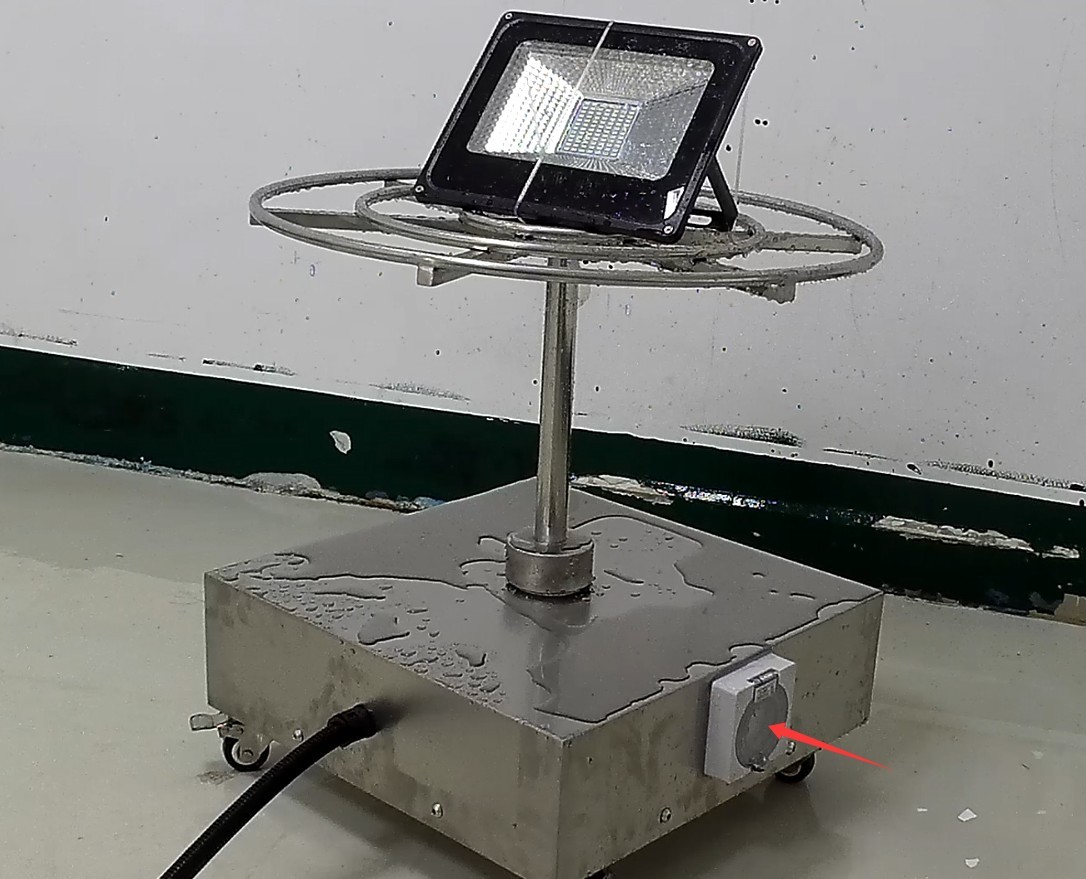
Figure 6
3.4 Powering On
After verifying that all connections are correct, turn on the device’s circuit breaker, then press the green power switch to turn on the device.
4. Introduction to the Touchscreen Program
4.1 Components of the Program’s Main Interface
4.1.1 User Interface
| No. | Note |
| ① Water resistance rating: IPX5 | Once selected, you can configure the IPX5 test parameters and perform the IPX5 water spray test. |
| ② Water resistance rating: IPX6 | Once selected, you can configure the IPX6 test parameters and perform the IPX6 water spray test. |
| ③ Sample Power Supply | The sample power can be turned on or off. When the sample power is turned on for testing, the program will automatically supply power to the sample according to the sample on/off times set in the parameter settings interface. |
| ④ Test Parameters | Click to access the test parameter settings screen |
| ⑤ Factory Settings | When the equipment is operating normally, there is no need to enter debug mode. If the equipment’s test parameters are abnormal, you may enter debug mode. A password is required; please contact us. |
| ⑥ Manual Window | Before the official test, you can check whether all device functions are working properly in the manual window. |
| ⑦ Reset to Zero | Before starting a test, click here to clear the data from the previous test. |
| ⑧ Start the Test | Click to start the water spray test |
| ⑨ Test Stopped | Click to stop the water spray test |
| ⑩ Test Duration Display | Display the current test duration |
| ⑪ Sample energization time | Display the current power-on duration for the sample |
| ⑫ Sample power-off time | Display the duration of the power outage for the current sample |
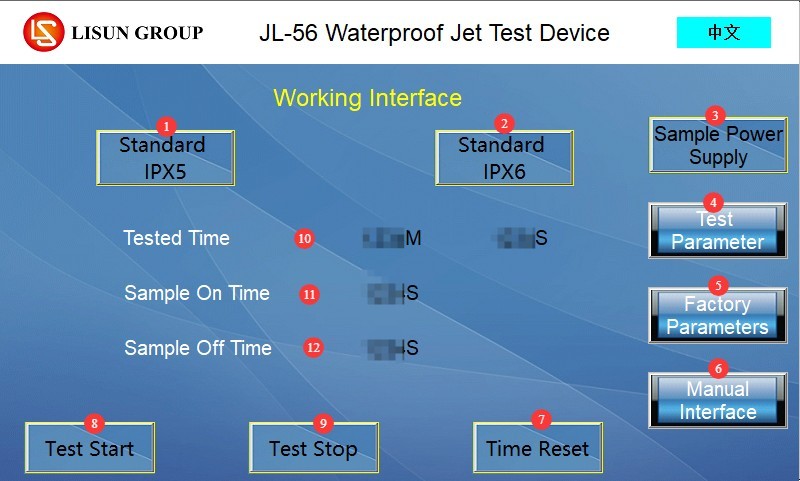
Figure 7
4.1.2 Parameter Settings Interface
| No. | Note |
| ① Test Duration | The total test duration can be set; the GB/T 4208-2017 standard requires that the test duration for both IPX5 and IPX6 be ≥3 min. |
| ② Turntable Speed | 1–5 r/min; the factory default turntable speed is 1 r/min. If the sample is large or has a large surface area, the speed may be adjusted appropriately to 2–5 r/min . Note: For samples that require power during testing, the turntable will automatically rotate in both directions to prevent the sample’s power cord from becoming tangled. |
| ③ Time the sample is energized | Set the duration of continuous power supply to the sample during the test, in seconds |
| ④ Power-off time of the sample | Set the duration of continuous power interruption for the sample during the test, in seconds |
| ⑤Back | Click to return to the work interface |
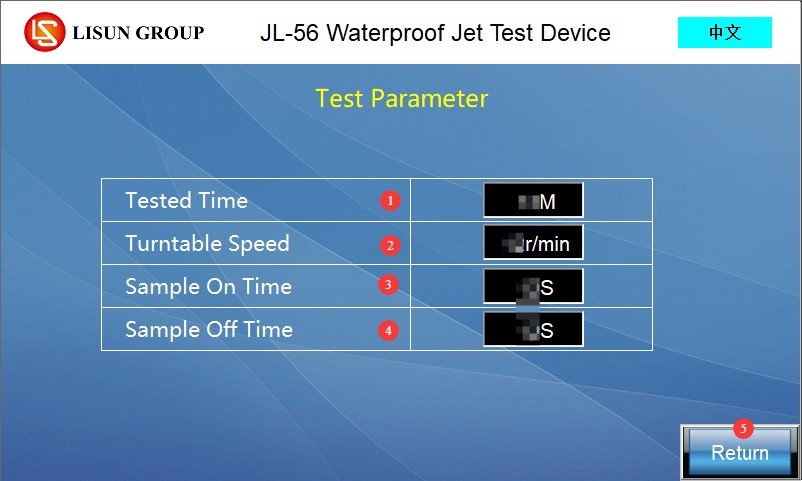
Figure 8
Note: Continuous power supply: Power-on time = test duration; power-off time = 0 s; No power supply: Power-on time = 0 s; power-off time = test duration.
4.1.3 Manual Window
| No. | Note |
| ① Pump Switch | Turn the water pump on/off |
| ② IPX5 Solenoid Valve | You can turn the IPX5 solenoid valve on or off; press ① and ② to turn on the IPX5. Note: You must open the valve at the IPX5 nozzle beforehand. |
| ③ IPX6 Solenoid Valve | You can turn the IPX6 solenoid valve on or off; press ① and ③ to turn on the IPX6. Note: You must open the valve at the IPX6 nozzle beforehand. |
| ④ Turntable Rotates Clockwise | Click to rotate the turntable clockwise or counterclockwise; release to stop. Note: If there are wires between the turntable and the sample, do not rotate in one direction for an extended period to avoid tangling the wires. |
| ⑤ Turntable Reversal | |
| ⑥ Sample Power Supply | If the sample power supply and the sample are connected, you can turn the sample power supply on or off. |
| ⑦Back | Click to return to the work interface |
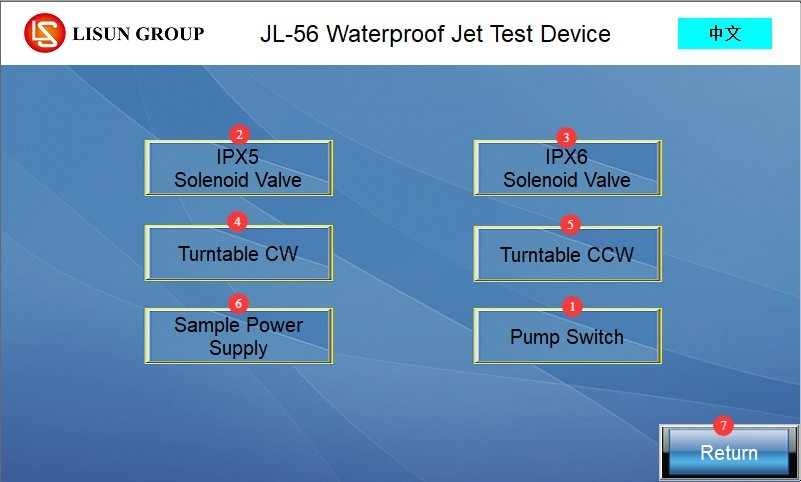
Figure 9
4.2 Description of the Program Alarm Interface
Incorrect phase sequence. The device is powered by three-phase electricity. Please turn off the power, swap the connections of any two live wires, and then turn the device back on.
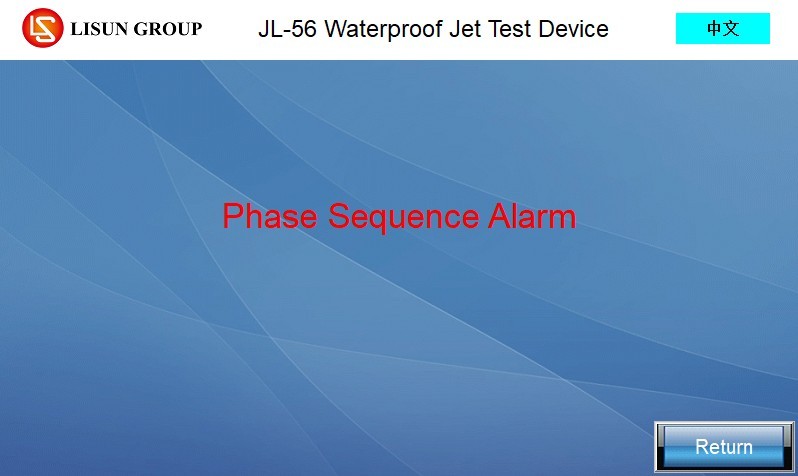
Figure 10
Emergency stop has not been reset. Please turn the emergency stop button clockwise to reset it, then try again.
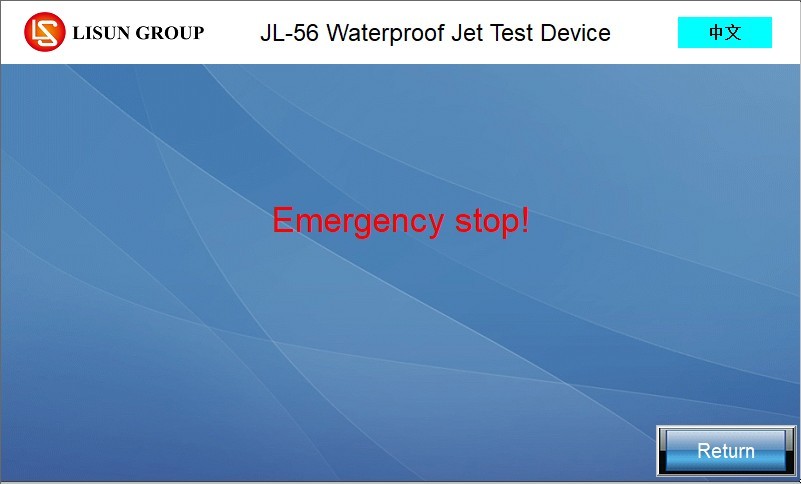
Figure 11
The water spray test is complete. Click “Back” to continue.
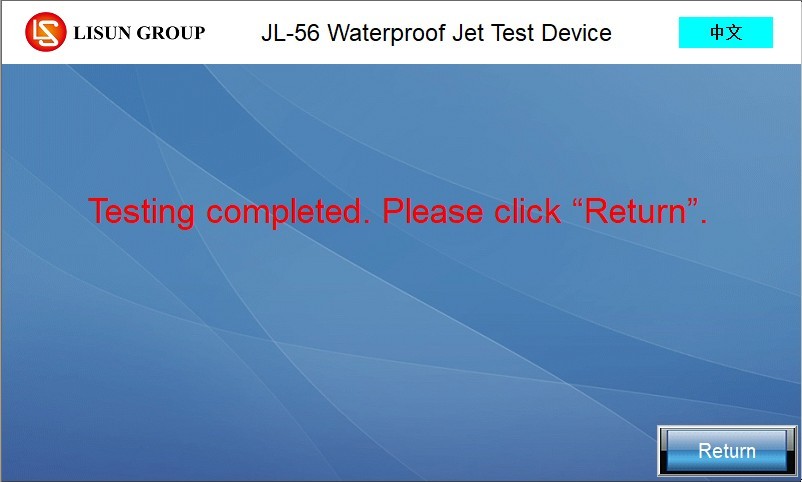
Figure 12
No water resistance rating has been selected. Please click “Back,” select the water resistance rating you want to test, and try again.
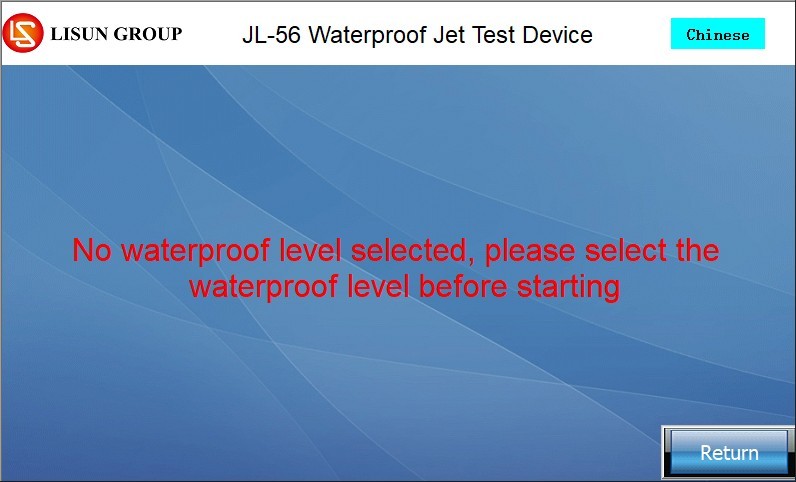
Figure 13
The test time has not been reset. Please click “Back,” then click “Reset” to clear the data from the previous test and try again.
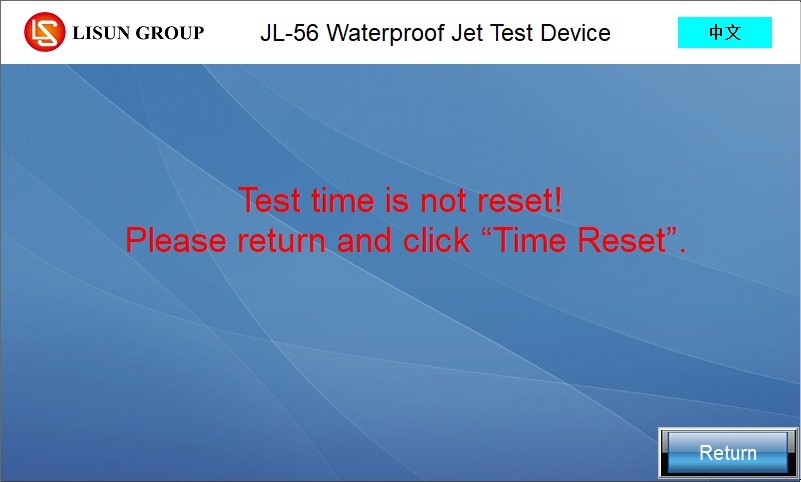
Figure 14
The water tank is low on water. Please ensure there is sufficient water in the tank. An electronic float switch at the bottom of the tank monitors the water level. If the water level is sufficient but a low-water alert still appears, check to see if the electronic float switch is blocked by debris. Remove any debris and allow the float to rise. Tap “Back” to clear the alert.
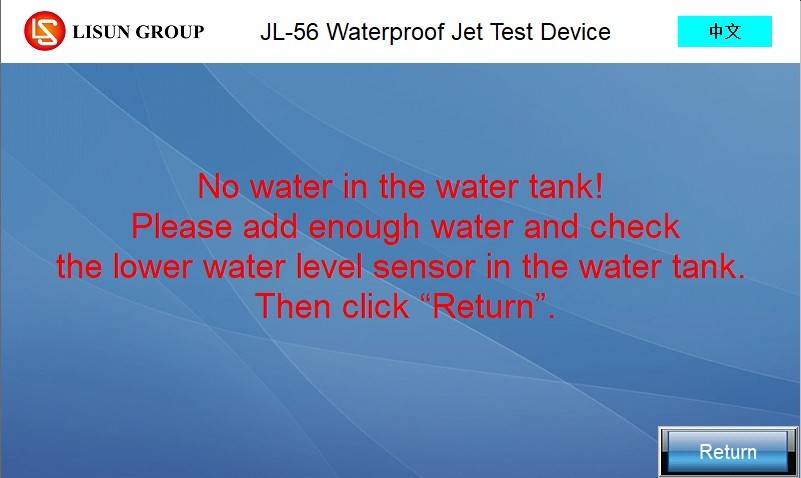
Figure 15
5. Preparations Before the Test
5.1 Sample Installation
5.1.1 Preliminary Inspection of Samples
Inspect the sample to ensure it is in good condition and free of damage or deformation; confirm the test requirements for the sample (whether power-on testing is required and the waterproof rating). If power-on testing is required, refer to Section 3.1.2 to connect the sample’s power cord to an appropriate power source.
5.1.2 Sample Mounting and Positioning
Place the sample exactly in the center of the turntable and secure it firmly with a tie-down strap to prevent it from shifting or falling off while the turntable is rotating;
For electrical testing, follow the instructions in Section 3.3 to connect the sample using a waterproof plug, socket, and power cord. Check that the connections are secure, with no looseness or short circuits, and verify that all connections are properly waterproofed.
5.2 Pre-commissioning of Equipment
5.2.1 Equipment Functionality Check
If the equipment has not been used for an extended period, or if you need to verify in advance that all its functions are still operating normally, refer to Section 4.1.3 to check and confirm that the equipment’s pump, solenoid valve, turntable, sample power supply, and other functions are working properly.
5.2.2 Water Flow Pre-regulation
Still referring to Section 4.1.3, turn on the water pump and the IPX5/IPX6 solenoid valves. Adjust the IPX5/IPX6 flowmeter knobs so that the IPX5 water flow rate is 12.5 ± 0.625 L/min and the IPX6 water flow rate is 100 ± 5 L/min.
Once commissioning is complete, you can turn off the pump and solenoid valve.
6. Water Spray Test
6.1 Start-up Test
On the touchscreen program interface, select the IPX5 or IPX6 waterproof rating you wish to test. If the sample is powered on, click “Sample Power.” Then click “Clear and Reset.”
Open the valve at the IPX5/IPX6 nozzle, then click “Start Test” to begin the water spray test. Please hold the nozzle and its bracket with one hand to ensure the water jet is aimed at the test area of the sample.
6.2 Real-Time Monitoring of Tests
6.2.1 Water Flow Rate
If the flow rate fluctuates during testing, you can fine-tune the flowmeter knob to keep the water flow rate stable at the standard flow rate.
6.2.2 Rotating Stage and Sample
The turntable rotates at a constant speed as set, with the sample holder unobstructed by water, ensuring that the sample is sprayed from all directions. If any abnormalities are detected, the test may be stopped, adjusted, and then restarted.
6.2.3 Electrical Conditions of the Sample
Power to the sample is automatically turned on and off according to the set schedule. If an abnormality occurs during the test—such as a short circuit—the test can be stopped immediately; after inspecting the sample, the test can be resumed.
7. Post-Test Procedures
7.1 Immediate Actions Upon Test Completion
7.1.1 Remove the sample
Press the “Stop Test” button, or wait for the test to end automatically; the turntable will stop rotating, and power will be cut off to the sample (for samples undergoing powered testing). Remove the sample from the turntable.
7.1.2 Touchscreen
Check whether the test time display on the work interface is functioning properly, then click “Clear and Reset” to prepare for the next test.
7.2 Shutdown
After all tests for the day are completed, turn off the water supply valve and switch off the power to the equipment.
7.3 Evaluation of Test Results
Use a dry cloth to wipe away any water stains from the outer surface of the sample, and then test the sample. Determine whether the sample has passed the test based on the following criteria.
| Evaluation Criteria | Specific Requirements |
| Safety | Insufficient water supply does not affect the normal operation of the equipment or compromise safety. |
| Insulation Protection | Water does not accumulate on insulated components where it could cause tracking along the creepage distance. |
| Protection of Electrical Components | Water must not enter live parts or windings that are not designed to operate in damp conditions. |
| Cable Protection | Water does not accumulate near the cable terminations or enter the cable |
| Effectiveness of Drainage Holes | If there are drain holes, it must be verified that incoming water will not accumulate and can be drained without damaging the equipment. |
| Equipment without a drain hole | If water accumulates and endangers live parts, follow the acceptance criteria specified in the relevant product standards. |
8. Daily Maintenance and Care of Equipment
8.1 Daily Cleaning
Wipe water spots and dust from the surface of the equipment, paying special attention to the turntable and test area to prevent water spots from leaving behind limescale;
Wipe the touchscreen and control panel with a dry cloth to prevent water and dust from entering the internal circuitry.
8.2 Periodic Inspections
Connections: Check all connections on the swing pipe, water lines, and electrical circuits to ensure there are no leaks or loose fittings.
Thoroughly clean the water tank at least once a week: Drain any standing water, then wipe it dry with a clean cloth. After cleaning, check the inner walls of the tank for rust or scale buildup. If there is minor rust, gently wipe it with a rust remover, then rinse thoroughly with clean water.
8.3 Maintenance of Idle Equipment
8.3.1 Short-term Idle Period (Within 1 Month)
Drain all standing water from the tank and water lines to prevent scale buildup in the nozzles and pipes;
Cover the entire piece of equipment with a dust-proof cover to prevent dust from entering;
Keep the equipment in a dry, well-ventilated area.
8.3.2 Long-term inactivity (more than 1 month)
Complete all maintenance procedures for short-term non-use; disconnect all electrical and water connections from the equipment; remove the water hoses, let them air dry, and store them properly;
Apply a layer of rust-preventative oil to the inner walls of the water tank and the surfaces of metal parts to prevent rust; store the equipment in a cool, dry place away from direct sunlight;
Apply a small amount of industrial lubricant to moving parts, such as the turntable bearings, to prevent rust and jamming;
The equipment should be powered on once a month. Enter the manual screen to test all functions, then shut it down after 5 to 10 minutes of operation to prevent circuit deterioration.
9. Troubleshooting and Resolution of Common Problems
| Fault Symptoms | Possible Causes | Procedure |
| Touchscreen Alarm | See 4.2 | |
| The touchscreen is lit, but the buttons do not respond when tapped | Touchscreen freezes, has stains or water marks on the surface, or has a faulty internal touch module | Turn off the device, wait 5 minutes, and then restart it; wipe the touchscreen with a dry cloth to remove any dirt or water stains; if it still does not respond, please contact us for repair. |
| Water flows intermittently from the nozzle | Insufficient water in the tank; air in the water lines | Please make sure there is enough water in the tank; continue running the unit to purge the air from the water lines. |
| Insufficient water flow | Foreign matter in the flow meter, foreign matter in the solenoid valve, foreign matter in the water pump | Please check whether the flow meter is functioning properly, whether there is any debris inside, and whether the gasket has fallen out. Remove the flow meter from the unit, clear out any debris, or reinstall the gasket. Please contact us to have the solenoid valve and water pump inspected. |
| IPX5 and IPX6 Water Spray Tests Conducted Simultaneously | There are foreign objects in the solenoid valve | Please contact us to have the solenoid valve inspected. |