
 English
 中文简体
中文简体 English
 Русский
 Español
 Português
 Türkçe
 العربية
 Deutsch
 Polski
 Italiano
 Français
 한국어
한국어 ไทย
ไทย Tiếng Việt
 日本語
日本語





























Remote Controller 330N Crush Test Device
User's Manual
Applicable LISUN models: LS-B24
1. Basic Understanding of Equipment
1.1 Basic Properties
This device is designed for specialized testing of the mechanical strength and static pressure resistance of handheld remote control units.
It is primarily used in electrical appliance quality inspection laboratories, the quality control departments of handheld remote control manufacturers, third-party testing organizations, and for the inspection of products entering or leaving the country.
1.2 Applicable Standards
Designed and manufactured in strict accordance with Clause 4.8.4.6 of GB/T 4943.1-2022 “Audio-Video, Information Technology, and Telecommunications Equipment—Part 1: Safety Requirements” (Clause 4.8.4.6 of IEC 62368-1:2023), testing, operation, and evaluation shall be conducted in accordance with this standard.
Conduct a static pressure test on the remote control device in accordance with the load, application angle, and pressure holding time specified in the standard. After testing, the test specimen should show no cracks, no permanent deformation beyond the specified tolerance, and no indentations or dents that would affect normal use.
1.3 Test Principles
1.3.1 Principles of Mechanical Pressurization
It uses a gravity-loading mechanism to apply a standard, constant load vertically to the surface of the remote-controlled device.
1.3.2 Principles of Detection and Analysis
After the pressure-holding time specified in the standard has elapsed, observe the appearance of the remote control device and the dimensions of the indentation, and determine whether the mechanical strength of the remote control device meets the requirements by comparing it with national and international standards.
1.4 Downloading Electronic Documents
We have already sent the download links for the electronic user manual, calibration certificate, warranty card, and other documents via email at the time of shipment. Please download them as soon as possible. If you have not received the email, please contact us to request the download links again.
2. Precautions for Use
2.1 Operating Environment Safety Requirements
Operating environment temperature: 10°C to 35°C; relative humidity: 45% to 75%; no condensation, no corrosive gases, and no airborne dust.
Place the device on a level, stable workbench with at least 30 cm of clearance on all sides, away from sources of vibration.
2.2 Safety Guidelines for Operators
During testing, do not extend any body parts between the support surface and the force application plane to prevent crush injuries.
Samples must be securely positioned to prevent them from slipping or shifting during loading, which could pose a safety hazard.
It is strictly prohibited to add weights beyond the equipment’s rated load or to apply external force to force the loading mechanism down. This is to prevent equipment damage and safety incidents.
3. Introduction to the Test Setup
See Figure 3-1.
| Number | Note |
| ① | Handwheel for adjusting the height of the force application plane |
| ② | Weights and their stands, rated load capacity: 330 N |
| ③ | Force application plane, 100 mm × 250 mm |
| ④ | Rigid support surface, larger than 150 mm × 300 mm |
| ⑤ | Adjustable base to ensure the unit is level |
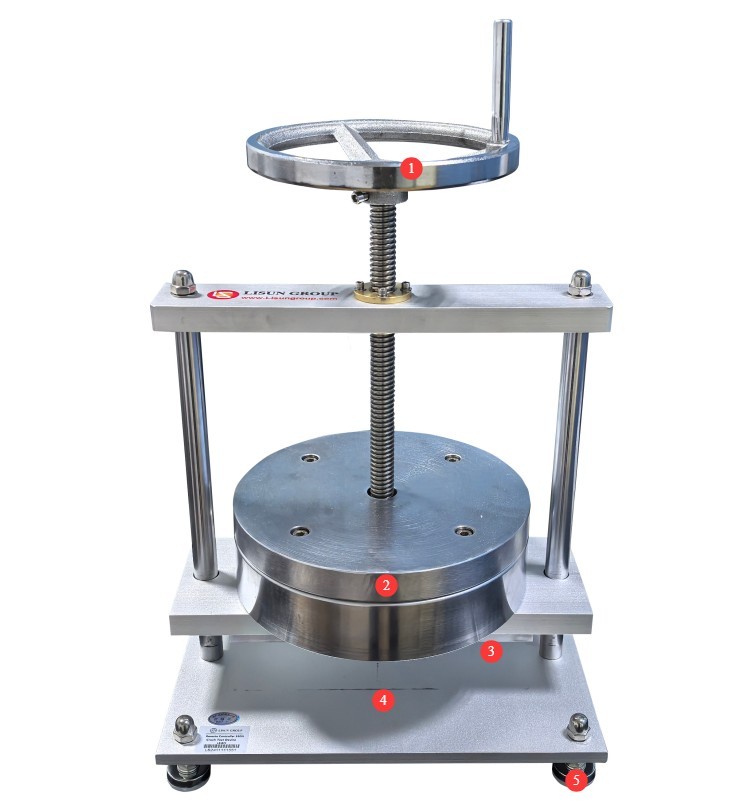
Figure 3-1
4. Steps for Conducting the Compression Test
| Number | Note |
| ① | Use the handwheel to lift the weight |
| ② | Place the remote control on the rigid support surface of the test apparatus in the position that would result in the most adverse outcome, directly beneath the force application plane. |
| ③ | Use the handwheel to lower the weight and press it down onto the remote control. Apply force to the exposed top and back surfaces of the remote control while it is in a stable position. Please bring your own stopwatch to time the process. |
| ④ | The force is applied for 10 seconds; after the force application period ends, use the handwheel to lift the weight. |
| ⑤ | In accordance with Section 1.3 and relevant standards, inspect the remote control to verify that it has passed the test. |
5. Post-Test Procedures
5.1 Device Reset
Use the handwheel to lower the position of the weight so that the force application surface comes into contact with the rigid support surface, thereby preventing the device bracket from being subjected to prolonged stress when not in use.
5.2 Sample Preparation
Separate the samples that passed and failed the test, label them clearly, and avoid any confusion.
5.3 Cleaning and Tidying Up the Test Site
Use a lint-free, soft cloth to wipe dust and debris from the surface of the test apparatus, the rigid support surface, and the force-application surface. Do not rinse the equipment directly with water.
Organize the tools on the workbench, arrange them neatly, and clean up any debris left over from the experiment.
6. Routine Maintenance and Care
6.1 Regular Maintenance
Every three months, apply a small amount of neutral grease to the handwheel lead screw to prevent rust and seizing; apply rust-preventative oil to the rigid support surfaces and force-application surfaces to prevent rust from affecting the test.
6.2 Calibration Interval Requirements
To ensure the accuracy and reliability of the device, it is recommended that it be sent periodically to a qualified third-party metrology laboratory for calibration. The recommended calibration interval is 12 months. Users may determine the specific calibration interval based on frequency of use, environmental conditions, and quality system requirements.
7. Troubleshooting and Resolving Common Problems
| Fault Symptoms | Possible Causes | Procedure |
| The stand moves up and down jerkily | Dust buildup on the slide rails, insufficient lubrication, or foreign objects lodged in the rails | Try again after removing dust from the slide rails, replenishing the lubricant, and clearing any foreign objects from the gaps. |
| Force Offset Tilt | The device is not level, and the test specimen is not properly positioned. | Make sure the device is level; after remotely repositioning the test specimen properly, try again. |