
 English
 中文简体
中文简体 English
 Русский
 Español
 Português
 Türkçe
 العربية
 Deutsch
 Polski
 Italiano
 Français
 한국어
한국어 ไทย
ไทย Tiếng Việt
 日本語
日本語





























Stability Test Bench
User's Manual
Applicable LISUN models: WDT-2、WDT-2A、WDT-2B
1. Unboxing and Basic Understanding of the Device
1.1 Key Technical Specifications
| LISUN Model | WDT-2 | WDT-2A | WDT-2B |
| Test Station | Single-station | ||
| Countertop Diameter | Ф600 mm | Ф800 mm | Ф1000 mm |
| Angle Adjustment Range | 0–30° (adjustable) | ||
| Table Rotation Speed | 1 rpm (adjustable) | ||
| Load-bearing capacity | 80 kg | ||
| Features | High-quality painted steel sheet, equipped with a protractor for easy measurement of angles | ||
1.2 Unboxing and Checking the Contents
1.2.1 Unpacking and Visual Inspection
When unpacking the device, handle it gently to avoid scratching the casing with sharp tools. After unpacking, first inspect the exterior of the device to ensure there is no visible deformation or dents, and that the buttons are not damaged or loose. If you find that the device or any accessories are damaged or deformed, do not turn on the power or use the device.
If you notice any issues, please contact us immediately.
1.2.2 Main Unit and Accessories
Stability Test Bench Main Unit: 1 unit.
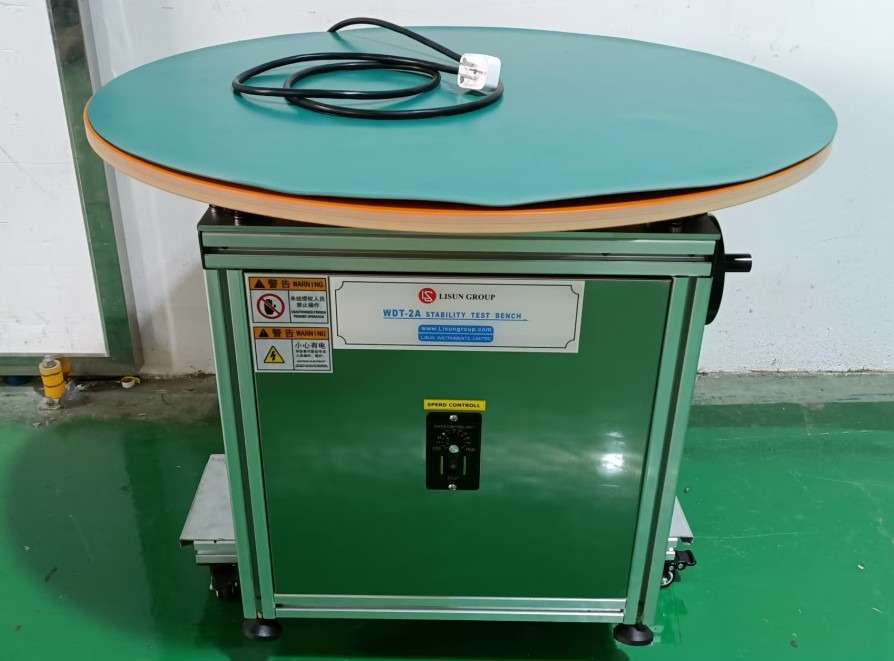
Figure 1
Standard accessories include the following: electronic protractor.
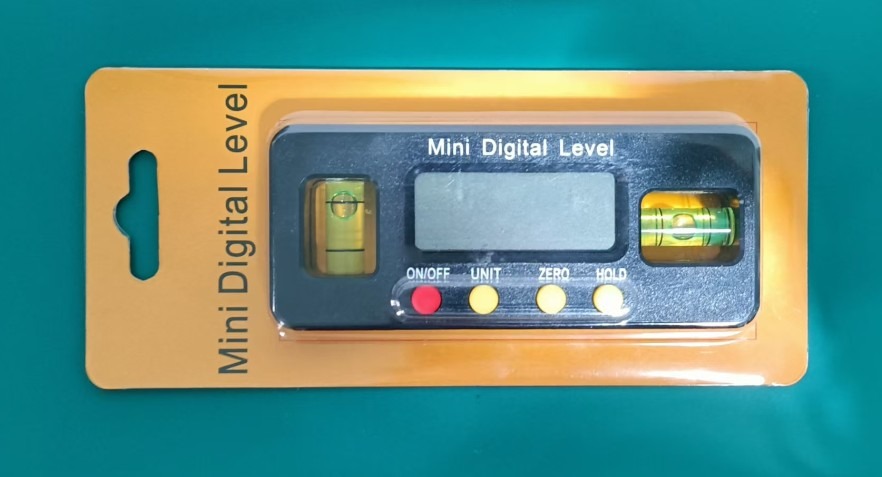
Figure 2
Note: The rubber pad is used to protect the test bench; it should be removed before testing.
Links to download the electronic user manual, warranty card, and other documents have been sent via email. Please download them as soon as possible. If you missed the email, please feel free to contact us to request the download links again.
1.3 Description of Equipment Structure
1.3.1 Front and Side Views of the Equipment
① Power switch and speed adjustment knob (factory default speed: 1 rpm); ② Turntable for adjusting the test stand’s tilt angle; ③ Test stand.
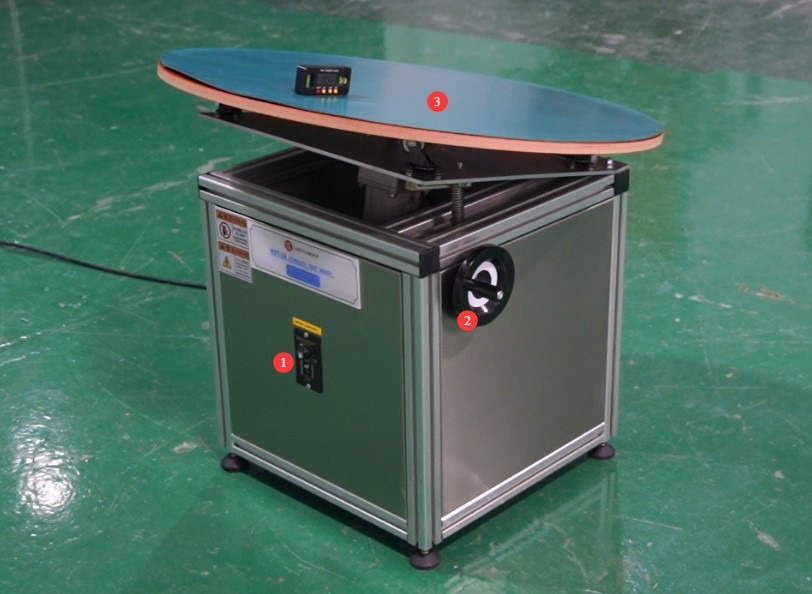
Figure 3
1.3.2 Back of the Device
Power cord.
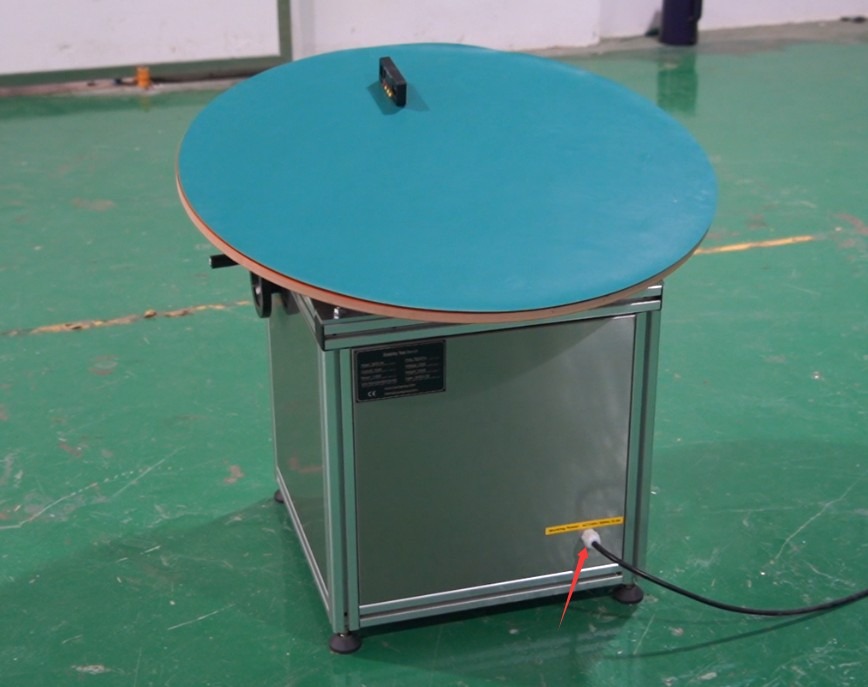
Figure 4
2. Safety Precautions
2.1 Electrical Safety
2.1.1 Power Connection
AC 220 V/50 Hz single-phase power; power outlets must comply with safety standards, have proper grounding, and have a rated current that matches the device’s power rating (which can be verified on the product nameplate).
2.1.2 Grounding Specifications
The equipment must be reliably grounded, with a grounding resistance of ≤4 Ω. Do not use gas pipes, non-metallic water pipes, or the neutral wire as a substitute for the grounding wire. After grounding is complete, use a Grounding Resistance Tester to measure the grounding resistance. Power may only be applied after confirming that the resistance meets the requirements, to prevent electric shock, equipment malfunctions, or measurement errors caused by poor grounding.
2.2 Operational Safety
When placing samples, ensure that their center of gravity is stable, avoid placing them beyond the boundaries of the work surface or tilting them excessively to one side, and ensure that the sample weight does not exceed the 80 kg rated load capacity to prevent equipment overload or the sample from tipping over and causing injury.
While the equipment is in operation, operators must not leave their workstations; they must closely monitor the condition of the samples and the operation of the equipment. If any abnormalities occur, they must immediately shut down the equipment to address the issue.
2.3 Environmental Safety
The equipment must be installed in an air-conditioned room, with the ambient temperature maintained between 5°C and 35°C and relative humidity ≤ 85%.
Avoid using the equipment in environments with high temperatures, high humidity, or high levels of dust, as these conditions may affect the equipment’s performance and service life, or even cause malfunctions.
The equipment must be placed at least 1000 mm away from walls and surrounding structures (such as other testing equipment and shelving) to facilitate maintenance.
At least 2000 mm of space must be left in front of the equipment, with no obstructions around it.
The equipment must be placed on a level, sturdy surface with a levelness error of ≤0.5°.
2.4 Other
For matters not covered in this manual, please proceed with caution or contact us.
3. Preparations Before the Test
3.1 Sample Preparation
3.1.1 Sample Pretreatment
Electrical products equipped with an input receptacle must be fitted with a suitable connector and a flexible cord, and assembled in accordance with the product’s normal operating conditions.
Utensils intended to be filled with liquid by the user during normal use must be tested, in accordance with the test requirements, either when empty or when filled to the most unfavorable water level (up to the capacity specified in the instructions for use).
3.1.2 Verification of Sample Condition
For equipment with doors, verify the door’s open or closed state and select the condition—whether open or closed—that is less favorable for stability for testing.
For equipment equipped with rollers, casters, or legs, if testing is to be conducted on a horizontal support surface, the casters or rollers must be locked to prevent the equipment from rolling during the test.
Ensure that the sample surface has no sharp protrusions or parts that could easily come loose, to prevent damage to equipment or the sample during testing, or to avoid creating safety hazards.
3.2 Preparation of the Test Environment
Ensure that the temperature and humidity of the test environment meet the equipment’s operating requirements and relevant standards, and that there is no significant airflow interference (such as strong winds or direct airflow from air conditioners), to prevent airflow from affecting the stability test results of the samples.
Clear the test area to ensure that the work surface and surrounding area are free of debris, providing a clean and safe environment for conducting the test and placing samples.
Ensure that the power supply for testing is stable and free from excessive voltage fluctuations; if necessary, install a voltage regulator to ensure the equipment operates normally.
4. Stability Test Procedure
4.1 Equipment Commissioning
Turn the handle to adjust the test bench to a level position (the goniometer reads 0°), ensuring the bench is level to provide a stable base for placing the sample.
4.2 Sample Placement
Remove the rubber pad from the test bench. Gently place the pretreated specimen in the center of the test bench surface, ensuring that its center of gravity falls within the surface area and that it is securely positioned with no risk of tipping over; if the specimen has multiple normal operating positions, tests must be conducted for each position individually.
4.3 Angle Adjustment
In accordance with the test standard requirements, adjust the tilt angle of the test stand:
For electrical products intended for use on surfaces such as the floor or a tabletop, other than fixed or handheld appliances, the initial tilt angle is 10° (GB/T 4706.1-2024, Clause 20.1); For appliances equipped with electric heating elements, the test must be repeated with the tilt angle increased to 15°.
ME equipment (medical electrical equipment) must have its work surface adjusted to a 10° angle relative to the horizontal plane (GB 9706.1-2020, Section 9.4.2.1).
During the adjustment process, the tilt angle is monitored in real time using a goniometer to ensure precise adjustment to the target angle.
4.4 Power Cord/Sample Placement
For electrical appliances, position the power cord on an inclined plane in the most unfavorable orientation; If, when the appliance is tilted at 10°, any part of it comes into contact with the horizontal support surface, place the appliance on a horizontal support and tilt it 10° in the most unfavorable direction (GB/T 4706.1-2024, Clause 20.1).
4.5 Start-up Test
After confirming that the sample is properly positioned, the angle is correctly adjusted, and the orientation is correct, turn on the power switch. The turntable will rotate at a speed of approximately 1 revolution per minute.
During the test, closely observe the condition of the sample and record whether it tips over, loses balance, or exhibits other such issues; for electrical products containing heating elements, the temperature rise during the test must also be monitored to ensure it does not exceed the value specified in the standard.(Table 9 referred to in Clause 20.1 of GB/T 4706.1-2024).
If the ME equipment or any of its components exhibits imbalance on a 10° inclined plane, the test is deemed failed (GB 9706.1-2020, Section 9.4.2.1).
4.6 Test Replication (if necessary)
After completing the test at a 10° tilt angle for appliances with live heating elements, increase the tilt angle to 15° and repeat the test according to the steps described above; if the appliance tips over in one or more positions, it must undergo the tests specified in the relevant standards in each tipped-over state.(Chapter 11 referred to in Clause 20.1 of GB/T 4706.1-2024).
If the specimen has multiple normal operating positions or multiple adverse orientations, the position or orientation must be changed one by one, and the test steps described above must be repeated to ensure that the specimen’s stability is fully evaluated.
5. Post-Test Procedures
5.1 Equipment Shutdown
After the test is complete, turn off the power switch on the test bench.
5.2 Sample Preparation
Carefully remove the test specimens from the work surface, inspect them for damage, and proceed with follow-up handling (such as sorting, storage, or submission for testing) in accordance with relevant requirements; for specimens filled with liquid, drain the liquid as specified and clean the specimen surface.
5.3 Resetting the Device
Turn the handle to adjust the test bench to a level position (the goniometer reads 0°).
5.4 Cleanup of the Test Area
Clean the test bench surface and surrounding area, removing any debris, liquids, or other residues left by the samples to keep the area tidy. If testing will not continue that day, return the rubber mat to the test bench.
6. Daily Maintenance and Care of Equipment
6.1 Daily Cleaning
After each test, wipe down the test bench, equipment casings, and other surfaces with a clean, dry cloth to remove dust, stains, and liquid residue, thereby preventing stains from adhering and affecting the equipment’s appearance and performance.
During cleaning, avoid using highly corrosive cleaning agents, solvents, and similar substances to prevent damage to the equipment’s surface coatings and components; never rinse the equipment directly with water to prevent moisture from entering the interior and causing short circuits or malfunctions.
6.2 Periodic Inspections
Turn the handle to adjust the angle, and verify that the angle adjustment mechanism operates smoothly, without any sticking or unusual noises; check that the tabletop rotates smoothly, without any abnormal vibrations or noise.
6.3 Maintenance During Long-Term Idle Periods
If the equipment will not be used for an extended period (more than one month), thoroughly clean it first by wiping it down. After it has dried completely, store it in a dry, well-ventilated area away from direct sunlight to prevent moisture and direct sunlight.
Turn off the device, unplug the power cord, and neatly store the power cord; store the goniometer together with the device to prevent loss.
Power on the equipment once a month, run it for 10 minutes, and check that it is functioning properly to prevent issues such as jamming or rust caused by prolonged inactivity.
When storing the equipment, avoid placing heavy objects on the tabletop to prevent it from warping; you may cover the equipment with a dust cover to prevent dust buildup.
7. Troubleshooting and Resolving Common Problems
7.1 Power-Related Faults
7.1.1 Symptom: The device does not power on, and the power indicator light does not illuminate
Troubleshooting Steps: Check whether the power outlet is live; you can plug in another appliance to test if the outlet is functioning properly. Check whether the power cord is securely plugged in, and inspect the plug and outlet for any looseness or poor contact. Check whether the power cord is damaged or worn out, and whether the internal wiring is broken. Check whether the device’s power switch is damaged; you can use a multimeter to test whether the switch is open or closed.
Troubleshooting: If the outlet has no power, replace it with a working one or check the power supply line; plug the power cord back in firmly to ensure good contact between the plug and the outlet; If the power cord is damaged or worn out, replace it with a cord of the same specifications that complies with national standards; do not attempt to repair or splice the cord yourself. If the power switch is damaged, contact the manufacturer’s customer service to have it replaced; do not attempt to disassemble or repair the switch yourself if you are not a qualified professional.
7.1.2 Symptom: The device frequently loses power after being turned on
Troubleshooting Steps: Check whether the power supply voltage is stable and whether there is low voltage or excessive voltage fluctuation; check whether the equipment is overloaded and whether the sample weight exceeds the rated load of 80 kg.
Solution: If the voltage is unstable, use a voltage stabilizer before operating the equipment; reduce the sample weight to ensure it does not exceed the rated load, and then restart the equipment.
7.2 Faults Related to Angle Adjustment
7.2.1 Symptom: Sticking or unusual noise when turning the handle to adjust the angle
Troubleshooting Steps: Check the angle adjustment mechanism for any foreign objects that may be blocking or entangling it, such as cables or debris; check whether moving parts are lacking lubrication, which could cause increased friction; check the connection points of the angle adjustment mechanism for looseness or deformation, such as loose screws or bent components.
Troubleshooting: Remove any foreign objects and ensure the adjustment mechanism is free of obstructions; apply an appropriate amount of compatible lubricant to moving parts to reduce friction; tighten any loose screws; if any parts are deformed, contact the manufacturer to replace the affected parts—do not force the adjustment.
7.2.2 Symptom: Inaccurate measurements from the goniometer
Troubleshooting Method: Check whether the 0° setting on the goniometer is still accurate.
Solution: Compare the readings using a mechanical protractor. If the 0° position on the electronic protractor is inaccurate, recalibrate it to zero and then use it again. If the measurements remain abnormal after recalibration, the protractor is defective; contact the manufacturer to request a replacement.
7.3 Faults Related to the Rotation Function
7.3.1 Symptom: The tabletop will not rotate
Troubleshooting Steps: Check whether the equipment is powered on and whether the power switch is turned on; check the rotary drive system for any foreign objects causing a jam, such as a sample collision or entangled debris; check whether the drive motor is operating normally, and look for any unusual noises or abnormal overheating.
Troubleshooting: Ensure the device is plugged in and turn on the power switch; remove any foreign objects causing obstruction and ensure the rotating mechanism is unobstructed; if the motor malfunctions, immediately turn off the power, stop using the device, and contact the manufacturer’s after-sales service for repair or motor replacement.
7.3.2 Symptoms: The table rotates unevenly; the speed is abnormal
Troubleshooting Steps: Check whether the work surface is level, whether the unit is placed steadily, and whether it wobbles; check whether the sample is positioned off-center or has an uneven weight distribution, which could cause rotational imbalance; check whether the bearings in the rotating mechanism are worn or loose, which could lead to reduced rotational accuracy.
Solution: Adjust the equipment’s position to ensure the work surface is level and stable; reposition the sample to ensure its center of gravity is centered and the weight is distributed evenly; if the bearings are worn or loose, contact the manufacturer’s technical staff to replace the bearings and tighten the relevant components.