
 English
 中文简体
中文简体 English
 Русский
 Español
 Português
 Türkçe
 العربية
 Deutsch
 Polski
 Italiano
 Français
 한국어
한국어 ไทย
ไทย Tiếng Việt
 日本語
日本語





























Tensile Testing Machine
User's Manual
Applicable LISUN models: PULL-10T、PULL-2000KG、PULL-200KG、PULL-20T、PULL-30T、PULL-5000KG、PULL-500KG、PULL-60T
1. Basic Understanding of the Equipment
1.1 Key Parameters
1.1.1 Model Classification
| Specifications/Model Numbers | PULL-30T | …… | PULL-2000KG | PULL-500KG | PULL-200KG |
| Maximum Tensile Force | 30 metric tons | 2000 kg | 500 kg | 200 kg | |
| Number of Posts | Double-column | Single-post | |||
| Effective width of the test | 400 mm (or customizable according to customer requirements) | 150 mm | |||
| Units of Force | N, KN, Kgf, and Lbf can be freely converted | ||||
| Travel (including fixtures) | 800 mm (or customized to customer specifications) | ||||
| Test Speed | Range: 0.001–500 mm/min (stepless speed control) | ||||
| Scope of Application | Can test the mechanical properties—such as tensile strength, elongation, tear strength, peel strength, shear strength, and adhesive strength—of materials including plastics, hardware, welded parts, electronic components, rubber, and fabrics. | ||||
Note: This manual uses a dual-column testing machine as an example; the operation of a single-column testing machine is the same as that of the dual-column model.
1.1.2 Fixtures
The equipment comes standard with a set of tension clamps. If you need other types of clamps, they can be purchased separately. See Figure 1-1.
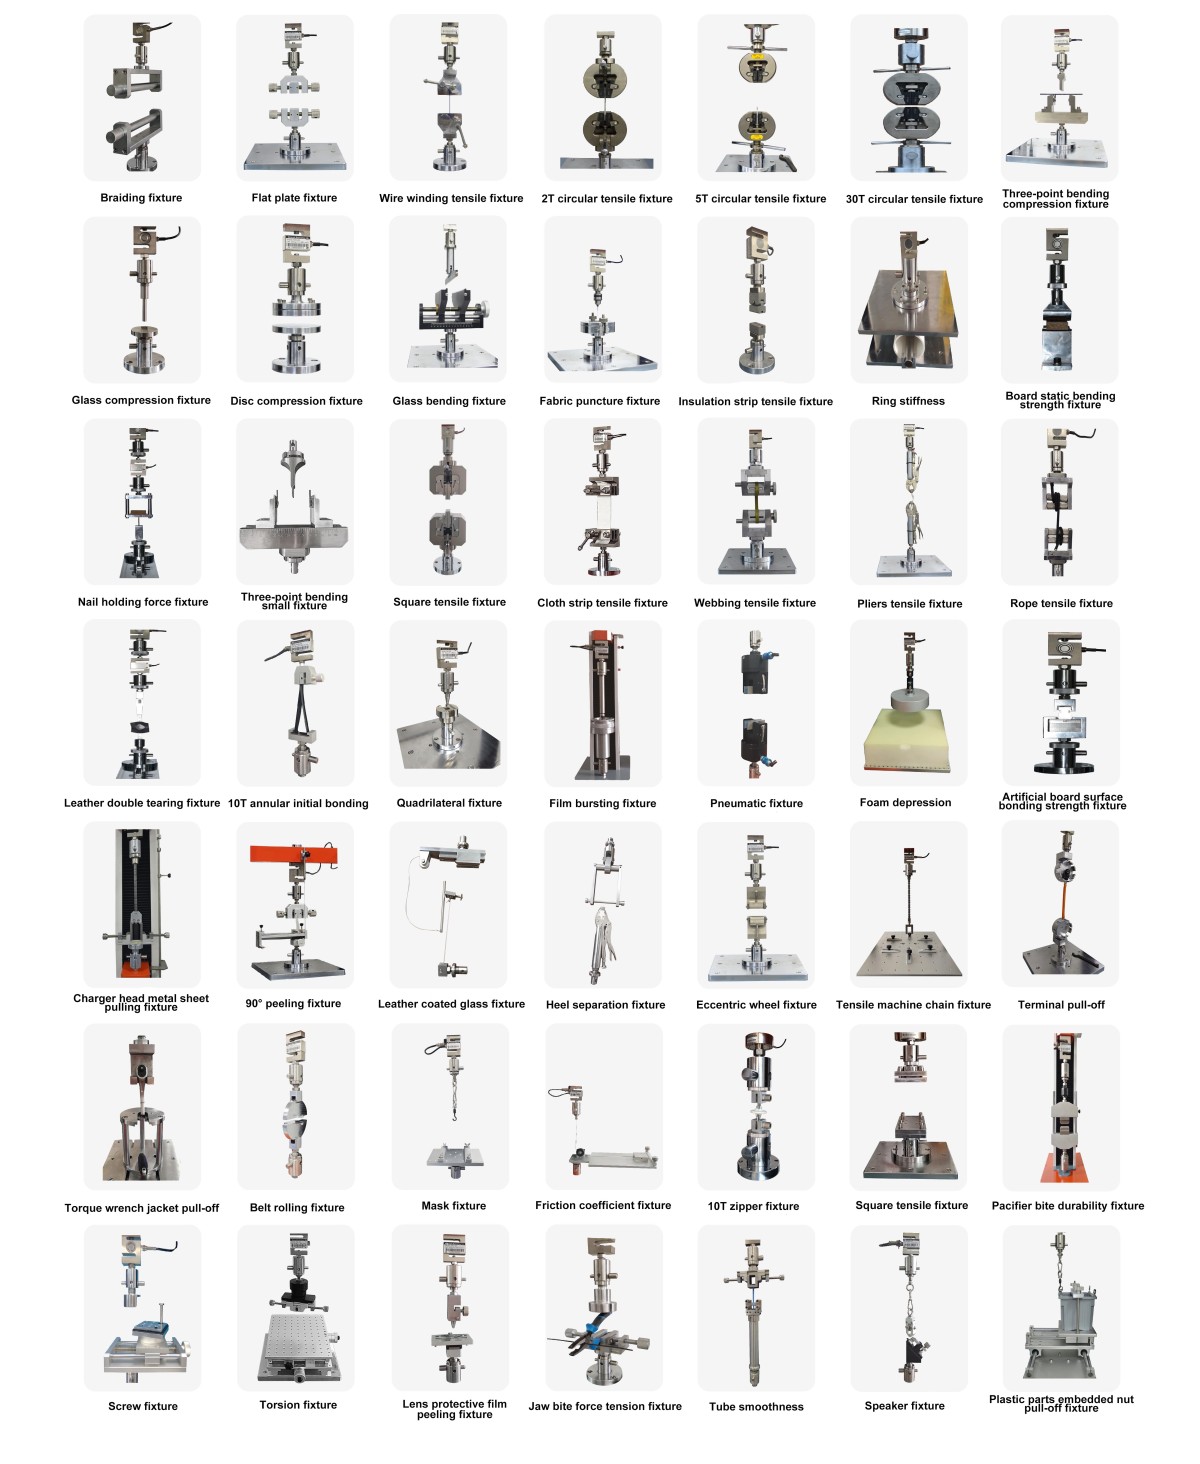
Figure 1-1
1.2 Equipment Configuration Verification
1.2.1 Unpacking
When unpacking the device, handle it gently to avoid scratching the outer casing with sharp tools. After unpacking, first inspect the exterior of the device to ensure there is no obvious deformation or dents, and that the buttons are not damaged or loose. If you notice any abnormalities with the device or its accessories, do not turn it on. Please contact us immediately.
1.2.2 Main Unit and Accessories
| Number | Note |
| ① | PULL Series Tensile Tester Main Unit |
| ② | Power Cord |
| ③ | RS-232 Communication Cable |
| ④ | Computers and Related Accessories |
1.2.3 Downloading Electronic Documents
We have already sent the download links for the electronic user manual, warranty card, and other documents via email at the time of shipment. Please download them as soon as possible. If you missed the email, you can contact us to request the download links again.
2. Safety Precautions
2.1 Electrical Safety
Before connecting the power cord, verify that the supply voltage is AC 220 V ±10% and the frequency is 50 Hz or 60 Hz;
You must use a three-prong outlet with a protective ground, with a protective ground resistance of ≤4Ω. It is strictly prohibited to cut or disconnect the protective ground wire; doing so poses a risk of electric shock.
2.2 Environmental Safety
Do not use in environments with flammable or explosive substances, strong electromagnetic interference, high temperatures and humidity, or excessive dust levels;
Operating Environment: Temperature 5°C to 35°C, relative humidity ≤ 65% RH.
2.3 Operating Procedures
Improper operation may result in personal injury, equipment damage, or compromised test accuracy. Please read this manual and strictly follow the standard testing procedures;
Remove jewelry before performing the procedure, tie back long hair, and do not wear loose-fitting clothing;
During the test, take precautions to prevent test specimen fragments from flying and causing injury;
During the test, do not extend your hands or tools into the fixture’s stroke;
Operators must not leave their posts without authorization while the equipment is in operation; in the event of an abnormality, immediately activate the emergency stop;
Do not perform tests that exceed the load capacity or stroke limit, and do not use damaged or non-standard fixtures.
2.4 Other
For matters not covered in this manual, please proceed with caution or contact us.
3. Equipment Overview and Wiring
3.1 Front View of the Testing Machine
See Figure 3-1.
| Number | Note |
| ① | Power Switch |
| ② | One set of standard tension clamps |
| ③ | Emergency Stop Button |
| ④ | Control Panel |
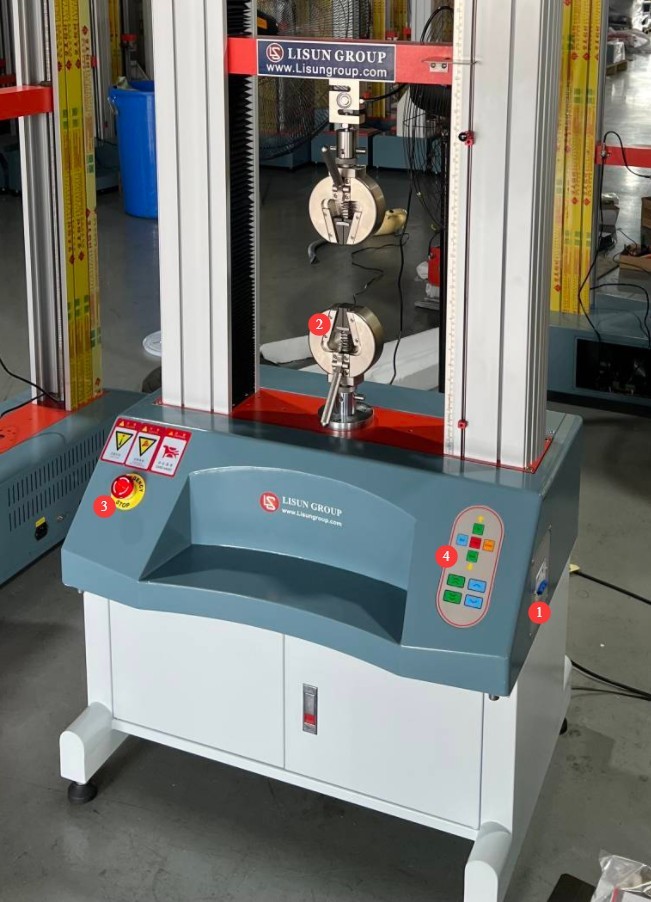
Figure 3-1
3.2 Rear View of the Testing Machine and Wiring
See Figure 3-2.
| Number | Note |
| ① | Connect the power cord to connect the device to an appropriate power source |
| ② | Connect the RS232 communication cable, with the other end connected to the corresponding computer. |
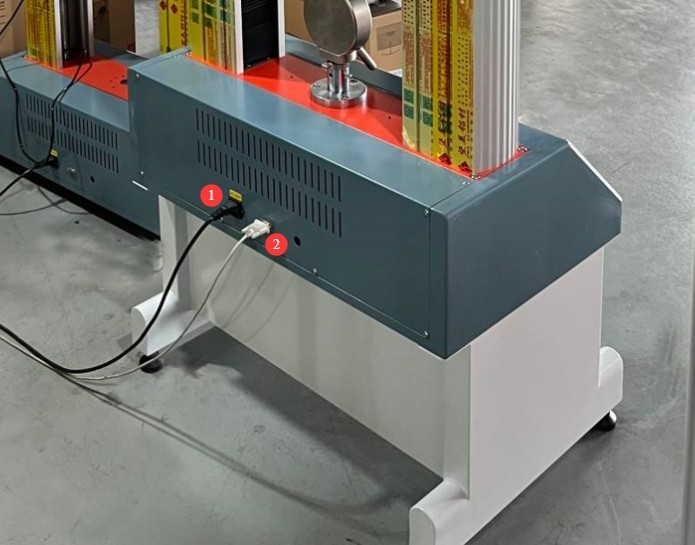
Figure 3-2
4. Tensile Test Procedure
4.1 Sample Preparation
4.1.1 Specimen Preparation and Measurement
Take the standard tensile test setup as an example. Use a dumbbell cutter to cut the test specimen and measure its dimensions.
See Figure 4-1 for the specimen width.
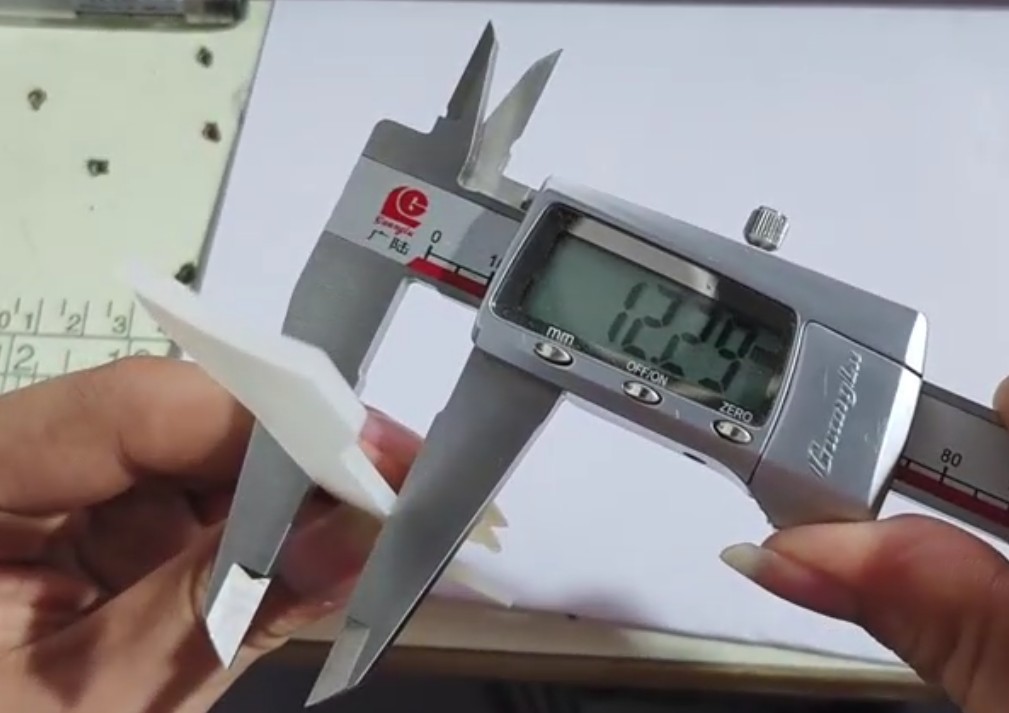
Figure 4-1
See Figure 4-2 for the specimen thickness.
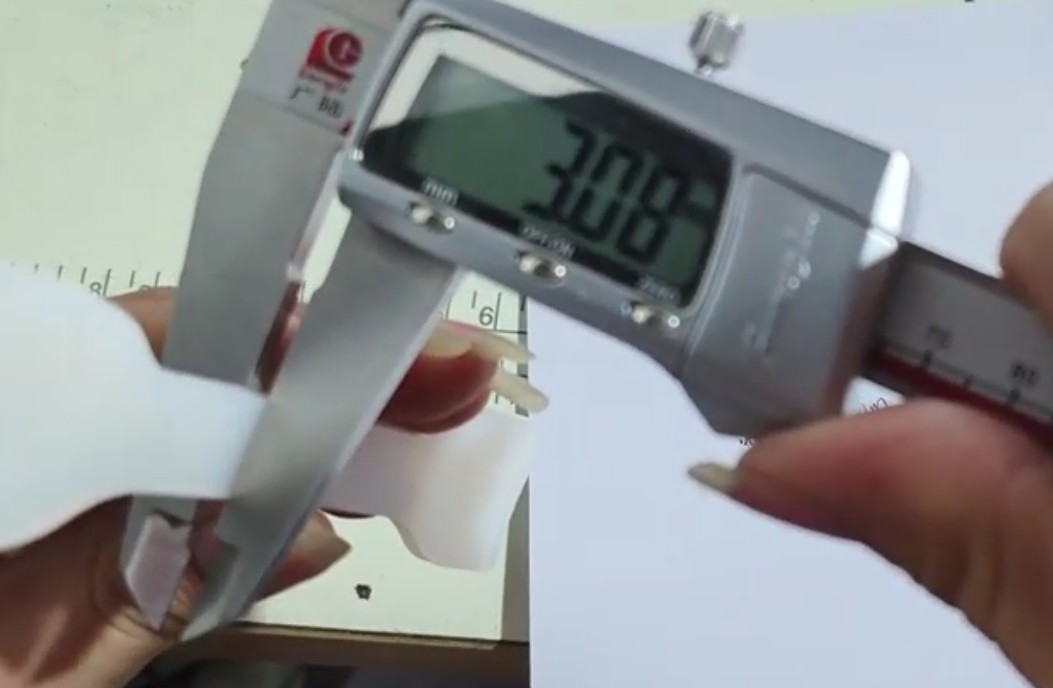
Figure 4-2
Specimen gauge length; see Figure 4-3.
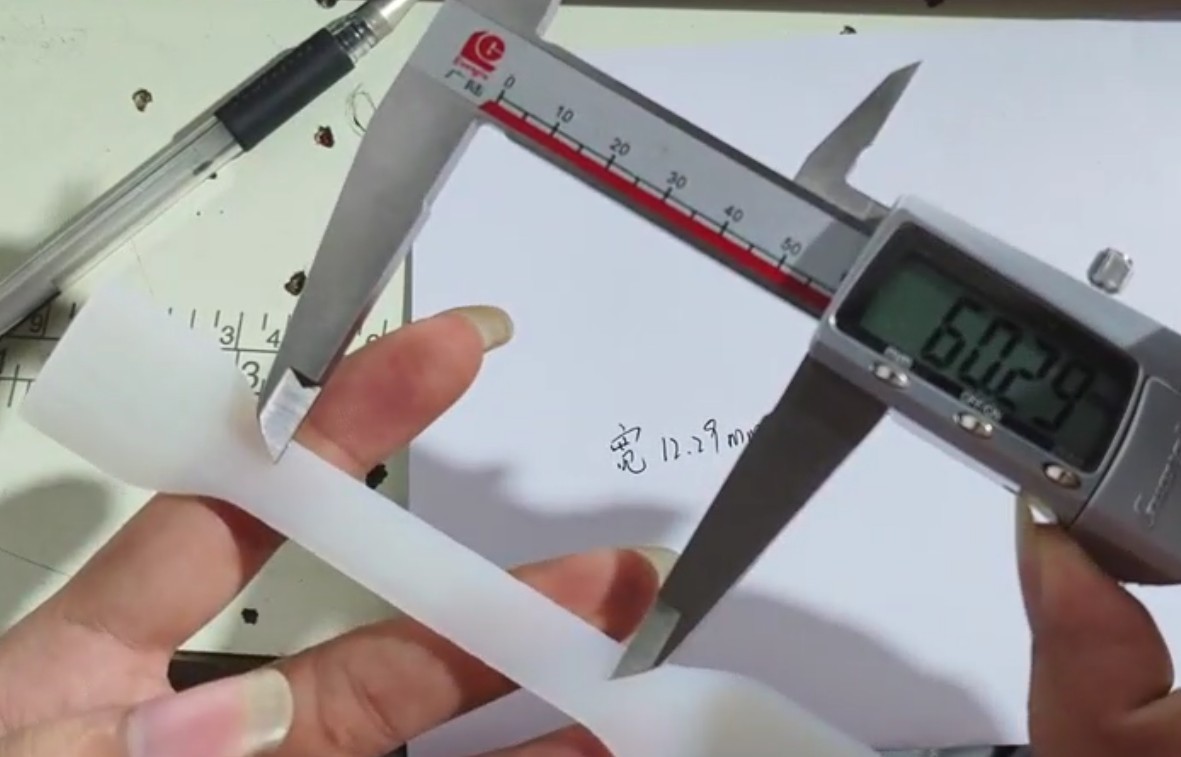
Figure 4-3
4.1.2 Installation and Securing of Test Specimens
The five buttons in the upper half of the equipment control panel (Up, Down, Run, Stop, Clear) (Figure 4-4) have the same functions as the five buttons in the upper right half of the software (Up, Down, Start Test, Stop, Clear) (Figure 4-5).
The four buttons on the lower half of the equipment control panel (Fig. 4-4) have the same functions as the corresponding buttons on the right side of the software (Inch Up, Inch Down) (Fig. 4-5).
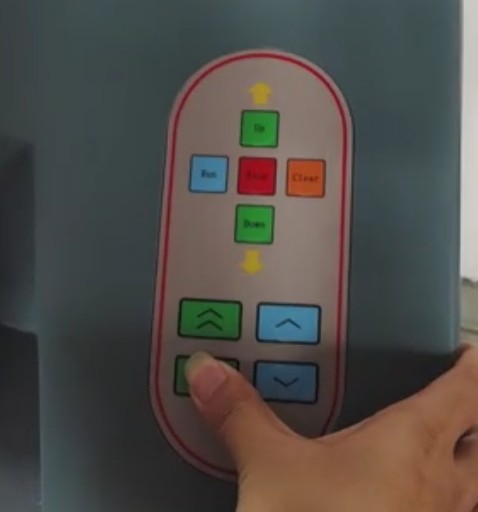
Figure 4-4
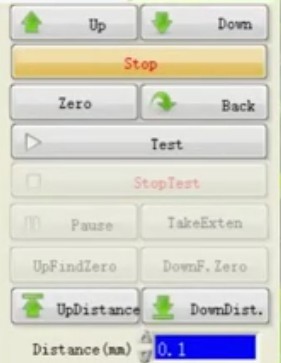
Figures 4–5
Use the jog function to move the fixture to the appropriate position, install the specimen, and secure it with the fixture, as shown in Figures 4–6.
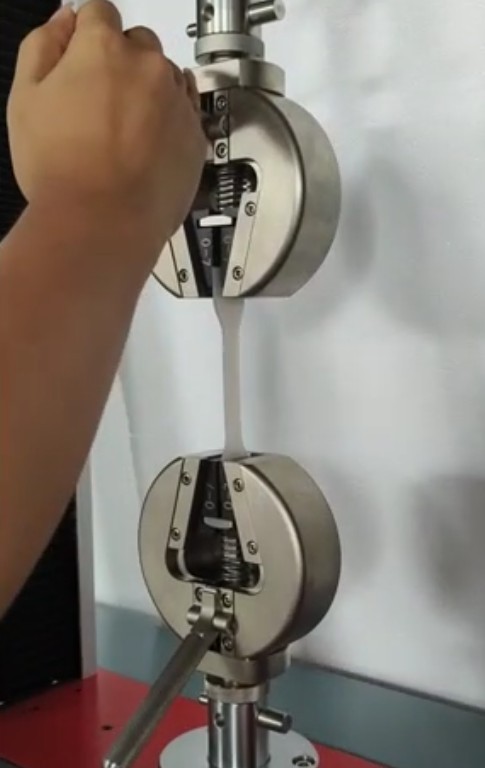
Figures 4–6
4.2 Software Debugging
4.2.1 Edit Specimen Information
Click “Edit,” as shown in Figure 4-7.
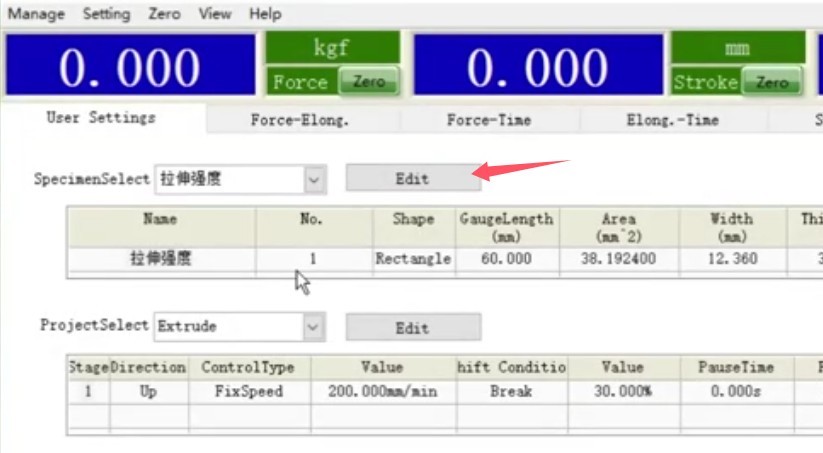
Figures 4–7
Based on the actual specimen information in Section 4.1.1, select or enter the specimen shape, gage length, width, and thickness, as shown in Figure 4-8. Refer to industry standards; if you need to enter other information, such as area or fillet radius, simply enter it in the corresponding fields.
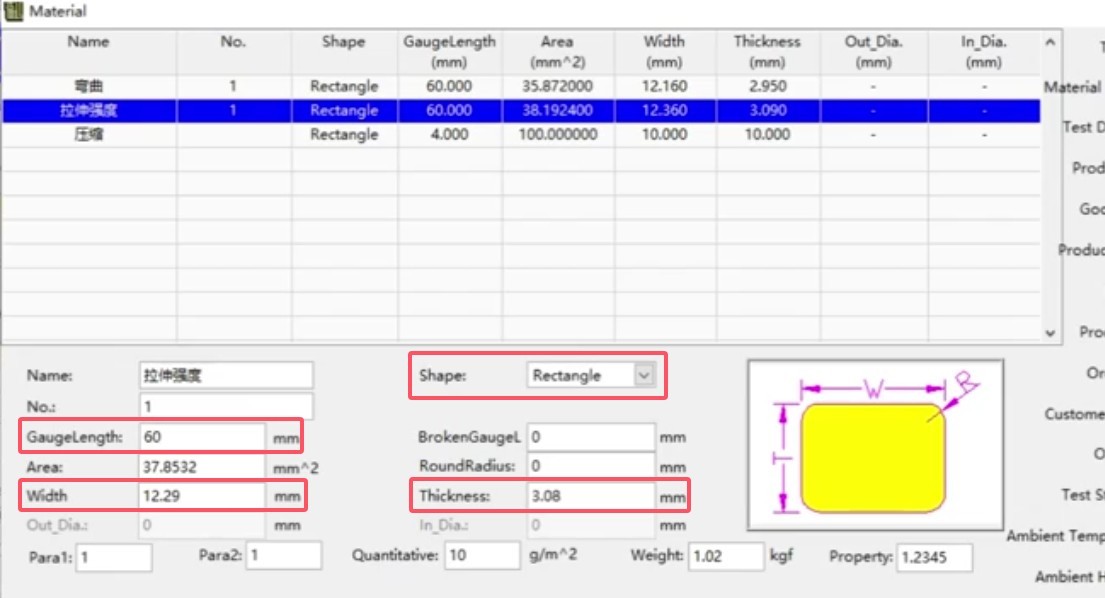
Figure 4-8
4.2.2 Modifying Test Parameters
Click “Edit,” as shown in Figure 4-9.
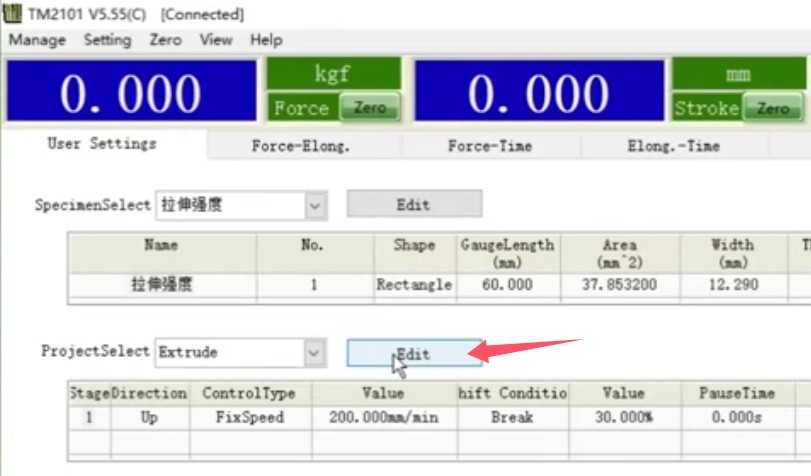
Figure 4-9
Select “Tensile,” set the test direction to “Up,” set the test speed, and for the test termination condition, generally select “Failure”; you can also choose to have the test end automatically upon failure.
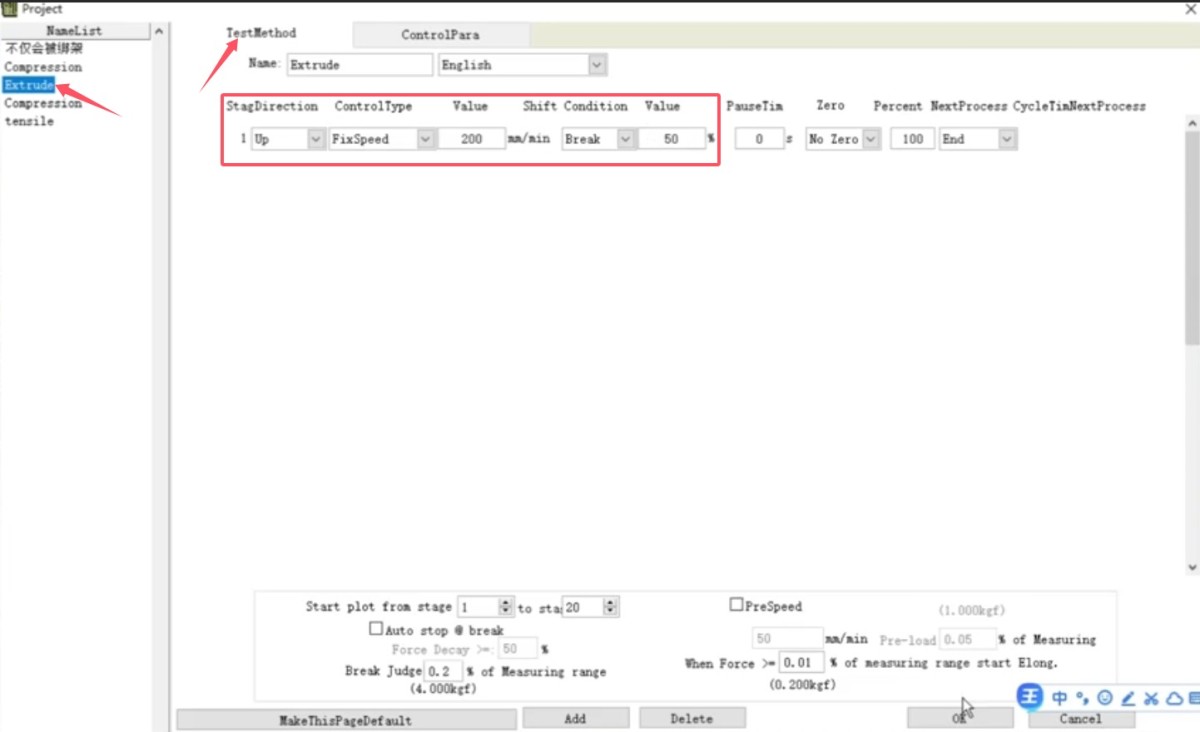
Figure 4-10
4.3 Tensile Test Procedure
4.3.1 Start-up Test
Click “Start Test,” as shown in Figure 4-11.
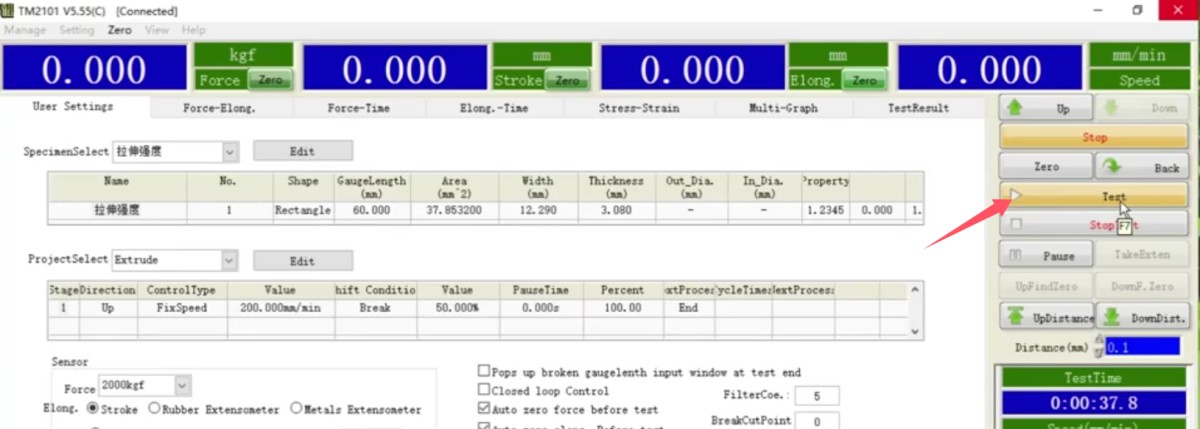
Figure 4-11
4.3.2 End of the Test
The test ends automatically when the specimen breaks or the tensile stroke reaches its upper limit. Click “Save” to save the test data. Figure 4-12 shows the real-time data recording at the moment the specimen breaks.
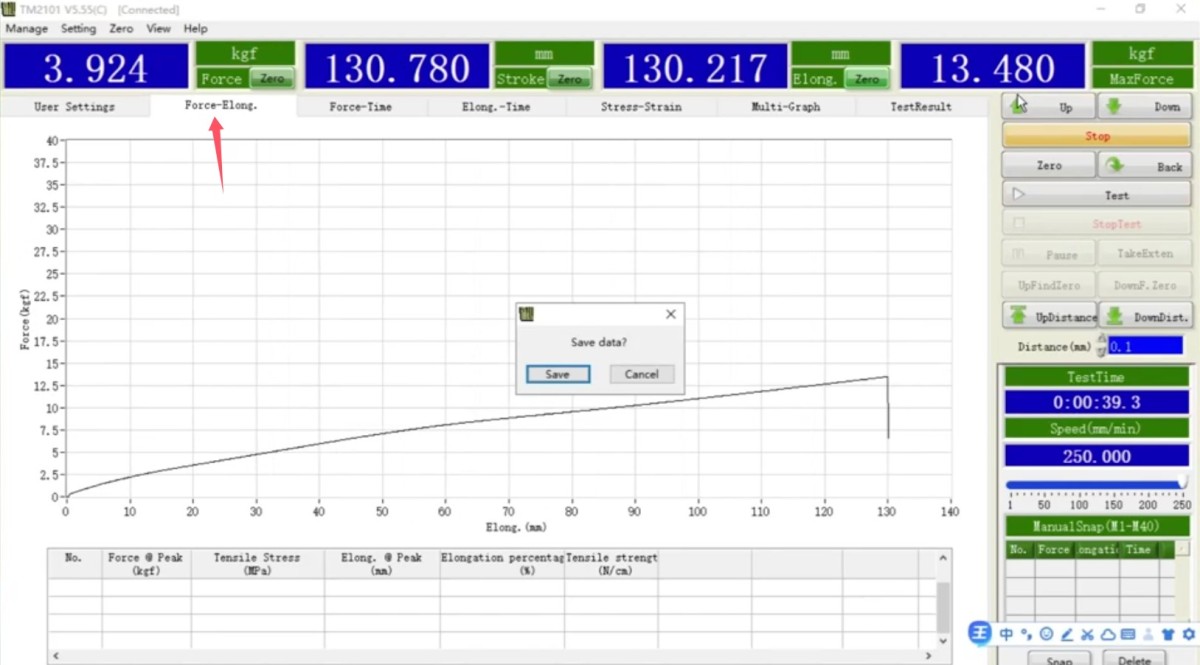
Figure 4-12
4.4 Exporting Test Data
To view and export tensile test data, see Figure 4-13.
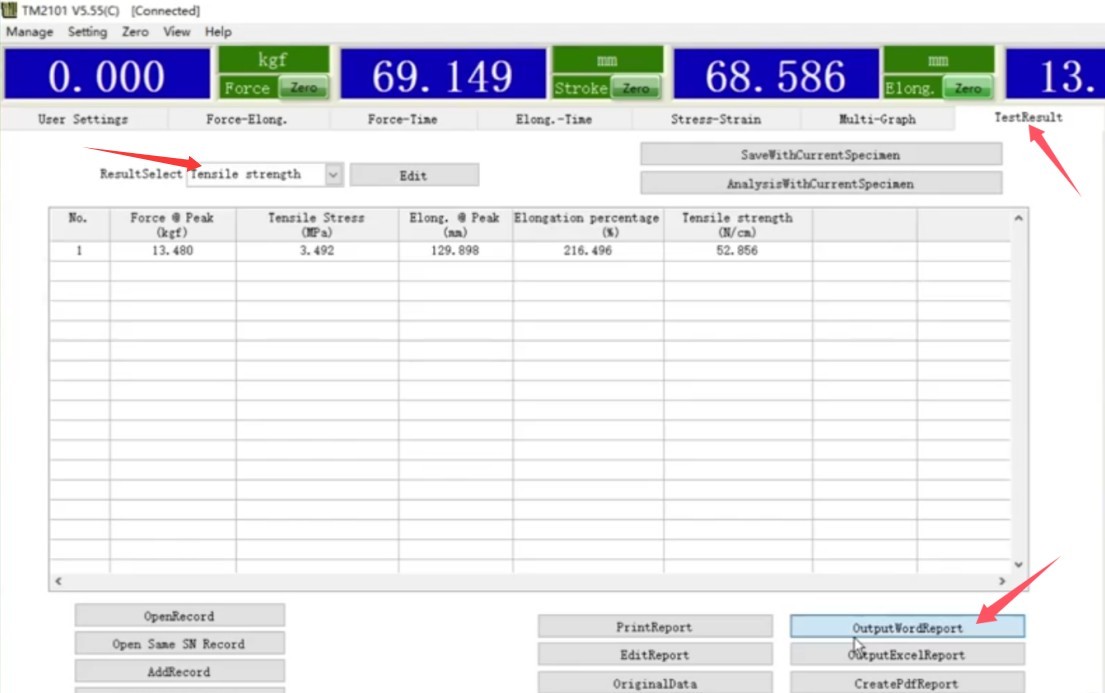
Figure 4-13
5. Post-Test Procedures
5.1 Test Termination and Equipment Reset
Click “Return” in the software to return the fixture to its initial position; confirm that the equipment has come to a complete stop and is free of vibration and abnormal noises.
5.2 Cleaning of Specimens and Fixtures
Remove the broken specimen and store it separately; wipe the testing fixture with a clean cloth to remove debris and dust; check that the jaws of the fixture show no signs of wear or deformation.
5.3 Normal Shutdown Procedure
Close the software and shut down the computer’s operating system; turn off the device’s power switch; unplug the power cord (if the device will not be used for an extended period).
6. Routine Maintenance and Care of Equipment
6.1 Routine Maintenance
Wipe down the machine, fixtures, and columns to keep the equipment clean; check that the power supply, communication cables, and emergency stop buttons are functioning properly; verify that the fixtures are secure and that the limit switches are not misaligned.
Apply special lubricating oil to the columns and drive screws to ensure smooth lubrication; check the clamping screws and crossbeam mounting screws, and retighten them.
6.2 Storage Specifications
6.2.1 Storage Environment Requirements
Temperature: 5°C to 35°C; relative humidity: ≤65% RH; dry, dust-free environment free of corrosive gases.
6.2.2 Long-Term Storage Operations
Turn off the power and unplug all cables; clean the equipment and wrap it in dust-proof film; turn on the power for 30 minutes each month to prevent moisture damage to the components.
6.3 Calibration Interval Requirements
To ensure the measurement accuracy and operational reliability of the equipment, it is recommended that it be sent periodically to a qualified third-party metrology laboratory for calibration. The recommended calibration interval is 12 months. Users may determine the specific calibration interval based on frequency of use, environmental conditions, and quality system requirements.
7. Troubleshooting and Resolving Common Problems
| Fault Symptoms | Possible Causes | Procedure |
| The device does not respond when powered on | The emergency stop knob has not been reset | Reset the emergency stop knob and try again. |
| The fixture does not move up or down | Limit Switch Triggered | Check and Adjust the Limit Switches |
| Force and displacement values are displayed incorrectly | Not reset to zero | Click to reset and try again |
| The machine stops as soon as the specimen is loaded. | The fracture trigger threshold is too low | Retry after increasing the break trigger threshold |