
 English
 中文简体
中文简体 English
 Русский
 Español
 Português
 Türkçe
 العربية
 Deutsch
 Polski
 Italiano
 Français
 한국어
한국어 ไทย
ไทย Tiếng Việt
 日本語
日本語





























Illuminance Meter
User's Manual
Applicable LISUN models: PHOTO-200、PHOTO-200B、PHOTO-200DLI、PHOTO-200IR、PHOTO-200IRZ、PHOTO-200L、PHOTO-200P、PHOTO-200R、PHOTO-200UV、PHOTO-200UVZ
1. Unboxing and Basic Familiarization with the Equipment
1.1 Key Technical Specifications
1.1.1 Specifications and Parameters
| Probe Accuracy | Class A (±4% of reading ±1 reading) |
| Measurement Repeatability | ±0.5% |
| Display Options | Touchscreen (can be expanded to include PCs and mobile apps) |
| Screen Size | 1.54-inch IPS HD LCD touchscreen |
| Screen Display | Can rotate 180° |
| Charging Port | Type-C |
| Power Supply Method | 1600mA Lithium-Ion Battery |
| Continuous operating time | It lasts about 12 hours on a single charge. |
| Product Dimensions | 65 mm × 60 mm × 60 mm |
| Product Weight | Aluminum alloy body, 100 g |
| Secondary Development | Support |
1.1.2 Product Selection
| LISUN Model | Name | Measurable Parameters and Specifications |
| PHOTO-200 | Pocket Illuminance Meter | Illuminance (lx) (380–780 nm) Test Range: 0.1–500000 lx (+/-0.1 lx), Upper and Lower Limit Settings, Sorting Test, Photometric Response Curve (PC Software), Illuminance, Average Illuminance, Maximum Illuminance, Minimum Illuminance, Integral Illuminance, Transmittance (%) |
| PHOTO-200L | Luminance Meter | Luminance (cd/m²) (380–780 nm) Test Range: 0.1–500000 cd/m² (+/-0.1 cd/m²), Upper and Lower Limit Settings, Sorting Test, Photometric Variation Curve (PC Software), Luminance, Average Luminance, Maximum Luminance, Minimum Luminance, Integral Luminance, Luminance Transmittance (%) |
| PHOTO-200P | Optical Quantum Meter | Illuminance (lx), PPFD (μmol/m².s) (400–700 nm) Test Range: 0.1–500000 μmol/m².s (+/-0.01 μmol/m².s), Upper and Lower Limit Settings, Sorting Test, Photometric Response Curve (PC Software), PPFD, Average PPFD, Maximum PPFD, Minimum PPFD, Energy, Transmittance (%), Test Duration |
| PHOTO-200DLI | Cumulative DLI per Photosynthetic Day | PPFD, umol/m².s (400–700 nm) Measurement range: 0.1–500000 umol/m².s (+/-0.01 umol/m².s); Total effective radiation, umol/m².d |
| PHOTO-200B | Blue Light Radiometer | Irradiance (μW/cm²) (Peak: 460 nm) Measurement Range: 0.1–200000 μW/cm² (+/-0.1 μW/cm²), Upper and lower limit settings, sorting test, photometric response curve (PC software), irradiance, average irradiance, maximum irradiance, minimum irradiance, blue light energy (μJ/cm²), irradiance transmittance ratio (%), test duration |
| PHOTO-200UV | Ultraviolet irradiance | Irradiance (μW/cm² at 222 nm, 254 nm, or 365 nm) Test Range: 0.1–500000 μW/cm² (+/-0.01 μW/cm²), Upper and lower limit settings, sorting test, photometric response curve (PC software), irradiance, average irradiance, maximum irradiance, minimum irradiance, UV energy, irradiance transmittance (%), test time |
| PHOTO-200UVZ | Multiband Ultraviolet Irradiance | Irradiance μW/cm² (switchable between 254 nm and 365 nm bands, etc.) Test range: 0.1–500000 μW/cm² (+/-0.01 μW/cm²), Upper and lower limit settings, sorting test, photometric response curve (PC software), irradiance, average irradiance, maximum irradiance, minimum irradiance, UV energy, irradiance transmittance ratio (%), test duration |
| PHOTO-200R | Red Light Radiometer | Irradiance (μW/cm²) (Peak: 650 nm) Measurement Range: 0.1–200000 μW/cm² (+/-0.1 μW/cm²), Upper and lower limit settings, sorting test, photometric response curve (PC software), irradiance, average irradiance, maximum irradiance, minimum irradiance, red light energy μJ/cm², irradiance transmittance ratio (%), test duration |
| PHOTO-200IR | Infrared Irradiance | Irradiance (μW/cm² at 850 nm or 940 nm) measurement range: 0.1–500000 μW/cm² (+/-0.01 μW/cm²) |
| PHOTO-200IRZ | Infrared Multi-Band Irradiance | Irradiance (μW/cm²) (850 nm and 940 nm) measurement range: 0.1–500000 μW/cm² (+/-0.01 μW/cm²) |
1.2 Unboxing and Checking the Contents
1.2.1 Unpacking and Visual Inspection
When unpacking the device, handle it gently and avoid using sharp tools that could scratch the outer casing. After unpacking, first inspect the exterior of the device to ensure there is no visible deformation or dents, and that the buttons are not damaged or loose. If you notice any abnormalities with the device or its accessories, do not turn it on. Please contact us immediately.
1.2.2 Main Unit and Accessories
| Number | Note |
| ① | Packaging Boxes |
| ② | USB Charging Cable |
| ③ | Plastic Bags |
| ④ | PHOTO-200 Unit |
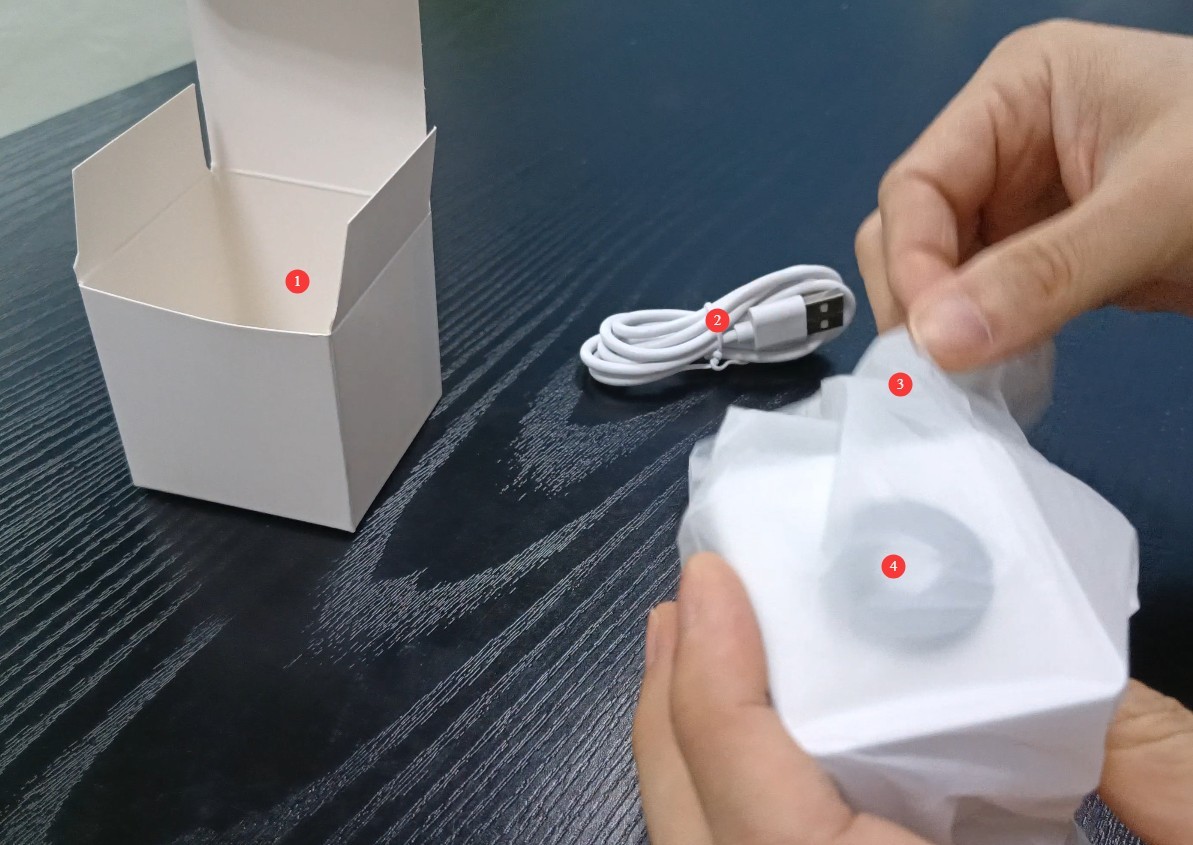
Figure 1
Download links for the electronic user manual, software, warranty card, and other materials have been sent via email. Please download them as soon as possible. If you missed the email, please feel free to contact us to request the download links again.
2. Safety Precautions
2.1 Environmental Safety
Do not use the equipment in environments that are flammable, explosive, high-temperature, high-humidity, high-pressure, or dusty, to prevent short circuits, corrosion, or performance failures.
Avoid placing the device in direct sunlight to prevent screen deterioration and overheating of internal components.
Stay away from environments with strong magnetic or electric fields (such as large Voltage Transformers or microwave ovens) to avoid interfering with the accuracy of the test data.
2.2 Operational Standards
This device contains glass optical components and a touchscreen. Handle it with care during use; do not drop or crush it to prevent the screen from cracking or the optical components from being damaged.
When the probe is aimed at the light source being measured, avoid looking directly at bright light sources, especially ultraviolet light sources, to prevent eye injury.
To ensure accurate test results, maintain a reasonable and consistent distance from the light source during testing to avoid interference from stray light. If necessary, conduct the test in a darkroom.
Please use the standard USB cable to connect the device; using other USB cables may cause charging issues.
2.3 Power Supply and Battery Safety
The built-in lithium-ion battery has a capacity of 1600 mAh. Please note: Using a high-current fast-charging power adapter may damage the battery.
Do not use the device for extended periods when the battery level is below 15 percent. When using the device for the first time, be sure to charge it promptly when the battery level reaches 15 percent. Do not charge the battery after it has been severely discharged, as this may shorten its lifespan.
Ensure the area is well-ventilated while charging, keep the charger away from flammable materials, and unplug it promptly after charging is complete.
If the device will not be used for an extended period, fully charge it first, and then top it up every three months to prevent the battery from becoming damaged due to discharge.
2.4 Maintenance and Calibration Standards
Unauthorized personnel are strictly prohibited from opening the case for repairs, to prevent further damage or personal injury.
To calibrate the equipment, please send it to a laboratory accredited for spectral and photometric calibration, or return it to us. We recommend calibrating the equipment once a year.
2.5 Other
For matters not covered in this manual, please proceed with caution or contact us.
3. Operating the PHOTO-200 Device
3.1 Overview of Appearance and Features
3.1.1 Equipment Appearance
| Number | Note |
| ① | Touchscreen |
| ② | Touchscreen control buttons, from left to right: Continuous Test, Single Test, Stop Test, Settings |
| ③ | Type-C charging and data port—please use the original USB cable |
| ④ | Power button—press and hold to turn the device on or off |
| ⑤ | Luminance Probe |
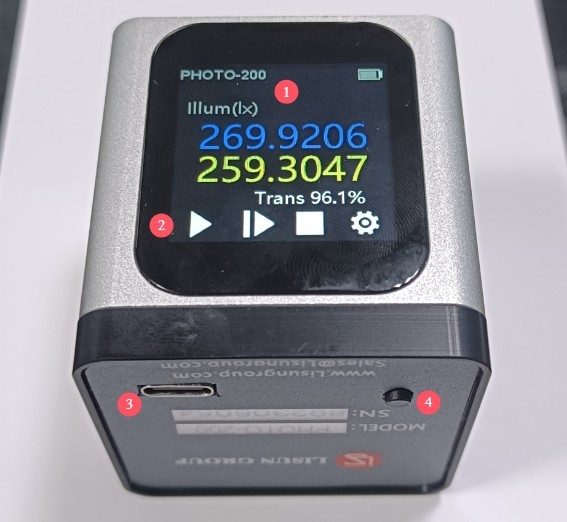
Figure 2
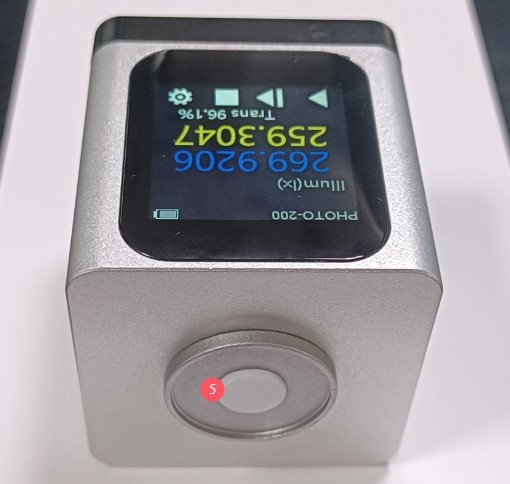
Figure 3
Note: The PHOTO-200L luminance meter looks as shown in the figure below.
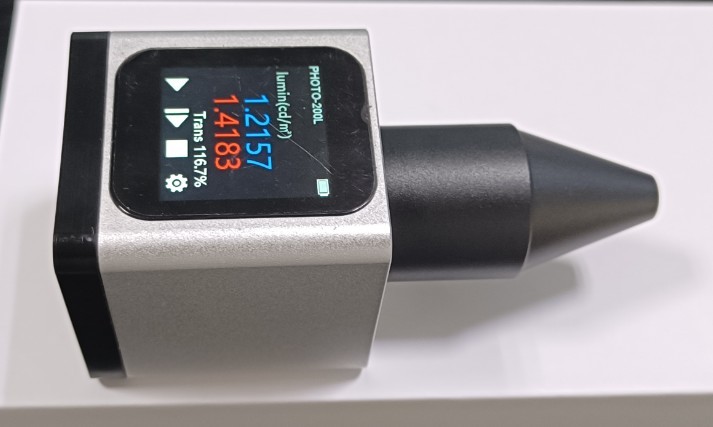
Figure 4
3.1.2 Recommended Test Methods
All photometric data, except for luminance, is dependent on distance. For example, if you need to measure the illuminance of a light fixture at a specific distance, position the probe directly in front of the light-emitting surface of the fixture and maintain a fixed distance; as the distance changes, the illuminance value will also change. To avoid interference from other light sources, you can move to a darkroom for testing.
If you need to test the photometric and colorimetric parameters at a specific location and orientation indoors or outdoors, place the probe at the corresponding location, adjust it to the corresponding orientation, and then tap “Test.”
Brightness measurements are independent of distance; the PHOTO-200L is typically used to measure the brightness of displays and other similar devices. When using the PHOTO-200L brightness meter, to avoid the influence of stray light, place the black sleeve at the front of the probe in close contact with the object being measured to obtain accurate brightness readings. See the figure below.
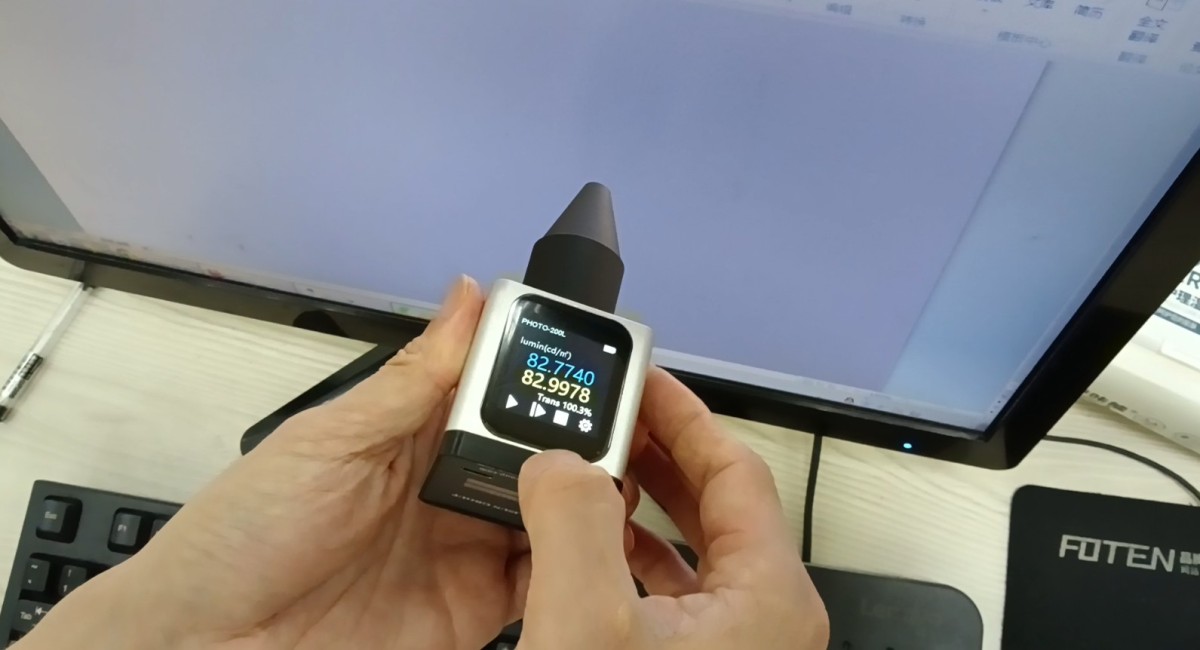
Figure 7
3.2 Testing
3.2.1 Standard Single-Test Procedure
During a single test, the touchscreen displays the data from the two most recent tests: the top entry shows the data from the previous test, and the bottom entry shows the data from the current test. The percentage in the lower-right corner represents the ratio of the two sets of data (current test data / previous test data × 100%). This allows you to perform a transmittance test.
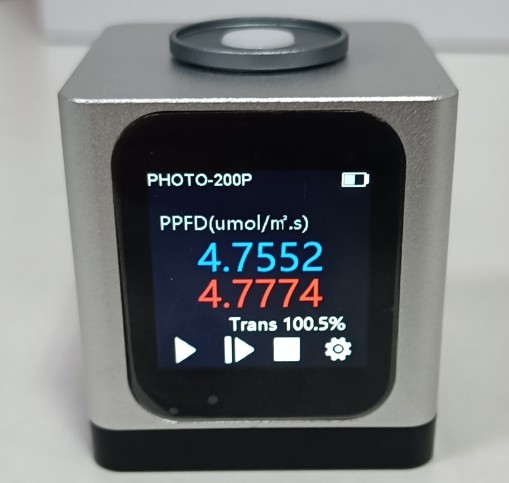
Figure 5
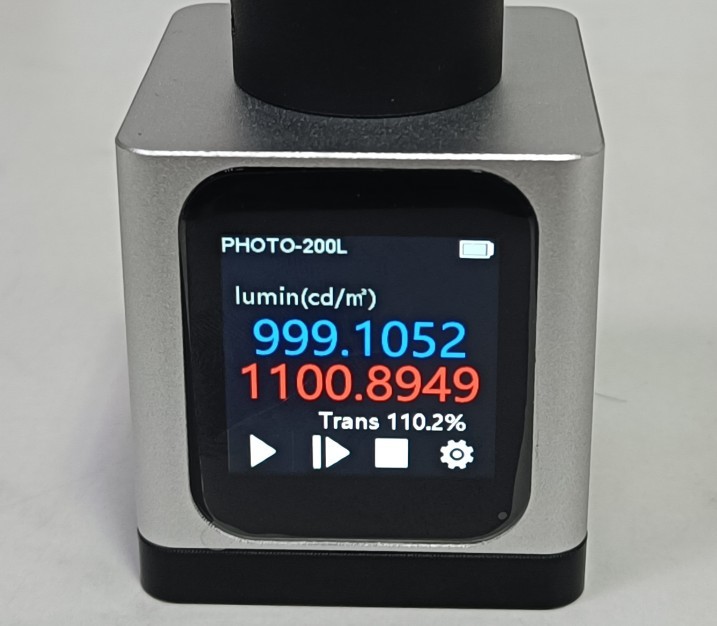
Figure 6
3.2.2 Continuous Testing
During continuous testing, the screen displays the maximum, minimum, and average values, as well as the test duration. See the figure below.
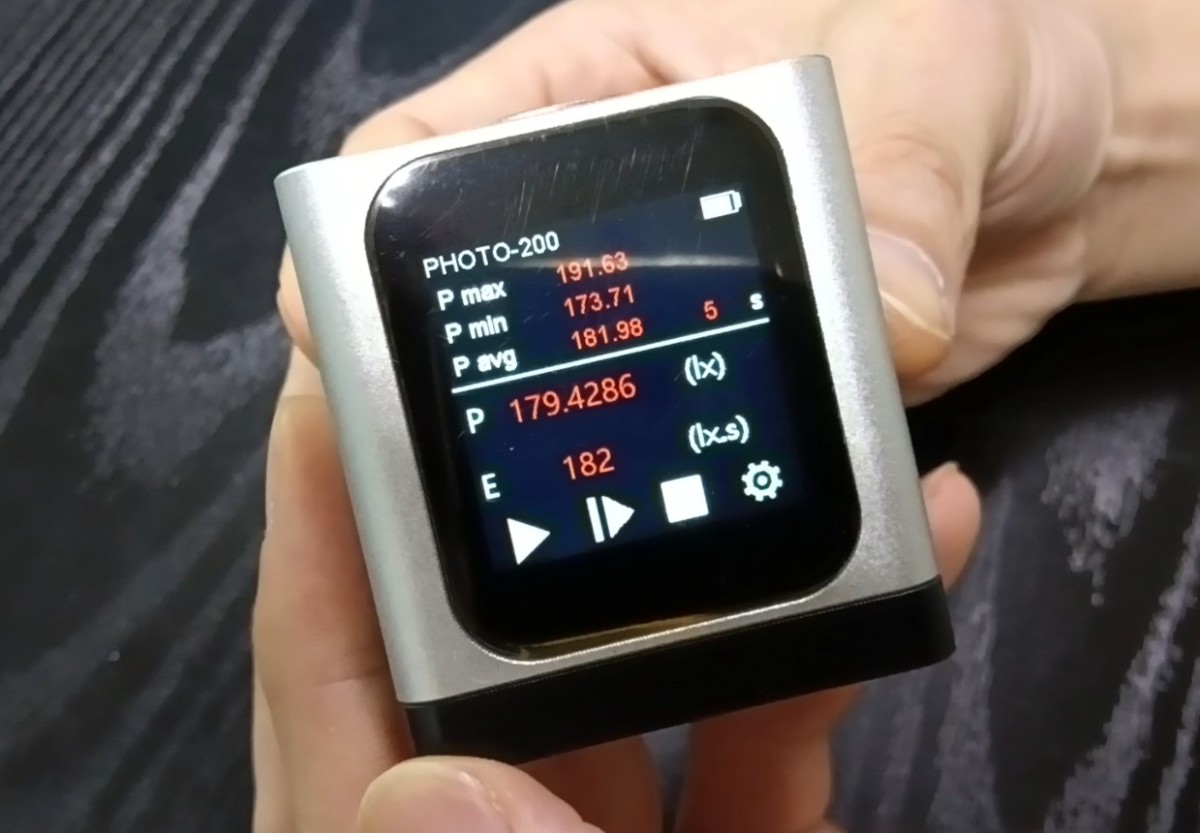
Figure 8
3.3 Settings Interface
| Number | Note |
| ① | Calibration: If calibration is required, please contact a third-party laboratory or return the device to us for calibration. |
| ② | System Settings |
| ③ | Device Version Information |
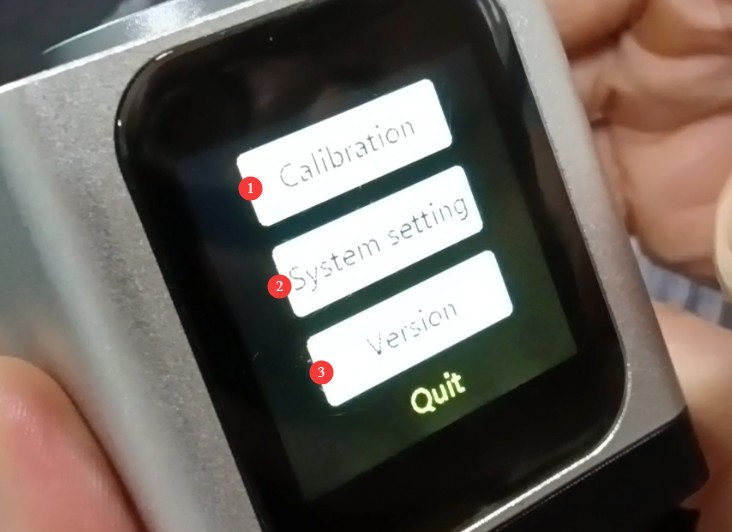
Figure 9
Click to go to the “System Settings” screen.
| Number | Note |
| ① | System Parameter Settings |
| ② | Limit Settings: You can set upper and lower limits |
| ③ | Adjust the system settings; they have been configured prior to shipment, so please do not modify them. |
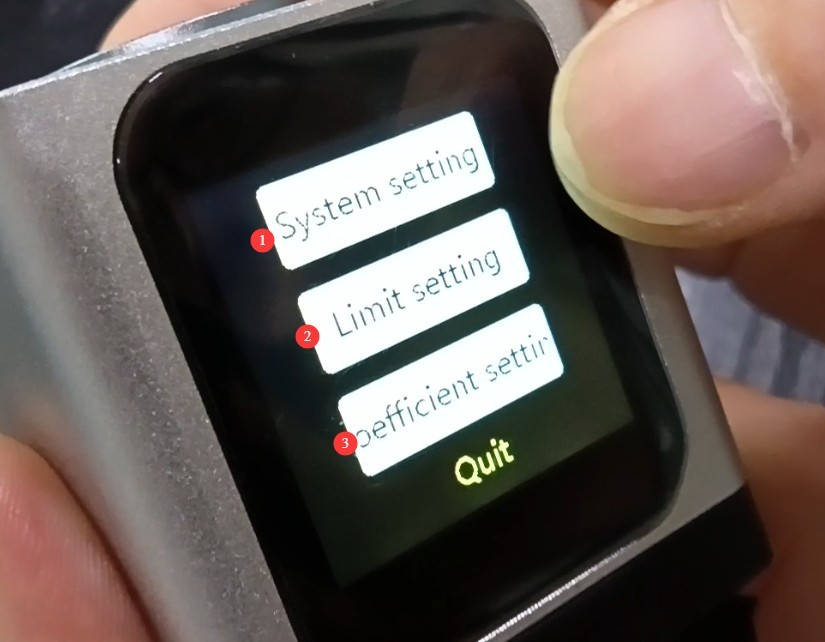
Figure 10
Click to open the “System Parameter Settings” screen.
| Number | Note |
| ① | Language Switch: Switch the display language between Chinese and English |
| ② | Test parameter settings—no changes required |
| ③ | The blue switch—its functionality is not yet fully developed—does not need to be turned on for now. |
| ④ | Screen Rotation: If checked, the screen display will rotate 180°, and the test will be performed with the orientation probe facing down. |
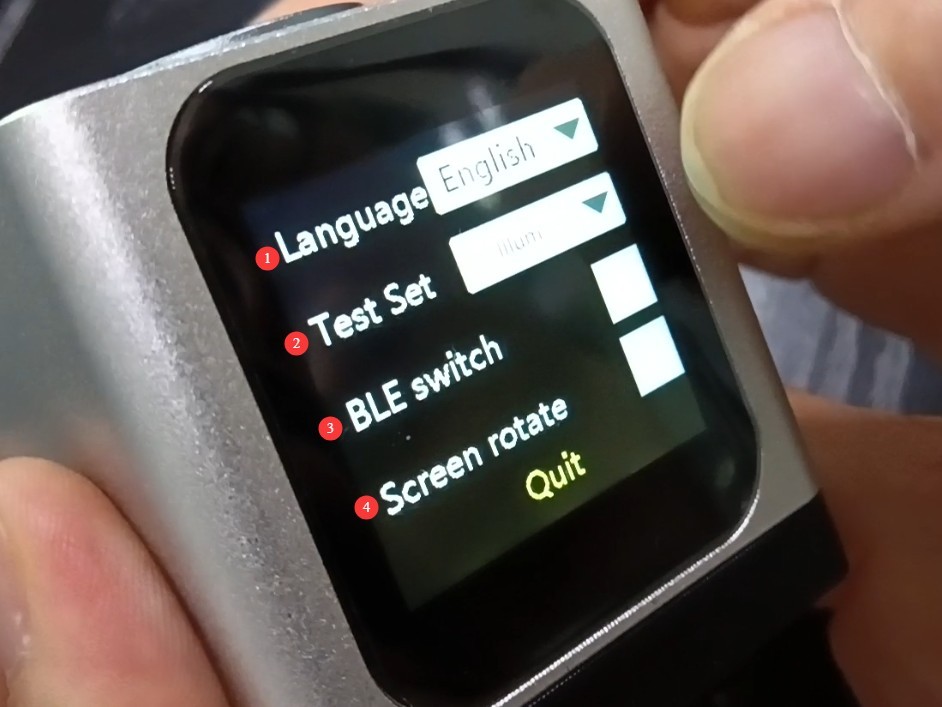
Figure 11
4. Daily Maintenance and Care of Equipment
4.1 Cleaning and Maintenance
Cleaning the Unit: Use a dry, soft cotton cloth to wipe dust from the surface of the unit. If there are stains, dip the cloth in a small amount of anhydrous ethanol and gently wipe the area, then dry it with a clean, dry cloth. Never rinse the unit directly with water or use corrosive cleaning agents;
Cleaning the Touchscreen: Gently wipe the screen with a clean microfiber cloth. Avoid using sharp objects (such as fingernails or pen tips) that could scratch the screen;
Probe Cleaning: If there is dust or dirt on the surface of the optical probe, use a blower to remove it, or gently wipe it with a lens-cleaning cloth. Never touch the probe’s sensing surface with your hands to prevent fingerprints from affecting measurement accuracy.
4.2 Battery Maintenance
Charging and Maintenance: Follow the “charge and discharge in small increments” principle to avoid overcharging or over-discharging the battery. Unplug the power source immediately after reaching 100% charge, and do not use the device continuously for more than 8 hours at a time (if extended testing is required, you may connect it to a power source);
Long-term storage: If the device will not be used for an extended period (more than one month), fully charge the battery first, then store it in a dry, sealed box. Recharge the battery once every three months to prevent battery degradation;
Battery Replacement: If you notice a significant decrease in battery life, please contact us to have the battery replaced with an original battery. Do not attempt to disassemble the device yourself or replace the battery with a non-original one.
4.3 Probe Maintenance
Probe Protection: Avoid bumping or crushing the probe during measurement to prevent damage;
Regular Calibration: We recommend having the device professionally calibrated once a year to ensure measurement accuracy. You may contact a third-party laboratory or return the device to us for calibration.
5. Troubleshooting and Resolving Common Problems
5.1 The device won’t turn on
Possible causes: The battery is dead, or the battery is damaged;
Troubleshooting: First, connect the device to the original charger and let it charge for 30 minutes, then try turning it on again. If it still won’t turn on, the battery may be damaged. Please contact us to have it replaced with an original battery.
5.2 Inaccurate Test Data
Possible causes: contaminated probe, stray light interference in the test environment, uncalibrated probe, or improper test distance;
Troubleshooting: Clean the probe’s sensing surface to remove contaminants such as dust and fingerprints; move to a darkroom or an environment free of stray light to retest (especially for illuminance and UV irradiance tests); Check the equipment’s calibration schedule; if it has not been calibrated for over one year, professional calibration is required; adjust the test distance to ensure the distance between the probe and the light source meets test requirements (see Chapter 3); for the PHOTO-200L, the probe must be in close contact with the sample during testing.
5.3 The Touchscreen Is Unresponsive
Possible causes: Stains on the screen surface, device freeze, or touchscreen malfunction;
Troubleshooting: Clean the screen surface with a microfiber cloth to remove any dirt or water marks, then try again; press and hold the power button for 10 seconds to force a shutdown, then restart the device and test it; if it still does not respond, please return the device for repair.