
 English
 中文简体
中文简体 English
 Русский
 Español
 Português
 Türkçe
 العربية
 Deutsch
 Polski
 Italiano
 Français
 한국어
한국어 ไทย
ไทย Tiếng Việt
 日本語
日本語





























High Temperature Pressure Test Device
User's Manual
Applicable LISUN models: GNGPL-3610、GNGPL-3610-2PA、GNGPL-3610-3PA
1. Basic Understanding of Equipment
1.1 Technical Specifications
| LISUN Model | GNGPL-3610 | GNGPL-3610-2PA |
| Number of workstations | 1 | 2 |
| Blade | 1 round blade (Ф6) | One rectangular blade and one Ф6 circular blade |
| Blade Thickness | 0.7 mm | |
| Weights | 2.5N weight (including the weight of the blade): 1 | 2.5N weights (including the weight of the blade): 2 |
| Applicable Standards | BS 1363-1 Figure 10 | GB/T 2099.1, Clause 30.1 and Figure 41 (IEC 60884-1, Clause 30.1 and Figure 44) |
Note: This device must be used in conjunction with the LISUN GW-225 High Temperature Chamber and is specifically designed for high-temperature pressure testing of insulation sheaths on plugs and prongs for household and similar purposes.
1.2 Application Scenarios
Plug and Socket Manufacturers: Inspection of incoming plastic materials, 100% final inspection of finished products, and comparative testing of new materials; Third-Party Safety Testing Laboratories: CCC certification, CE (IEC) certification, and mandatory testing for UK BS certification; Quality Inspection / Market Regulatory Authorities: Random inspections of plug products in e-commerce and brick-and-mortar markets; Small Appliance Manufacturers: In-house reliability verification of plugs for adapters, rice cookers, electric kettles, and desk lamps.
1.3 Download Electronic Documents
We have already sent the download links for the electronic user manual, calibration certificate, warranty card, and other documents via email at the time of shipment. Please download them as soon as possible. If you have not received the email, please contact us to request the download links again.
2. Safety Precautions
During high-temperature testing, temperatures may reach up to 200°C. When opening the door to remove or place test specimens, wear heat-resistant gloves; do not touch the inner chamber, blades, weights, or fixtures with bare hands to prevent burns.
Weights are heavy metal objects; handle them gently. Do not throw or stack them. The blades are sharp; be careful of the cutting edges when installing or replacing test specimens to avoid cutting your hands. When moving the entire press fixture, lift it steadily to prevent the blades from causing scratches.
3. Equipment Overview
3.1 Standard Diagram
See Figure 3-1 (taken from IEC 60884-1, Figure 44).
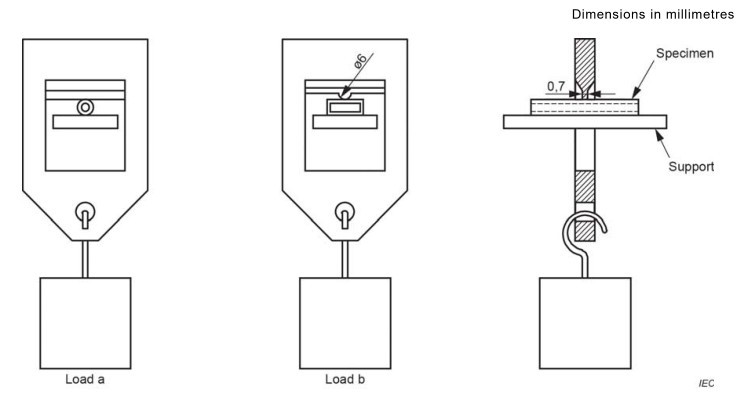
Figure 3-1
3.2 Photographs of the Actual Items
3.2.1 GNGPL-3610
See Figure 3-2.
| Number | Note |
| ① | Round Blade |
| ② | Weights |
| ③ | Adjustable Base |
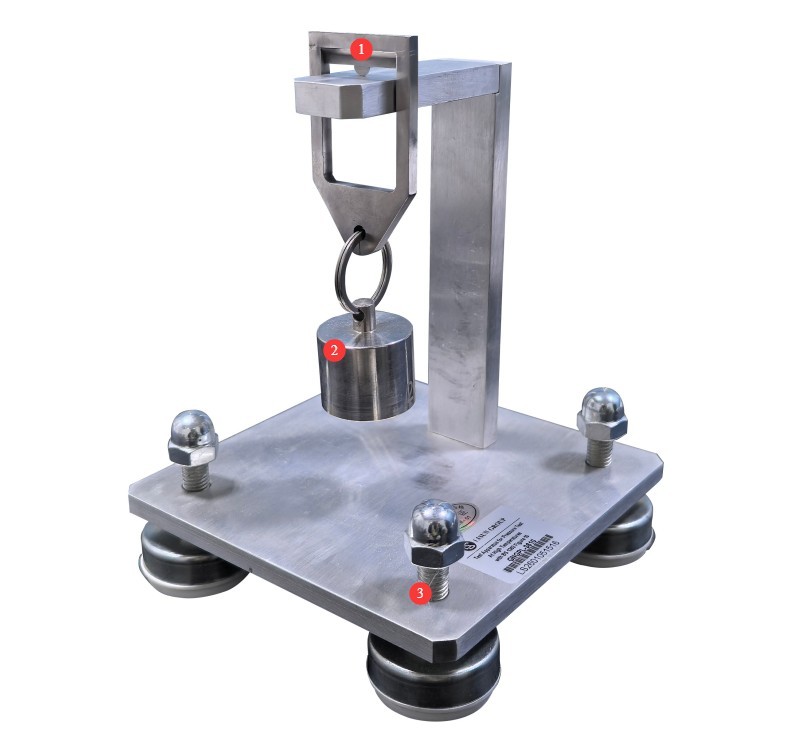
Figure 3-2
3.2.2 GNGPL-3610-2PA
See Figure 3-3.
| Number | Note |
| ① | Rectangular Blade |
| ② | Round Blade |
| ③④ | Weights |
| ⑤ | Adjustable Base |
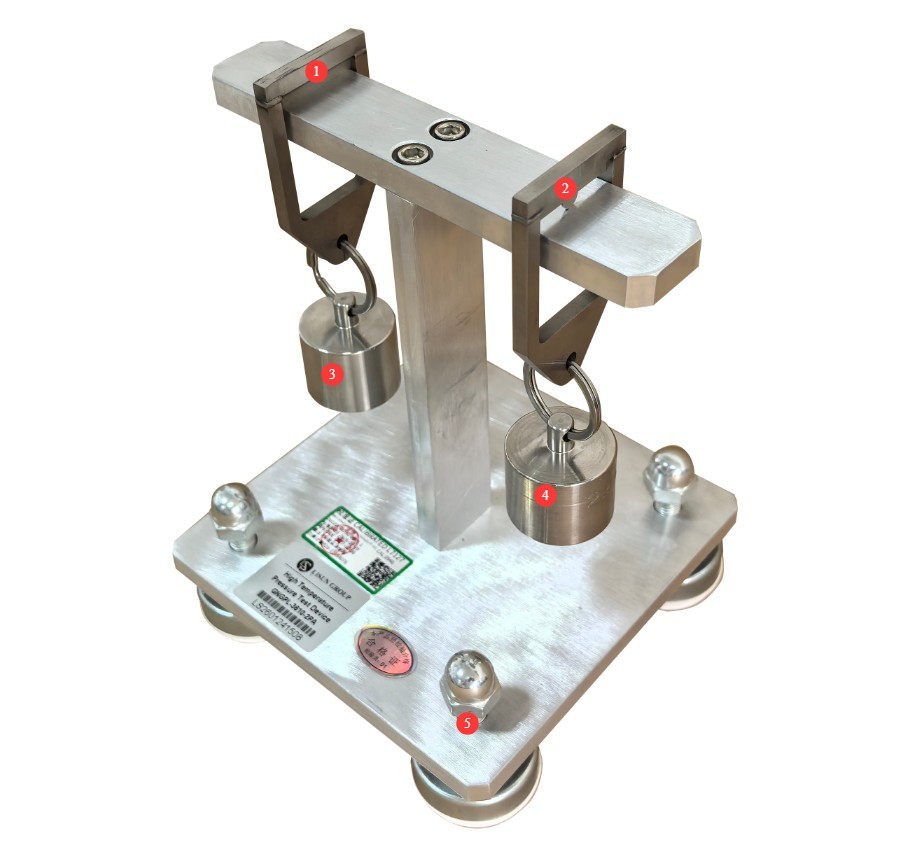
Figure 3-3
4. High-Temperature Pressure Test of the Insulation Sheath
4.1 Preparation of Specimens and Apparatus
Rectangular blades are used for round-pin tests; circular blades are used for other pin tests. Refer to Section 3.1 to position the specimen correctly.
4.2 Test Procedure
Set the high-temperature chamber to 200°C and allow it to stabilize at the target temperature. Place the test setup, along with the test specimen mounted in its normal position, in the high-temperature chamber for 2 hours.
Next, remove the test apparatus and the specimen, detach the specimen from the apparatus, and immerse it in cold water within 10 seconds to cool it.
4.3 Evaluation of Test Results
Measure the thickness of the insulating material at the indentation point; the reduction in thickness compared to the original measurement at the start of the test should not exceed 50 percent.
4.4 Post-Test Procedures
4.4.1 Device Reset
After the test is complete, remove the weights and blades from the test rig bracket. Do not allow the weights and blades to remain suspended on the test rig for extended periods when the test is not in progress.
4.4.2 Sample Preparation
Separate the samples that passed and failed the test, label them clearly, and avoid any confusion.
5. Daily Maintenance and Care of Equipment
5.1 Daily Maintenance After Shutdown
At the end of each day’s testing, clean dust and sample debris from the equipment surfaces, and keep the chucks and slide rails clean and free of debris; check that the blades are not deformed.
5.2 Maintenance During Long-Term Storage
After routine maintenance is complete, apply a neutral rust-preventive oil to the test apparatus, blades, weights, and other components to prevent rust; cover the entire unit with a dust cover and store it in a dry, well-ventilated warehouse.
5.3 Calibration Interval Requirements
To ensure the measurement accuracy and operational reliability of the equipment, it is recommended that it be sent periodically to a qualified third-party metrology laboratory for calibration. The recommended calibration interval is 12 months. Users may determine the specific calibration interval based on frequency of use, environmental conditions, and quality system requirements.
6. Troubleshooting and Resolving Common Problems
| Fault Symptoms | Possible Causes | Procedure |
| The blade is not perpendicular to the sample | The test setup is not level. | Please adjust the base of the test apparatus so that it is level. |