
 English
 中文简体
中文简体 English
 Русский
 Español
 Português
 Türkçe
 العربية
 Deutsch
 Polski
 Italiano
 Français
 한국어
한국어 ไทย
ไทย Tiếng Việt
 日本語
日本語





























Portable Colorimeter
User's Manual
Applicable LISUN models: CD-320PRO
1. Unboxing and Basic Familiarization with the Equipment
1.1 Key Technical Specifications
| Parameters | Note |
| Measurement Structure | D/8, including specular reflection (SCI) |
| Measurement Metrics | CIE-Lab, CIE-LCh, HunterLab, CIE-Luv, etc. |
| Measurement Diameter | 8 mm |
| Wavelength Range | 400–700 nm |
| Battery Capacity | 4.2V/760mAh; a single full charge allows for 10000 consecutive measurements |
1.2 Unboxing and Checking the Contents
1.2.1 Unpacking and Visual Inspection
When unpacking the device, handle it gently to avoid scratching the exterior casing with sharp tools. After unpacking, first inspect the exterior of the device to ensure there is no visible deformation or dents, and that the buttons are not damaged or loose. If you notice any abnormalities with the device or its accessories, please contact us immediately.
1.2.2 Main Unit and Accessories
| Number | Note |
| ① | CD-320PRO, includes a calibration whiteboard stand |
| ② | USB Cable |
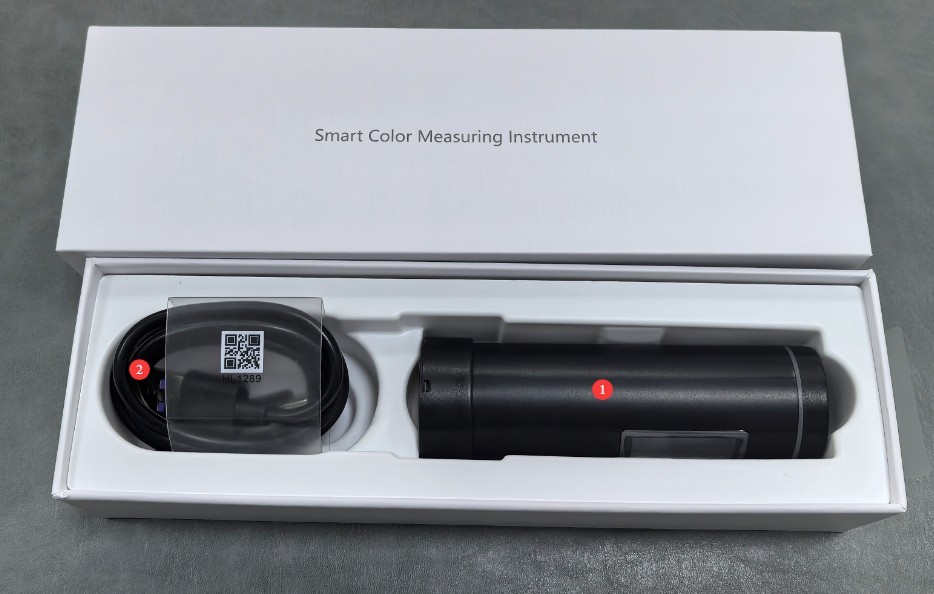
Figure 1
Download links for the digital user manual, software, warranty card, and other materials have been sent via email. Please download them as soon as possible. If you missed the email, you may contact us to request the download links again.
1.3 Description of Equipment Structure
| Number | Note |
| ① Device buttons | Power On (short press while off), Power Off (long press for 5 seconds while on), Color Measurement(Short press while the device is on; press and hold for 2 seconds while the device is on to toggle between color measurement and color difference measurement), Color difference measurement (Short press; press and hold for 2 seconds to toggle between color difference measurement and color measurement) |
| ② Display | Display the measurement results |
| ③ Calibrate the whiteboard stand | Used to calibrate equipment; attaches to the equipment’s test port via a magnetic connection |
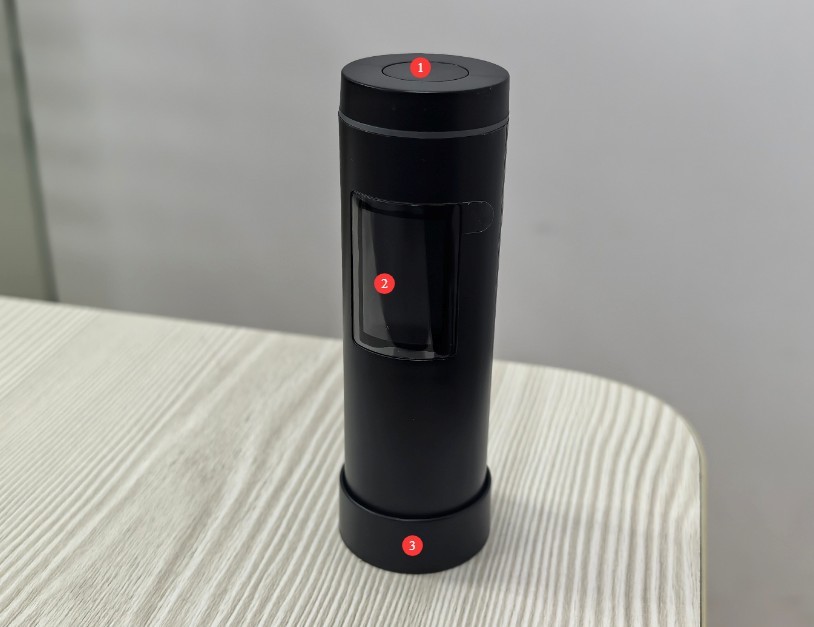
Figure 2
2. Precautions for Use
2.1 Precautions Before Operation
2.1.1 Preparing the Environment
Before taking a measurement, allow the device and the sample to stand in the same environment for at least 30 minutes to ensure they reach the same temperature. The measurement environment must be free from direct strong light and stray light interference. Avoid operating in environments with high temperatures, high humidity, or excessive dust. The ambient temperature should be maintained between 10°C and 35°C, with relative humidity ≤80%(no condensation).
2.1.2 Sample Preparation
The surface of the sample being tested must be flat, clean, free of stains, and free of scratches. For powder or liquid samples, use a dedicated sample dish to ensure the sample completely covers the measurement aperture without any gaps. For irregularly shaped samples, ensure that the measurement probe fits snugly against the measurement area of the sample to prevent light leakage.
2.1.3 Equipment Inspection
Before turning on the device, check the measurement port for dust or dirt and ensure that the buttons and ports are functioning properly. After turning on the device, check that the battery is sufficiently charged (if the battery is low, charge it first to avoid a power outage during measurement).
2.2 Precautions for Use
2.2.1 Measurement Procedures
When taking a measurement, place the device’s sensor in close contact with the sample’s surface, ensuring it is level and free from light leakage. After pressing the button, keep the device still until the measurement is complete (1 second); do not move the device during the measurement process. It is recommended to take 3–5 measurements of the same sample and use the average as the final result to minimize measurement errors.
2.2.2 Functional Operation Specifications
Do not force a shutdown or disconnect the USB cable during the device’s self-test, calibration, or measurement processes. When switching between measurement parameters, wait until the display has finished loading before proceeding to the next step. If you need to export saved measurement data, connect the device before shutting it down to prevent data loss.
2.2.3 Contraindications for Equipment Use
Do not touch the optical components inside the measurement port with your hands, and do not point the measurement end toward a strong light source. Since this is a handheld device, do not drop, bump, or crush it, and avoid exposing the unit to water or other liquids.
2.3 Safety Warnings
Do not attempt to disassemble or replace any internal parts of the device. In the event of a malfunction, please contact official customer service or an authorized dealer for assistance. Unauthorized disassembly will void the warranty;
If liquid, dust, or other substances enter the device, immediately turn off the power, unplug the charging cable, and contact customer service promptly. Do not continue to use the device;
If equipment and accessories (such as the calibration whiteboard stand) are accidentally swallowed by a child, they may pose a choking hazard or other risks; therefore, the equipment must be kept out of the reach of children;
Do not place the device near heat sources, open flames, or in high-temperature environments to prevent the battery from swelling and damage to the device’s components.
3. Equipment Operation
3.1 Color Measurement Procedure
| Number | Note |
| ① | Remove the calibration whiteboard base |
| ② | Place the test well directly against the surface of the sample, ensuring that the sample completely fills the test well. |
| ③ | Press the device button briefly |
| ④ | The screen displays the sample measurement results |
| ⑤ | Measure Serial Number |
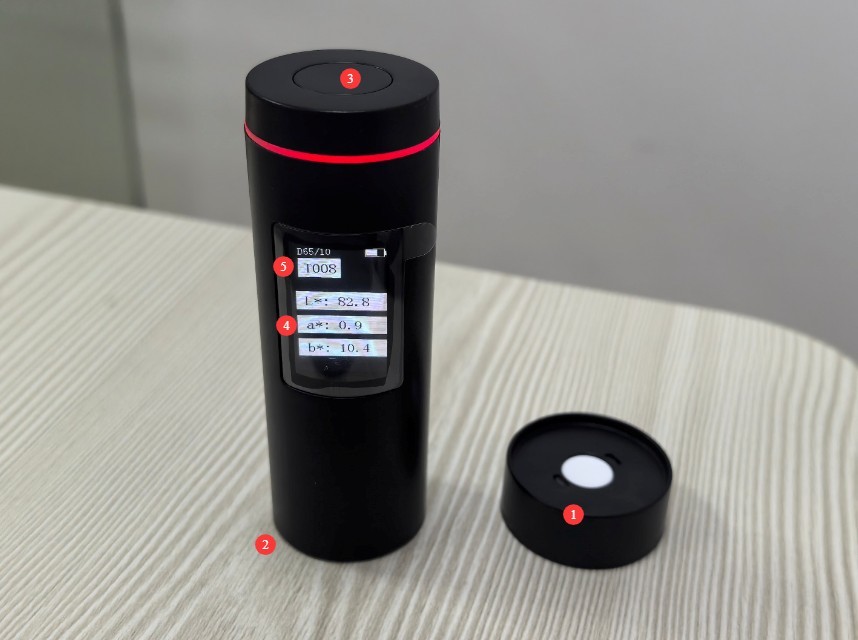
Figure 3
3.2 Color Difference Measurement Procedure
3.2.1 Measure the reference samples first
The procedure for measuring the reference standard is the same as that for color measurement.
| Number | Note |
| ① | Place the test well directly against the surface of the standard sample, ensuring that the standard sample completely fills the test well. |
| ② | Press the device button briefly |
| ③ | The screen displays the measurement results for the reference standard. |
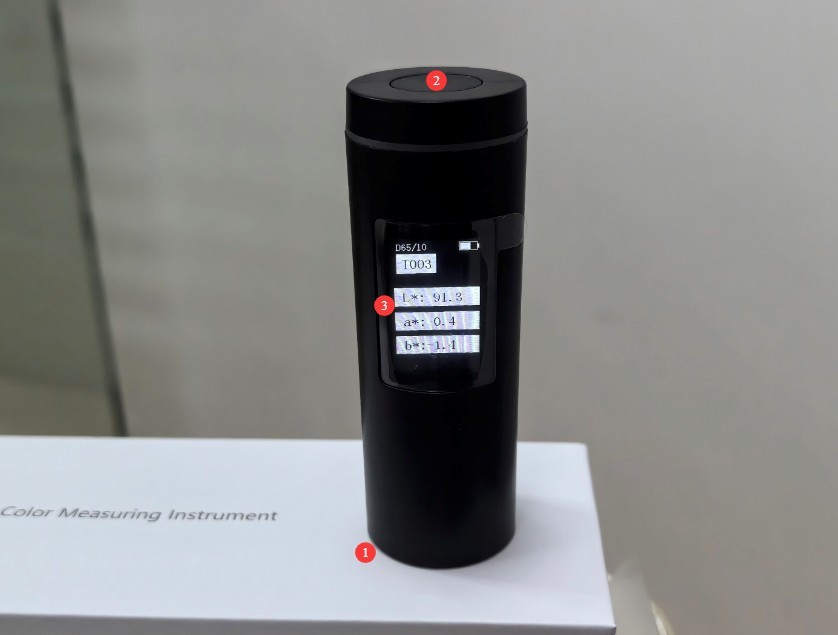
Figure 4
3.2.2 Re-measurement of Color Difference
| Number | Note |
| ① | Press and hold the device button for 2 seconds |
| ② | The screen displays the chromatic aberration measurement interface |
| ③ | Place the test well directly against the sample, ensuring the sample completely fills the well. |
| ④ | Press the device button briefly |
| ⑤ | The screen displays the color difference measurement results between the sample and the reference standard, along with a “PASS” or “FAIL” indication. |
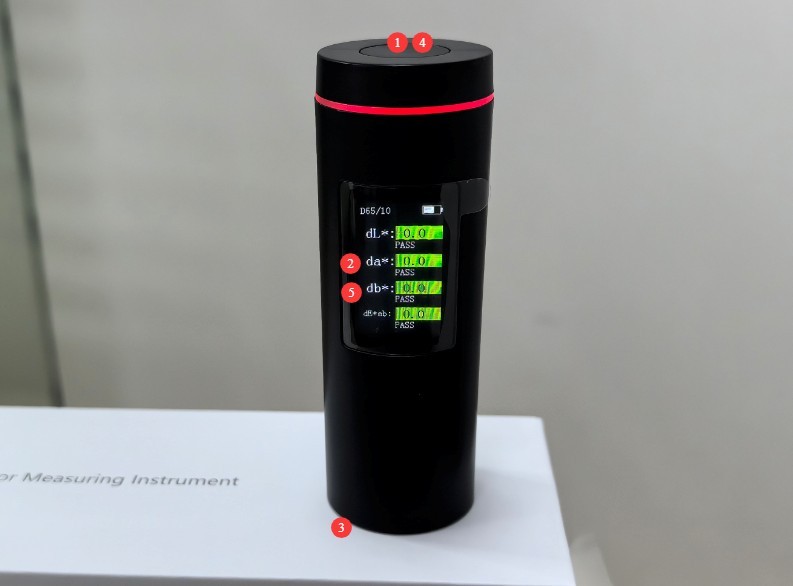
Figure 5
4. App Operation
4.1 Online
Turn on the CD-320PRO. Follow the instructions below to install the app on your phone.
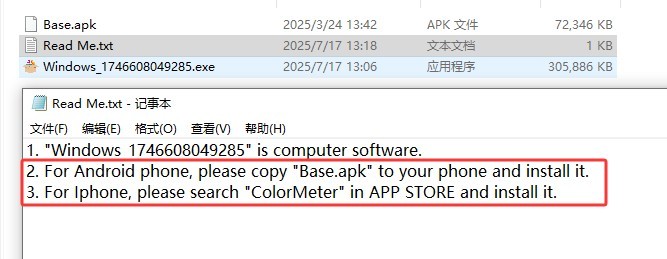
Figure 6
Open the app and tap “Connect.”
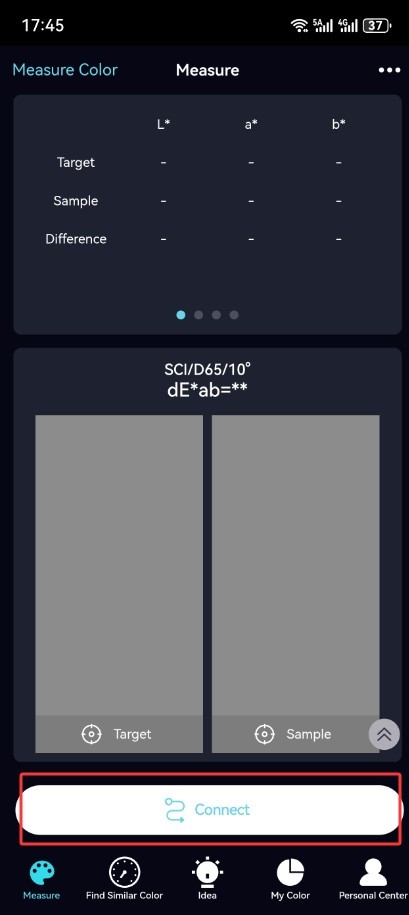
Figure 7
4.2 Calibration
If the app prompts you to calibrate, follow the instructions to perform white and black calibration.
When the calibration whiteboard base is attached to the test hole, click to perform white calibration.
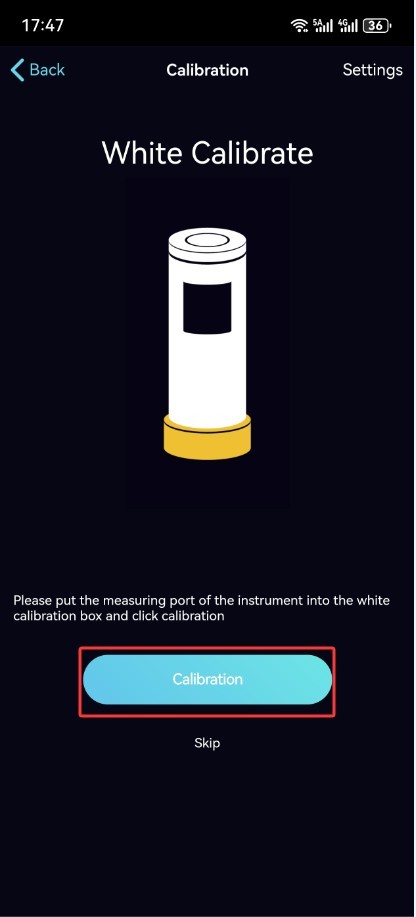
Figure 8
Remove the calibration whiteboard stand, align the test holes with the floor, ensuring they are at least 1 meter above the ground, and click to perform the black calibration.
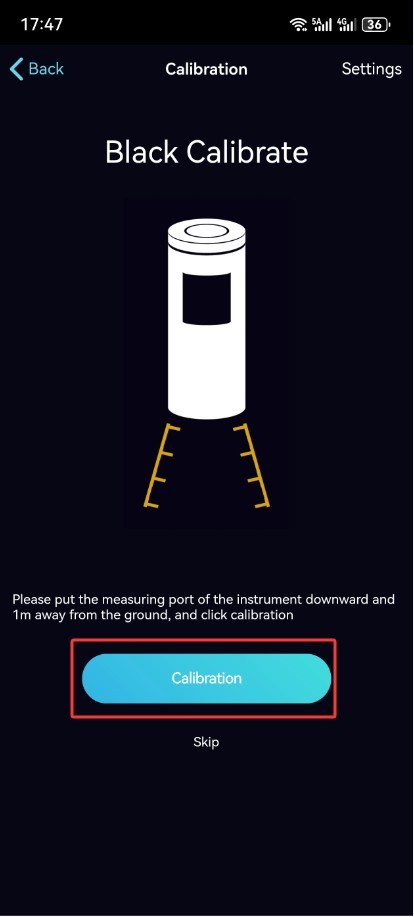
Figure 9
4.3 Measurement Procedure
4.3.1 Color Measurement and Color Difference Measurement
| Number | Note |
| ① | Click on the left to measure a color or measure a standard sample. |
| ② | Click on the right to measure the color difference of the sample |
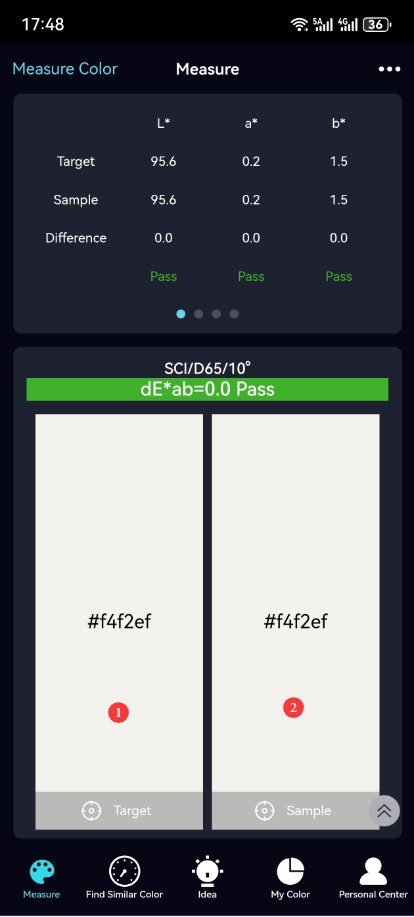
Figure 10
4.3.2 Saving and Loading Reference Color Swatches
To save this reference color chart to the app, edit its name, select a save location, and save it.
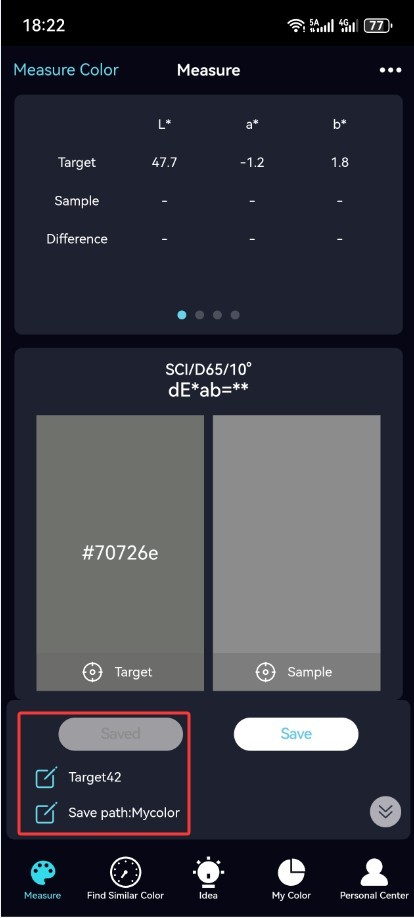
Figure 11
You can then directly access the saved color charts or use the app’s built-in reference color charts as standards. In this case, there is no need to measure the reference standards again; you can proceed directly to measuring the color difference of the sample.
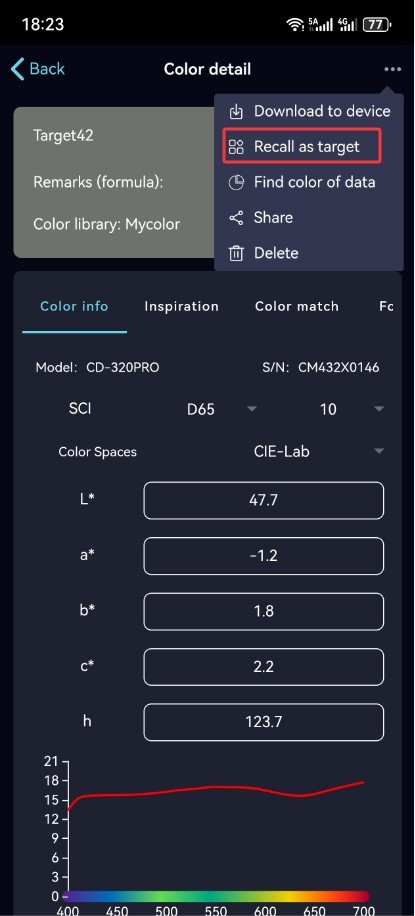
Figure 12
4.4 Parameter Settings
4.4.1 Measurement Parameter Settings
| Number | Note |
| ① | Click to select the parameter you want to measure |
| ② | If you only need to display this parameter on the app interface and do not need to sync it to the device, you do not need to click “Sync”; if you need this parameter to be displayed on the device as well, please click “Sync to Device.” |
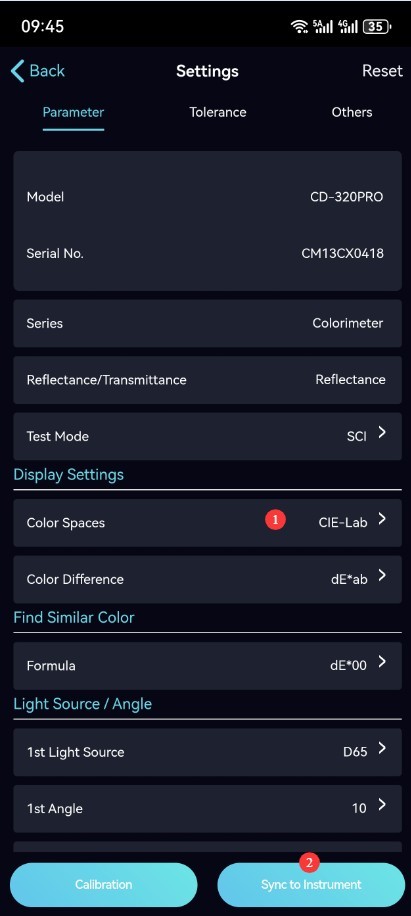
Figure 13
4.4.2 Permissible Error Settings
| Number | Note |
| ① | Set the required tolerance and display content. |
| ② | If you only want to display this setting on the app interface and do not need to sync it to the device, you do not need to tap “Sync”; if you want to sync this setting to the device, please tap “Sync to Device.” |
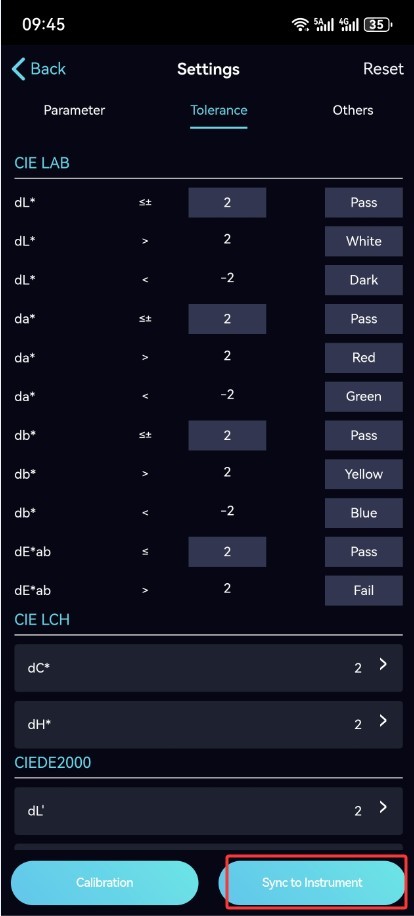
Figure 14
5. Software Operation
5.1 Connection and Calibration
Connect the CD-320PRO to your computer using the dedicated USB cable, and turn on the CD-320PRO. Install the following software on your computer.
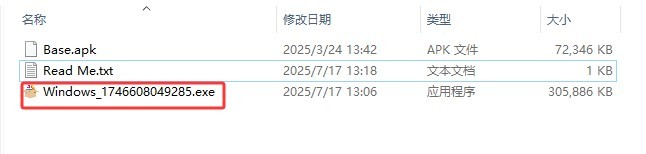
Figure 15
| Number | Note |
| ① | This is paid color management software; you don’t have to use it. |
| ② | Double-click to open this software. Once it opens, it will automatically connect to the internet. |
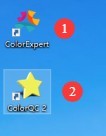
Figure 16
If the software prompts you to perform calibration, follow the on-screen instructions to perform white and black calibration. For calibration procedures and steps, refer to Section 4.2.
5.2 Software Operation
| Number | Note |
| ① | Click to measure color (reference sample measurement) |
| ② | Click to measure the color difference of the sample |
| ③ | List of Measurement Results for All Reference Standards |
| ④ | Color difference measurement results for all samples compared to the reference standard |
| ⑤ | You can print and save measurement results; you can create a new measurement interface or open a previously saved measurement report. |
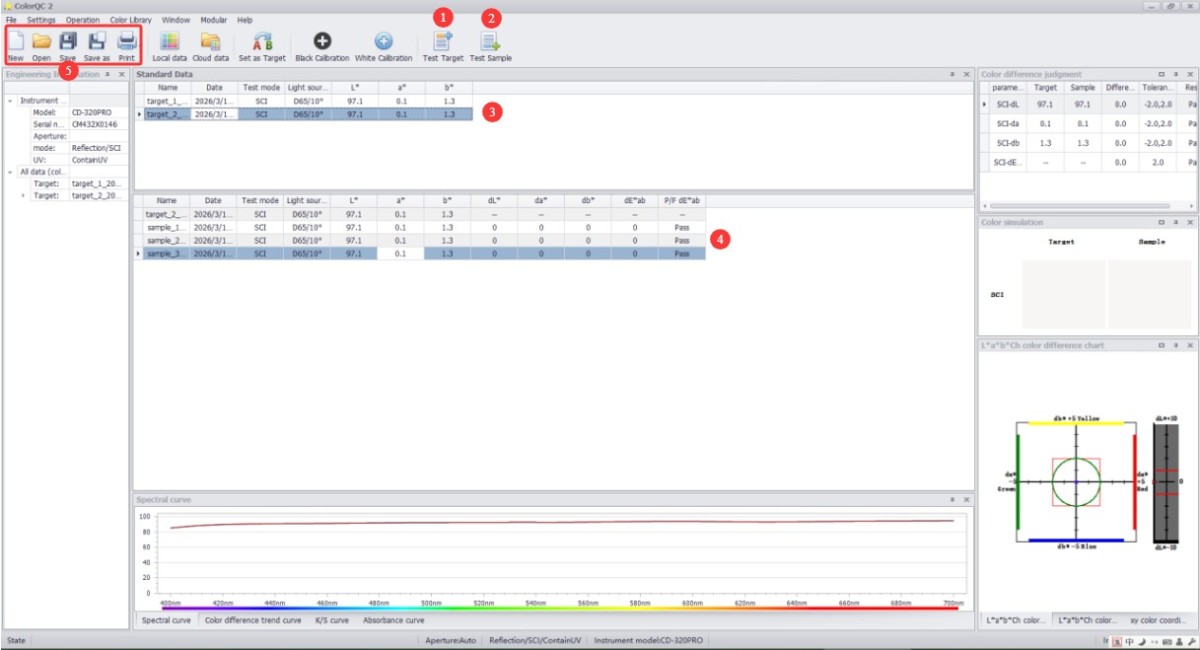
Figure 17
6. Daily Maintenance and Care of Equipment
6.1 Cleaning and Maintenance
6.1.1 Cleaning the Body and Display
Body Surface: Wipe dust and stains from the body with a clean, soft cloth. For stubborn stains, you may dip the cloth in a small amount of water and wipe gently. Do not use detergents or other corrosive liquids;
Display: Gently wipe the screen with a dedicated screen-cleaning cloth to avoid scratching it. Do not touch the display directly with your fingers. If dust gets on the screen, gently brush it away with a lint-free brush.
6.1.2 Cleaning the Calibration Plate
The calibration plate is a standard accessory; surface wear and stains will affect calibration accuracy: Gently wipe the surface of the calibration plate with a lint-free cloth. If there are stubborn stains on the surface of the calibration plate, contact customer service promptly to have it replaced. Do not attempt to sand or repair the calibration plate yourself.
6.2 Battery Maintenance
6.2.1 Charging and Maintenance
Use the device’s standard USB cable; do not use non-standard fast-charging cables or high-wattage chargers to avoid damaging the battery. Avoid charging the device in high-temperature environments, and unplug the charging cable immediately after charging is complete to prevent overcharging. Charge the device promptly when the battery level falls below 15% to avoid deep discharge of the lithium battery, which can shorten its service life.
6.2.2 Battery Life Maintenance
The device’s built-in lithium battery is rechargeable; under normal use, a single charge allows for 10000 consecutive measurements;
When the device is not in use for an extended period, ensure that the battery charge remains between 50% and 80%. Recharge the battery once every three months to restore the charge to between 50% and 80%, to prevent the battery from becoming deeply discharged or swelling;
If the battery shows signs of swelling, leakage, or a significant decrease in battery life, stop using it immediately and contact us for repair.
Troubleshooting and Resolving Common Issues
| Fault Symptoms | Possible Causes | Procedure |
| Unable to Power On | Low battery | Please use the dedicated USB cable to charge the device; if it still won’t turn on after charging, please contact us for repair. |
| Battery life has gotten worse | Battery degradation, excessive ambient temperature | Contact us for service; use in high-temperature environments causes the battery to drain quickly, so please use the device in a normal environment. |
| Significant Errors in Measurement Data | The sample is uneven / the sample does not fully cover the test well, the calibration white plate is contaminated, the reference standard measurement is incorrect, or the test well is contaminated | Replace the sample for measurement; clean or replace the calibration white plate; remeasure the reference sample; clean the inside of the test port with a lint-free brush; if the test port shows signs of physical damage, please contact us for repairs. |